6 min read
How To Install WordPress Plugin

The WordPress marketplace is full of many WordPress plugins. Even third-party websites offer many useful plugins and add-ons to extend your WordPress site. But, all these plugins can’t help you if you’re not able to install them properly on your site. So, how to install a WordPress plugin?
After WordPress installation, this is the very first thing that every WordPress user must learn. When you know how to install them properly, you can integrate many useful and required features within your website quickly. Even a non-coder can manage his website like a professional. In this step-by-step guide, we will help you learn the process of installing WordPress plugins. Let’s get started.
Also Read: A Guide For Beginners To Build a Website From Scratch
Point To Be Considered
Check out this guide in order to install a WordPress plugin on your website.
Important points to be considered before plugin installation
Before you move on, take out 2 minutes to consider these points:
- In order to install WordPress plugins and use their features on your website, it is required to have a premium WordPress plan. You can’t install and use WordPress plugins on wordpress.com websites with a free plan.
- If you have a self-hosted WordPress.org website, you can install any plugin to extend your site.

How to Install WordPress Plugin
Here, we are going to discuss three ways to install plugins on your WordPress website.
- Through WordPress Plugin Search
- Through WordPress Admin Plugin Upload
- Through WordPress Plugin using FTP
Let’s take a look at one-by-one:
Method 1: Through WordPress Plugin Search
This is the easiest way to install WordPress plugins. To use this option, it is mandatory that the required WordPress plugin is available in the WordPress plugin directory. That’s why only free WordPress plugins can be installed using this method. Follow the steps below to install plugins on the WordPress site:
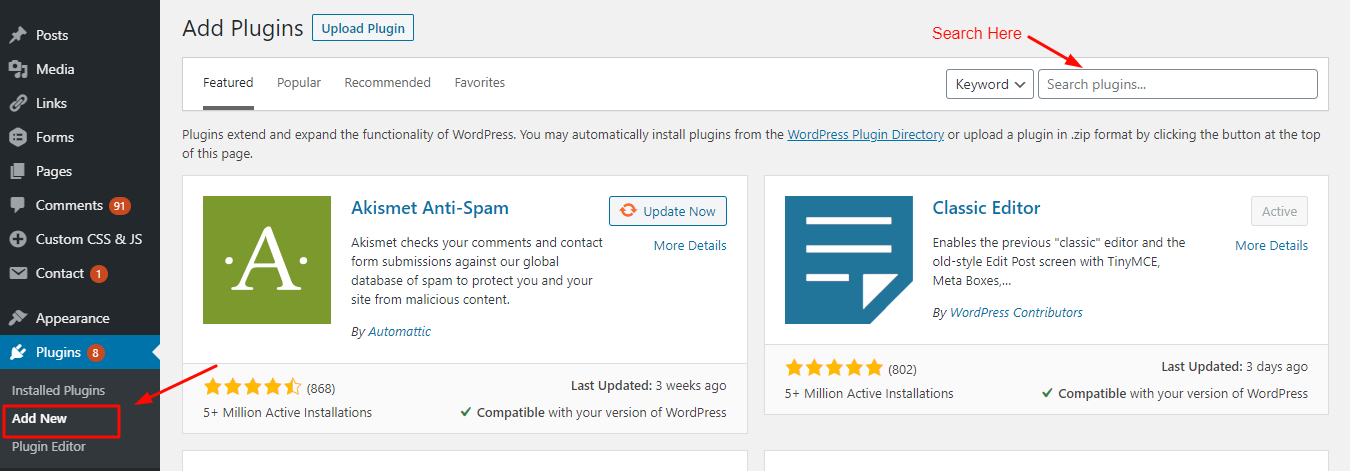
1. Login to your WordPress website→ Navigate to Plugins tab→ Add New
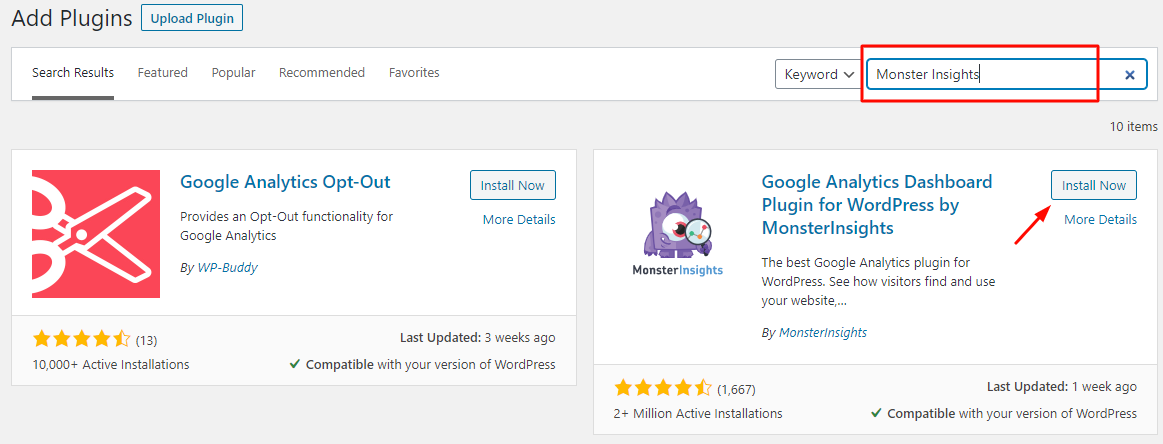
2. Type the plugin name in the search bar that you want to install.
3. Now, pick the required plugin and click the ‘Install Now’ button next to it. For example, we’re here installing Monster Insights Plugin.
4. Next, you need to click on the “Activate” button in order to start using that plugin.
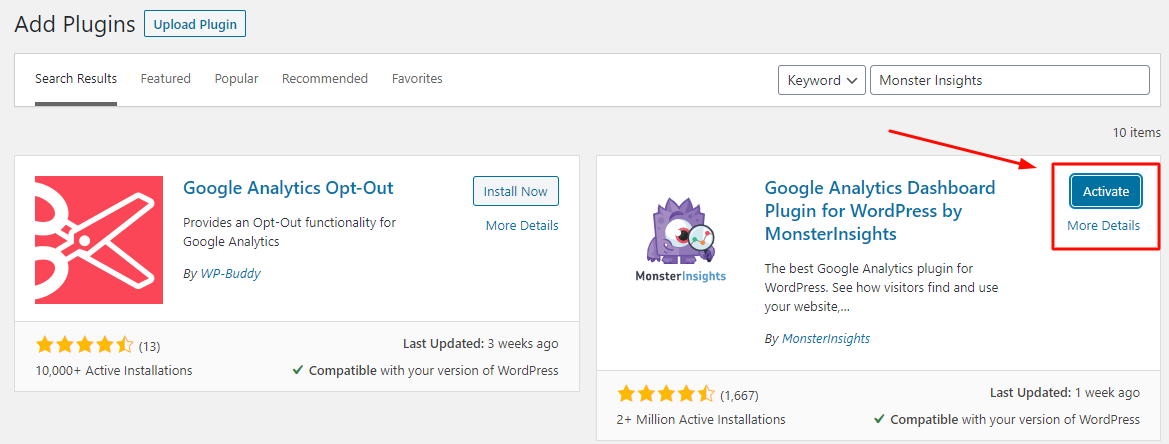
Your WordPress plugin has been successfully installed. Now, you need to configure the settings offered by the plugin as per your website requirements.
Method 2: Through WordPress Admin Plugin Upload
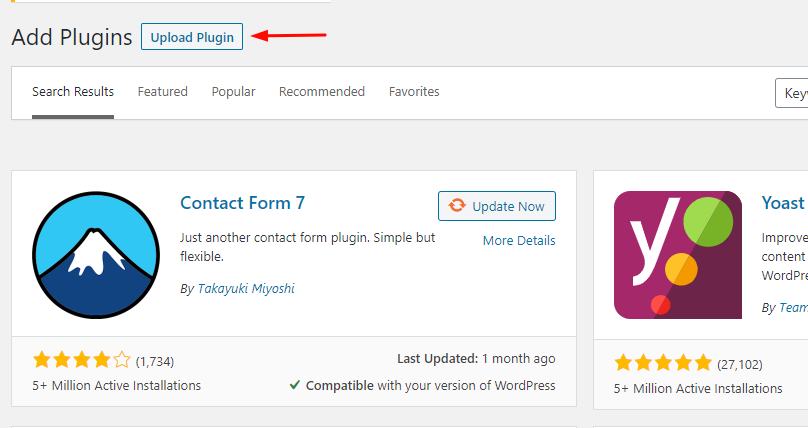
If you want to install a paid plugin, this method is useful. WordPress itself offers the upload plugin functionality in the admin area so that you can install any plugin by yourself.
Just follow the steps mentioned below:
1. Download the plugin from the source. It will be in a zip file format.
2. Log in to your WordPress admin area and navigate to Plugins→ Add New
3. Click on “Upload Plugin”.
4. Next, click on the ‘Choose File’ button and select the plugin file that you downloaded earlier. And, then click on “Install Now”.
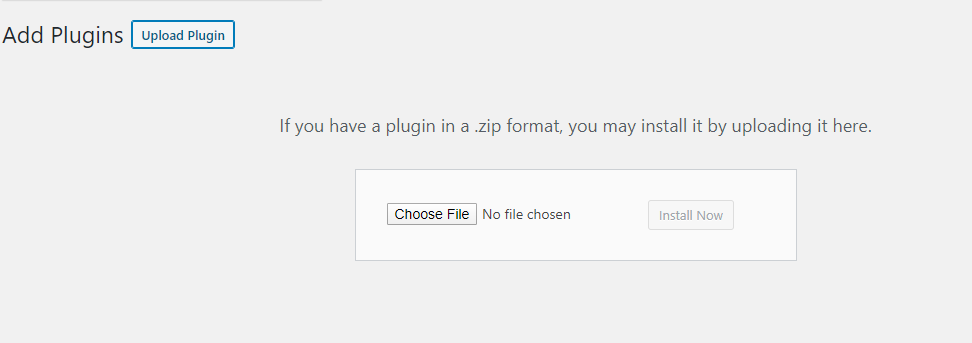
5. After plugin installation, you need to click on the “Activate Plugin” button in order to use it within your WordPress site.

Your WordPress plugin has been successfully installed. Now, you need to configure the settings offered by the plugin as per your website requirements.
Also Read, Leading OptinMonster Alternatives
Method 3: Through WordPress Plugin using FTP
Sometimes, you may find issues installing a plugin from the WordPress admin area. It might be due to the file restrictions of your WordPress hosting provider. In such a case, you can use this third method, i.e., plugin installation using FTP.
- Download the plugin’s source file. The plugin file will be in a zip file format.
- Extract the zip file on your computer.
- While extracting the zip file on your computer, it will create a new folder with the same name. You will require to upload this new folder manually to your website using an FTP client.
- Access your host through the FTP manager. Maybe you don’t have such access. In such a case, you have to contact your WordPress hosting provider and ask for their username and password.
- Now, open the FTP client on your computer and connect to your website using the login credentials.
- Go to the /wp-content/plugins/ folder on your website.
- Next, you have to upload the extracted folder to the/wp-content/plugins/ folder on your web server.
- Visit the WordPress admin area and navigate to the Plugins tab. There, you’ll find your required plugin installed successfully.
Your WordPress plugin has been successfully installed. Now, you need to configure the settings offered by the plugin as per your website requirements.
Also Read: Best WordPress Membership Plugins
How do I find the best WordPress plugins?
In the free WordPress plugin directory offered by WordPress.org, you’ll find more than 55,000 WordPress plugins for all types. The repository includes SEO plugins, analytics plugins, contact form plugins, social network plugins, LMS plugins, and many more.
Apart from these free WordPress plugins, premium plugins are also available in the market. So, it might be quite confusing to select the best one for your website.
Here, we have compiled a list of all essential WordPress plugins that you can pick out as per your specific requirements
- WordPress Header Plugins
- WordPress Sidebar Plugins
- WordPress Post Plugins
- WordPress Calander Plugins
- WordPress Countdown Plugins
- WordPress Helpdesk Plugins
- WordPress Newsletter Plugins
And, the list goes on….
You can find the complete list of essential WordPress plugins here.
Now, a question may strike your mind “How many plugins I can install in WordPress?”
Actually, there is no such hard and fast rule on the number of plugins you can install on your site. But make sure whatever plugin you’re installing on your site, its quality must be of top class. Otherwise, it will affect your website speed and performance.
Also Read: How to Add Custom Fonts to WordPress?
Installed Plugins Vs. Active Plugins: The Difference You Need To Know About
Plugin Installation: WordPress plugin installation refers to the process of inserting the plugin within your WordPress website. You can see the list of installed plugins in the Plugins tab in the WordPress admin area.
Activating Plugin: Activating plugins allows you to use the installed plugins within your website. You can see the list of active plugins in the Plugins tab in the WordPress admin area. All these plugins will be highlighted with a blue background.
Without activating the installed plugin, you will not be able to use them on your site.
Also Read: Best Hotel WordPress Themes
How To Uninstall WordPress Plugins
The plugin which is no longer in use on your site must be uninstalled. Here are the simple steps that you can follow to uninstall the WordPress plugins:
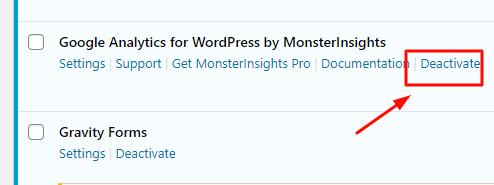
1. log in to your WordPress admin area and click on the Plugins tab.
2. Next, find out the plugin from the list which you want to uninstall.
3. If the plugin is active, you have to first deactivate it.
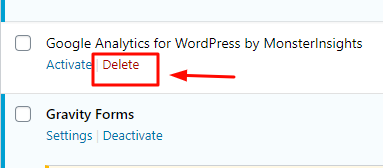
4. After that, click on the “Delete” option in order to uninstall the plugin.
Also Read: Best Web Fonts Manager WordPress Plugins

Final Words
We hope this tutorial on how to install WordPress plugins helps you a lot. If you have other questions that you would like to ask, we encourage you to use the comment section below. If you liked this article, subscribe to our YouTube Channel. You can also find us on Twitter and Facebook. Stay tuned & connected!
Interesting Read:
10 Essential BuddyPress plugins For a Community Website
The Best Premium WordPress BuddyPress Themes
Useful Hacks And Customizations For Your BuddyPress Powered Website Via Reign Theme
Related reading