10 min read
Getting Started with WooCommerce Product Vendors

WooCommerce Product Vendors plugin converts your online store into a multivendor marketplace. You can authorize existing products to Vendors or they can add and edit their own page.
Every Vendor has a devoted page where they can list their products, which can be shown on ordinary shop pages. You have all power over the amount of commission paid to every vendor, with the choice of manually adding new commissions or adjusting existing ones.
Product Vendors

With WooCommerce product vendor you can turn your online store into a multivendor marketplace site. Do you already have a site and a community and might want to discover ways to enhance your income? Or do you want to begin an eCommerce business without making an investment in your own product offering? With Product Vendors by WooCommerce, you can quickly change over a WooCommerce powered single store into an online marketplace store with various vendors, products, and payment settings.
Allow different vendors to sell their products on your site and consequently take a commission on every deal to take care of the expenses of dealing with the site while you make your efforts on building an online community.
Why use Product Vendors?
- Make a marketplace that can sell anything: From physical, hand-made products to cutting edge downloads like themes, fonts, photos, audio or video, and even time-sensitive meetings with WooCommerce Bookings even more you can make a booking tickets system.
- Set vendor explicit commission rates: Boost new vendors to join your online multi-vendor marketplace or reward with vendor express commission rates - while at this point set an alternate base commission rate across your marketplace.
- Shorten your administrator: Permit vendors to deal with their own products.
- Try not to pay commissions on orders that are not finished: Set commissions to just being appointed to vendors once the request is finished.
- Stay on top of your online marketplace with deals reports: Get a general perspective on vendor deals, commissions, and income each month by the vendor.
- Defer commission payments to represent returns. Use PayPal Payouts to defer commission payment if there should arise an occurrence of profits on actual products.
- It also provides a services page like Woo Sell Services.
Product Vendors Requirements
- WooCommerce.
- WordPress 4.9+.
- PHP version 5.6+.
- PayPal account
How to Install Product Vendor plugin
- Download the zip file from your WooCommerce account.
- Go to: WordPress Admin > Plugins > Add New> Upload the file you downloaded.
- Activate the extension.
Two types of custom tables are created in your WooCommerce database: wcpv_commissions and wcpv_per_product_shipping_rules.
Shipping, Payment, and Email Notifications are built into Product Vendors.
Setup and Configuration of the plugin
The basic Terminology of Product Vendors roles and people:
- Storekeeper - WordPress and WooCommerce Admin. Proprietor of the site or store on which vendors register.
- Vendor Admin - Has admittance to all settings.
- Vendor Manager - Has restricted admittance to the Vendor dashboard.
- Pending Vendor - A customer that has selected to convert into a Vendor, in any case, has not yet been approved or assigned out a Vendor Admin or Vendor Manager work.
- Vendor - An “account” added to the product that Vendor Admin and Vendor Managers approach.
- Consider WooCommerce.com - that is the Vendor and our group is Vendor Managers who can refreshes products, and Vendor Admin is like group leads.
- Shop Manager is a WooCommerce job that can oversee vendors - this is the job given to Store Owners.
How to Setup Product Vendor
- Sign up for a PayPal account or have your current accreditations prepared. More data and guidelines at PayPal Setup.
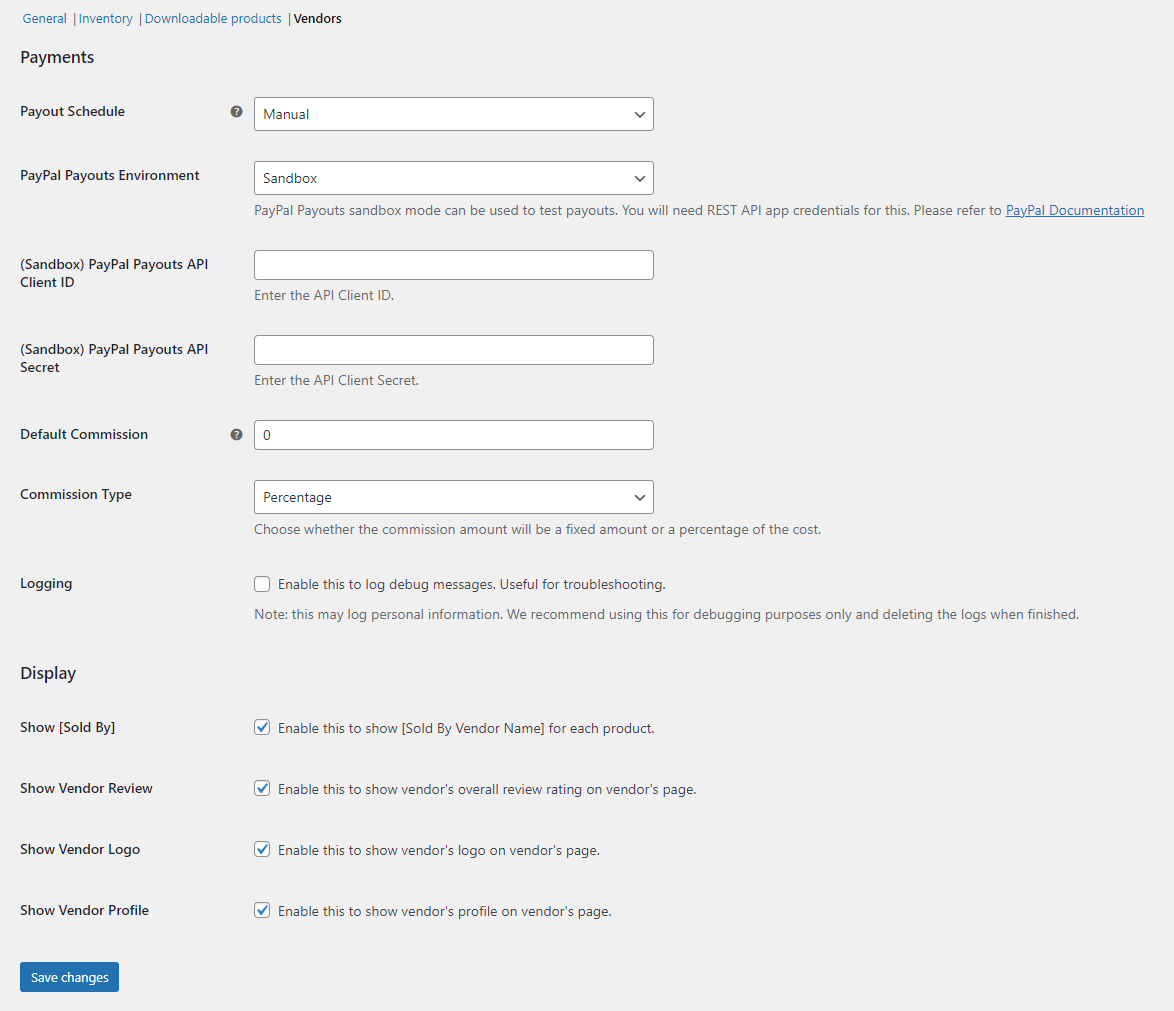
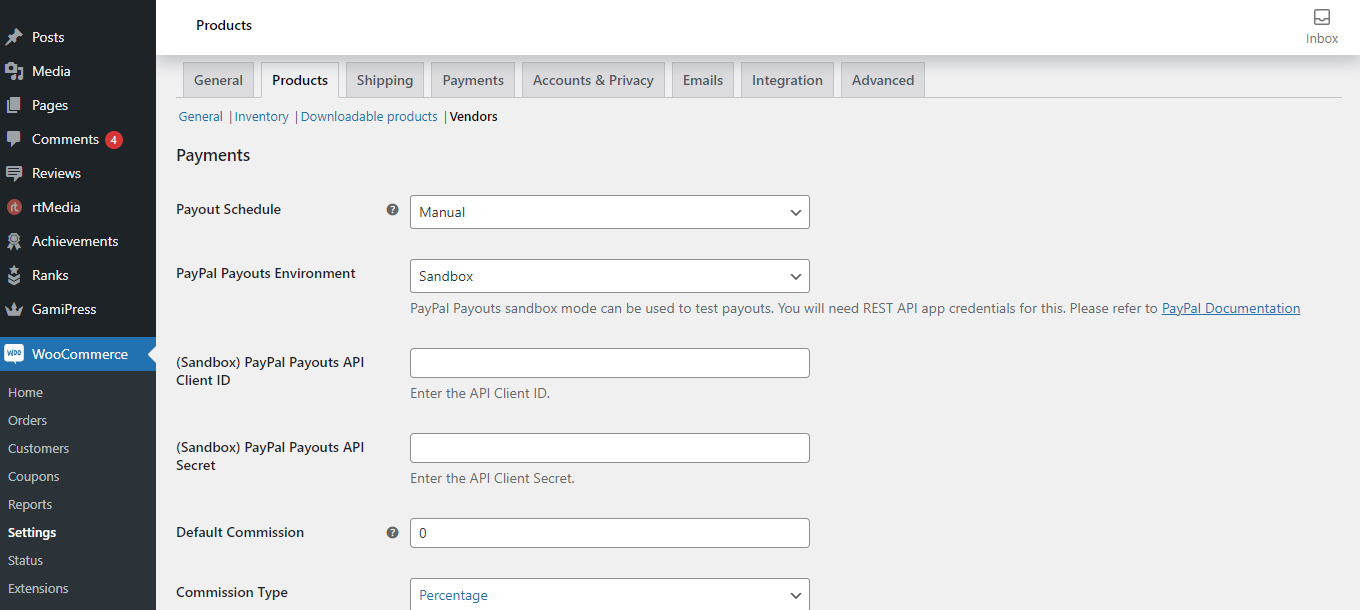
- Go to: WooCommerce account > Settings > Products > Vendors.
- Payout Schedule: Frequency of paying commissions.
- Manual: If this is set, any neglected commission won’t be automatically paid. This doesn’t influence instant pay for every vendor portrayed further down this document.
- Week by week, Bi-Weekly, Monthly: Once you pick a recurrence, it triggers a quick payout of neglected commissions and the period begins from when you set/save the setting. Presently this uses PayPal Payouts so be certain you have your PayPal Client ID and Client Secret added to your settings and that you have sufficient assets. The sellers additionally would have to have their PayPal account email arrangement in their settings for them to get a commission.
- PayPal Payouts Payments Environment:
- Sandbox - PayPal Payouts Sandbox mode can be utilized to test payouts. You need API credentials to add. More information at PayPal Developer - Manage Your Applications or go to PayPal Setup to see bit by bit guidelines.
- Go Live.
- PayPal Payouts Payments API Client ID: Sandbox or Live, contingent upon which you chose in the past step.
- PayPal Payouts Payments API Client Secret: Sandbox or Live, contingent upon which you chose in the above step.
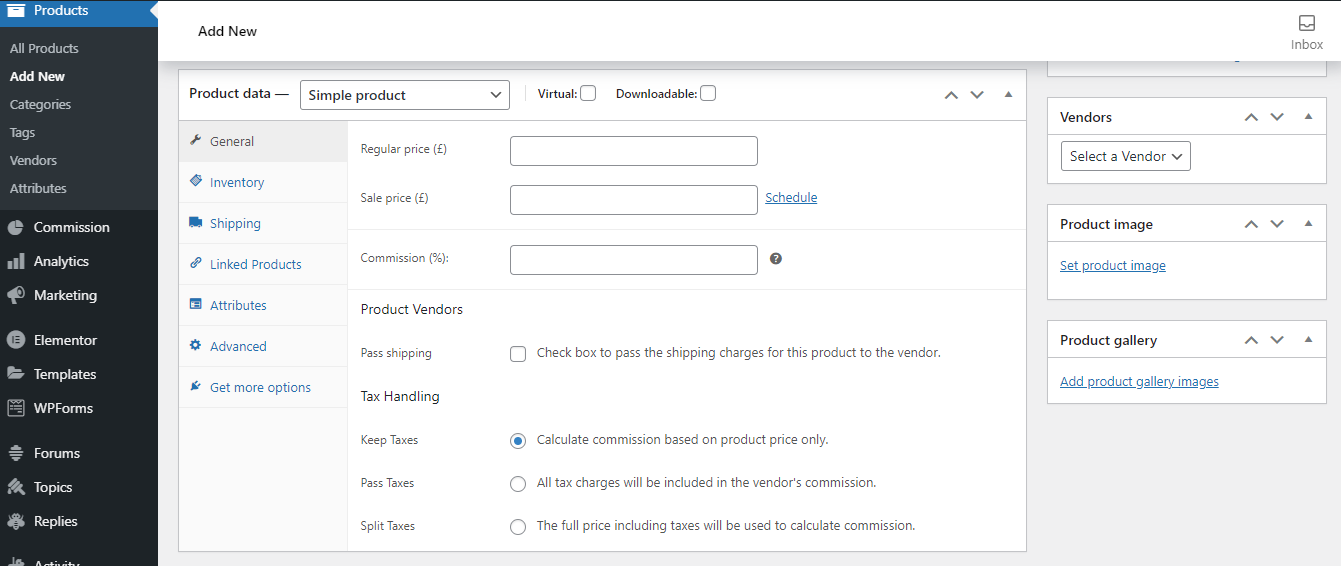
- Default Commission: Amount or rate of commission paid to the vendor, if a Product or vendor level commission isn’t mentioned.
- Commission Type: Set if the Default Commission is a Fixed Amount or Percentage of commission of product cost.
- Show Sold By: Enable to display Sold By Vendor Name for every product.
- Show Vendor Review: Enable to display complete review rating on vendor’s page.
- Show Vendor Logo: Enable to display the logo on the vendor’s page.
- Show Vendor Profile: Enable to show vendor profile on vendor’s page.
- Save changes.
Important Points for Vendor Creation/Registration
There are two different ways that a vendor can be created:
- Registration form.
- Manual addition by the store owner.
Vendor’s Registration Form
Signed-in Admins won’t see the form. You should be a logged-out Admin or a signed-in role that isn’t Admin.
To allow vendors to register and sell their products on your site:
- Create a new page in WordPress at Pages > Add New.
- Enter the shortcode [wcpv_registration] on the page and,
- Publish.
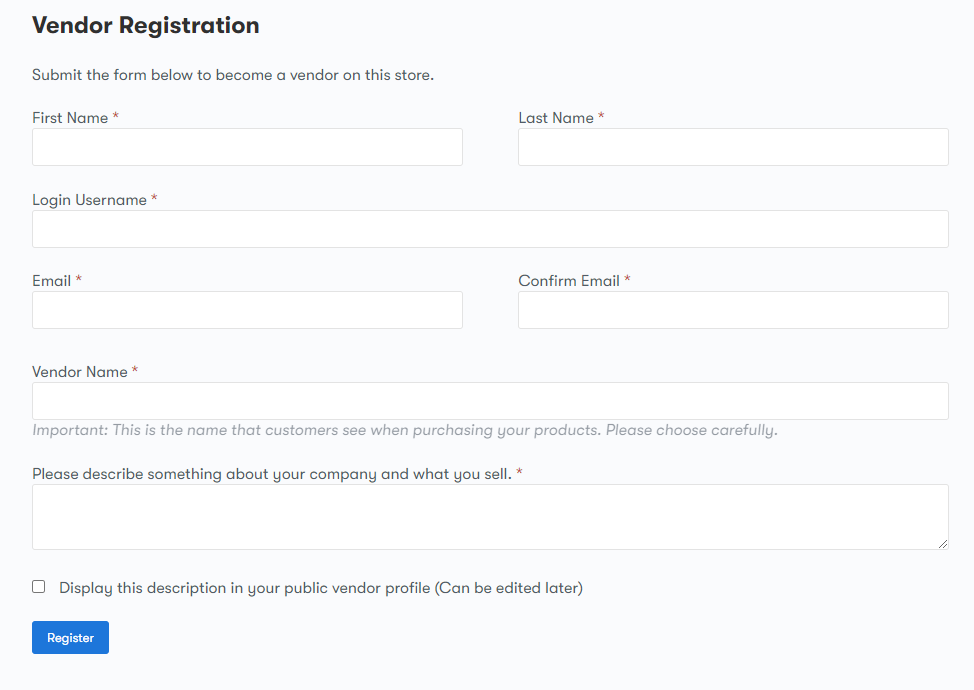
Vendor Name should be unique and decides the vendor name for the store, e.g., If they enter “Jon,” this is the name utilized all through the store.
When the seller has presented the structure, the storekeeper gets an email notification that a vendor has applied and a client account is made for this vendor. As a Shop Owner, you can simply “Approve” the Vendor by changing the User Role to Vendor Admin Role or Vendor Manager Role and adding them to a Vendor under the Vendor Admins region.
Vendor’s Manual Addition
Store owners can manually add and create a vendor.
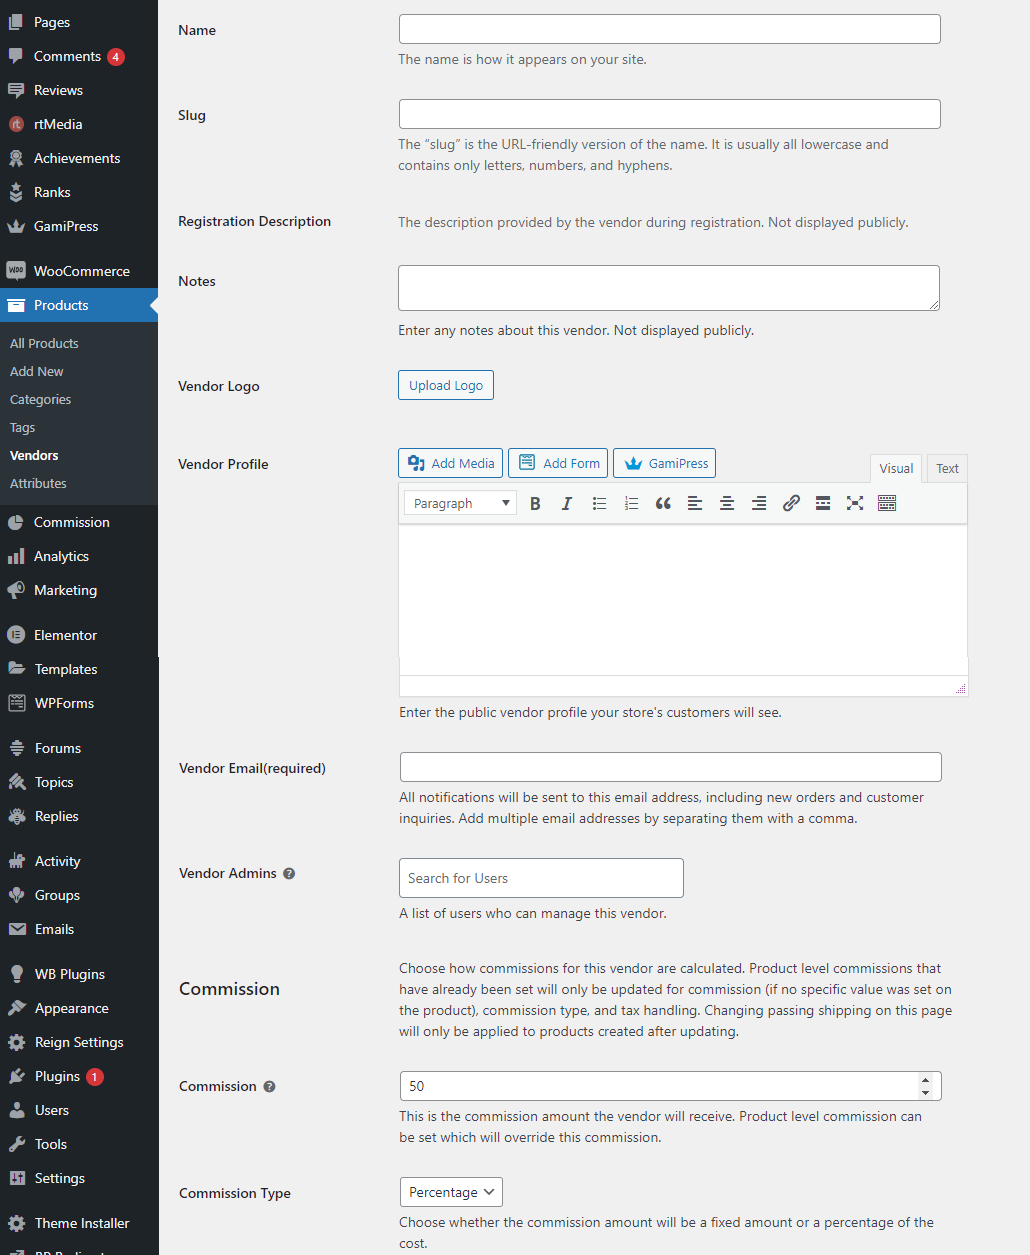
- Go to: Products > Vendors.
- Complete fields.
- Allocate a Vendor Admin or Vendor Manager to the Vendor User, permitting a current client to deal with this vendor. Utilizing the past model, the vendor “Jon,” go to Products > Vendors, click on a vendor to edit, discover the Vendor Admins field (above) and look for the username/email to add as an administrator.
- Provide the Vendor User access as a Vendor Admin User Profile. Go to the Vendor Users section, discover the Vendor User, and snap to edit, change the role to Vendor Admin Role or Vendor Manager Role.
- Scroll down to Vendor Management System. Here you can allow the user to:
- Publish Products
- Manage customers

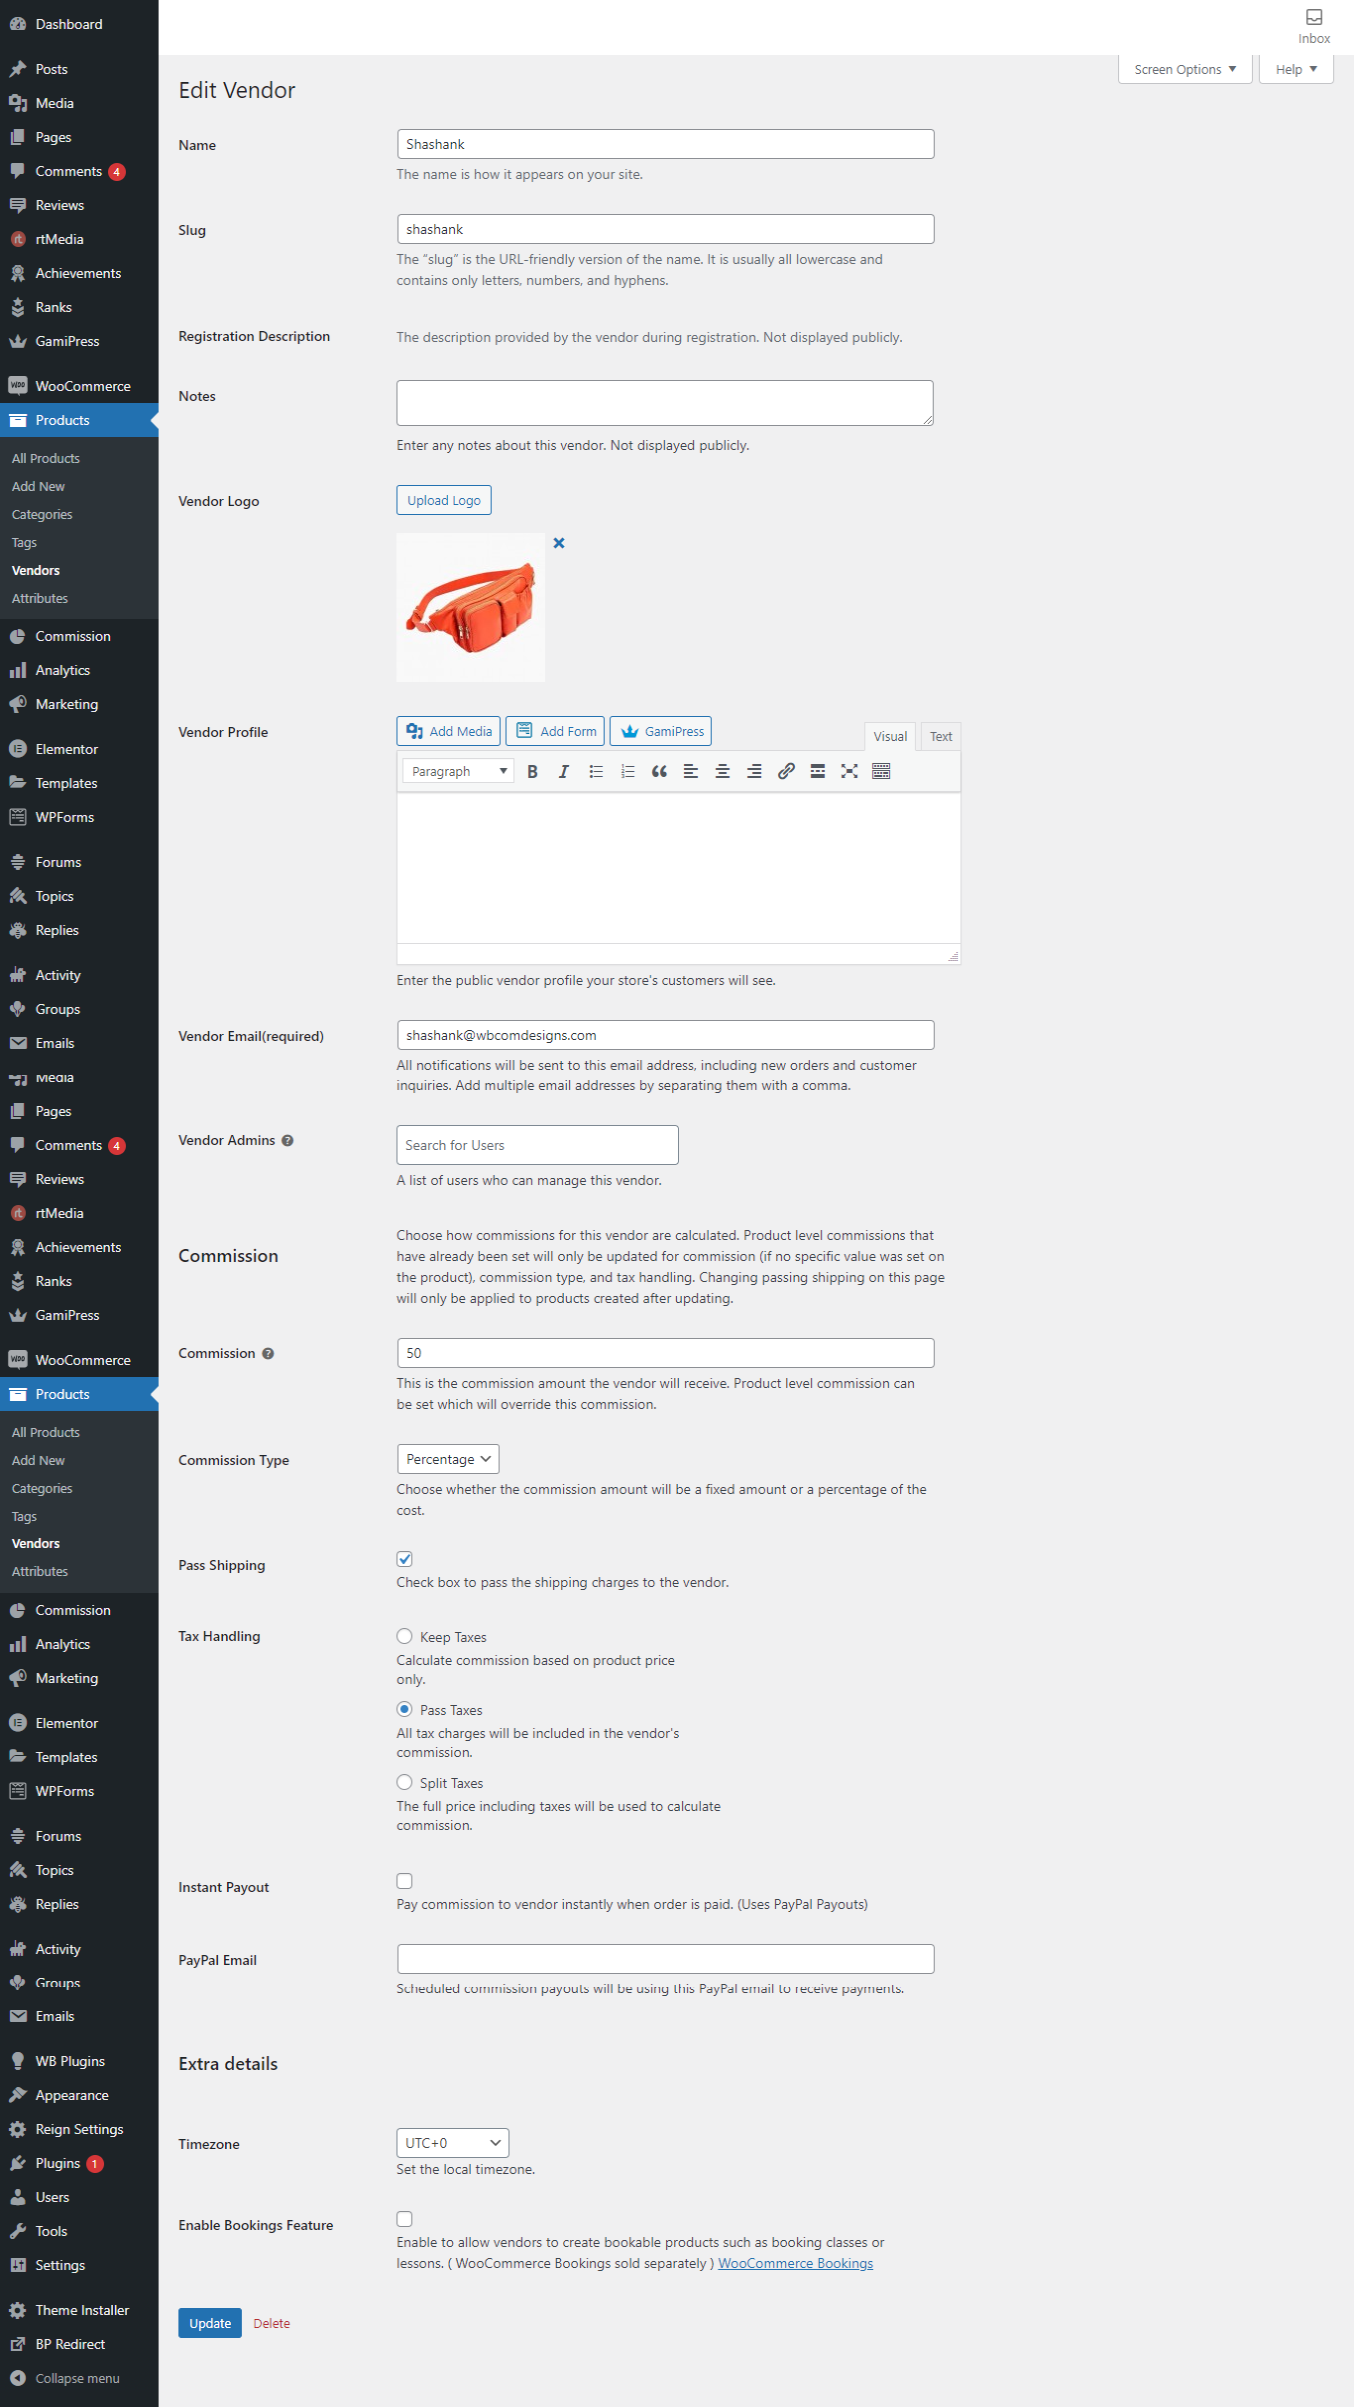
Vendor Settings and their details
Details of Vendor Settings:
Go to: Products > Vendors, click on a Vendor to edit.
Adding Products in WooCommerce Page
Adding products to Product Vendors is like adding products to the WooCommerce page, with options or differences described below.
Note, that in case they’re more than one client has added products in WooCommerce for the example shop owners and product vendors, the Product posting page will show a “Mine” channel at the top. This is to recognize products added by executives and shop administrators, with products added by vendors.
Store Owner Product Editing
Product Editing Settings:
Vendors Product Editing
Users who have manager control over the vendor are allowed to add/edit products.
Go: to WordPress Admin > Users > Vendor.
Change the value in the dropdown from Needs Approval to Allow for Publish Products.
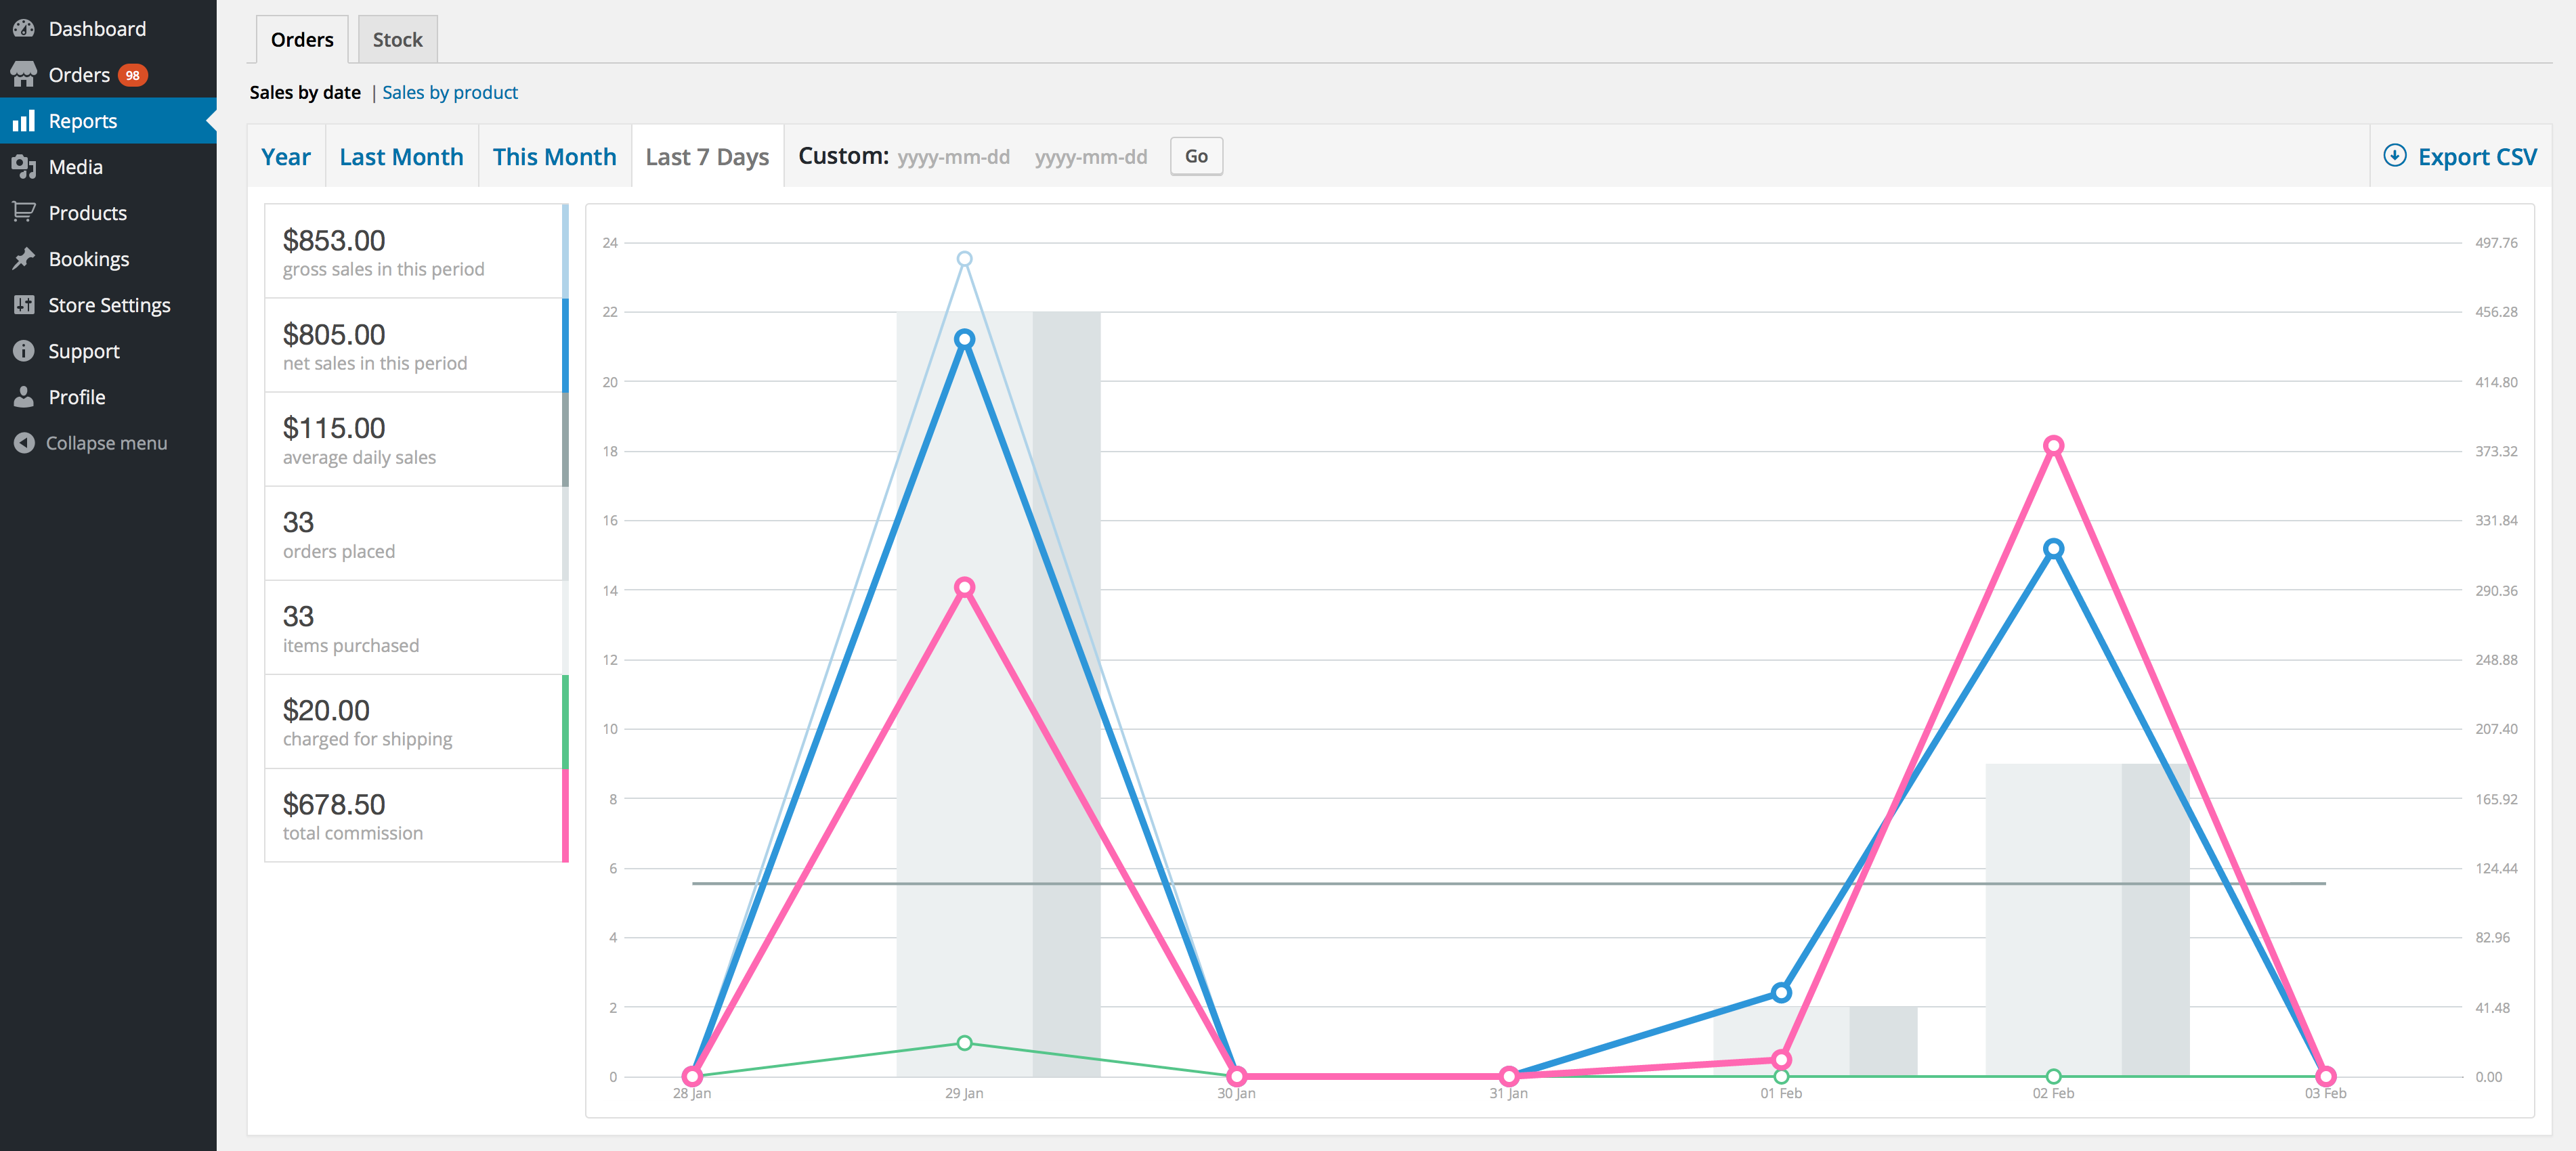
Vendor’s WooCommerce Reports
Store Owner Reporting
Store Owner reports for Product Vendors provide in the legacy WooCommerce Reports and located in the same location, under the extra Vendors tab.

Vendors Reporting by Orders
Vendor reports are the same as to the Store Owner, except they only see their own sales.
Product Vendors Commissions page
The Product Vendors Commissions page shows the commission of every product by request. Other data, like commission/shipping/fulfillment status, is additionally included.
Commissions can be calculated to include and exclude taxes in the product price.
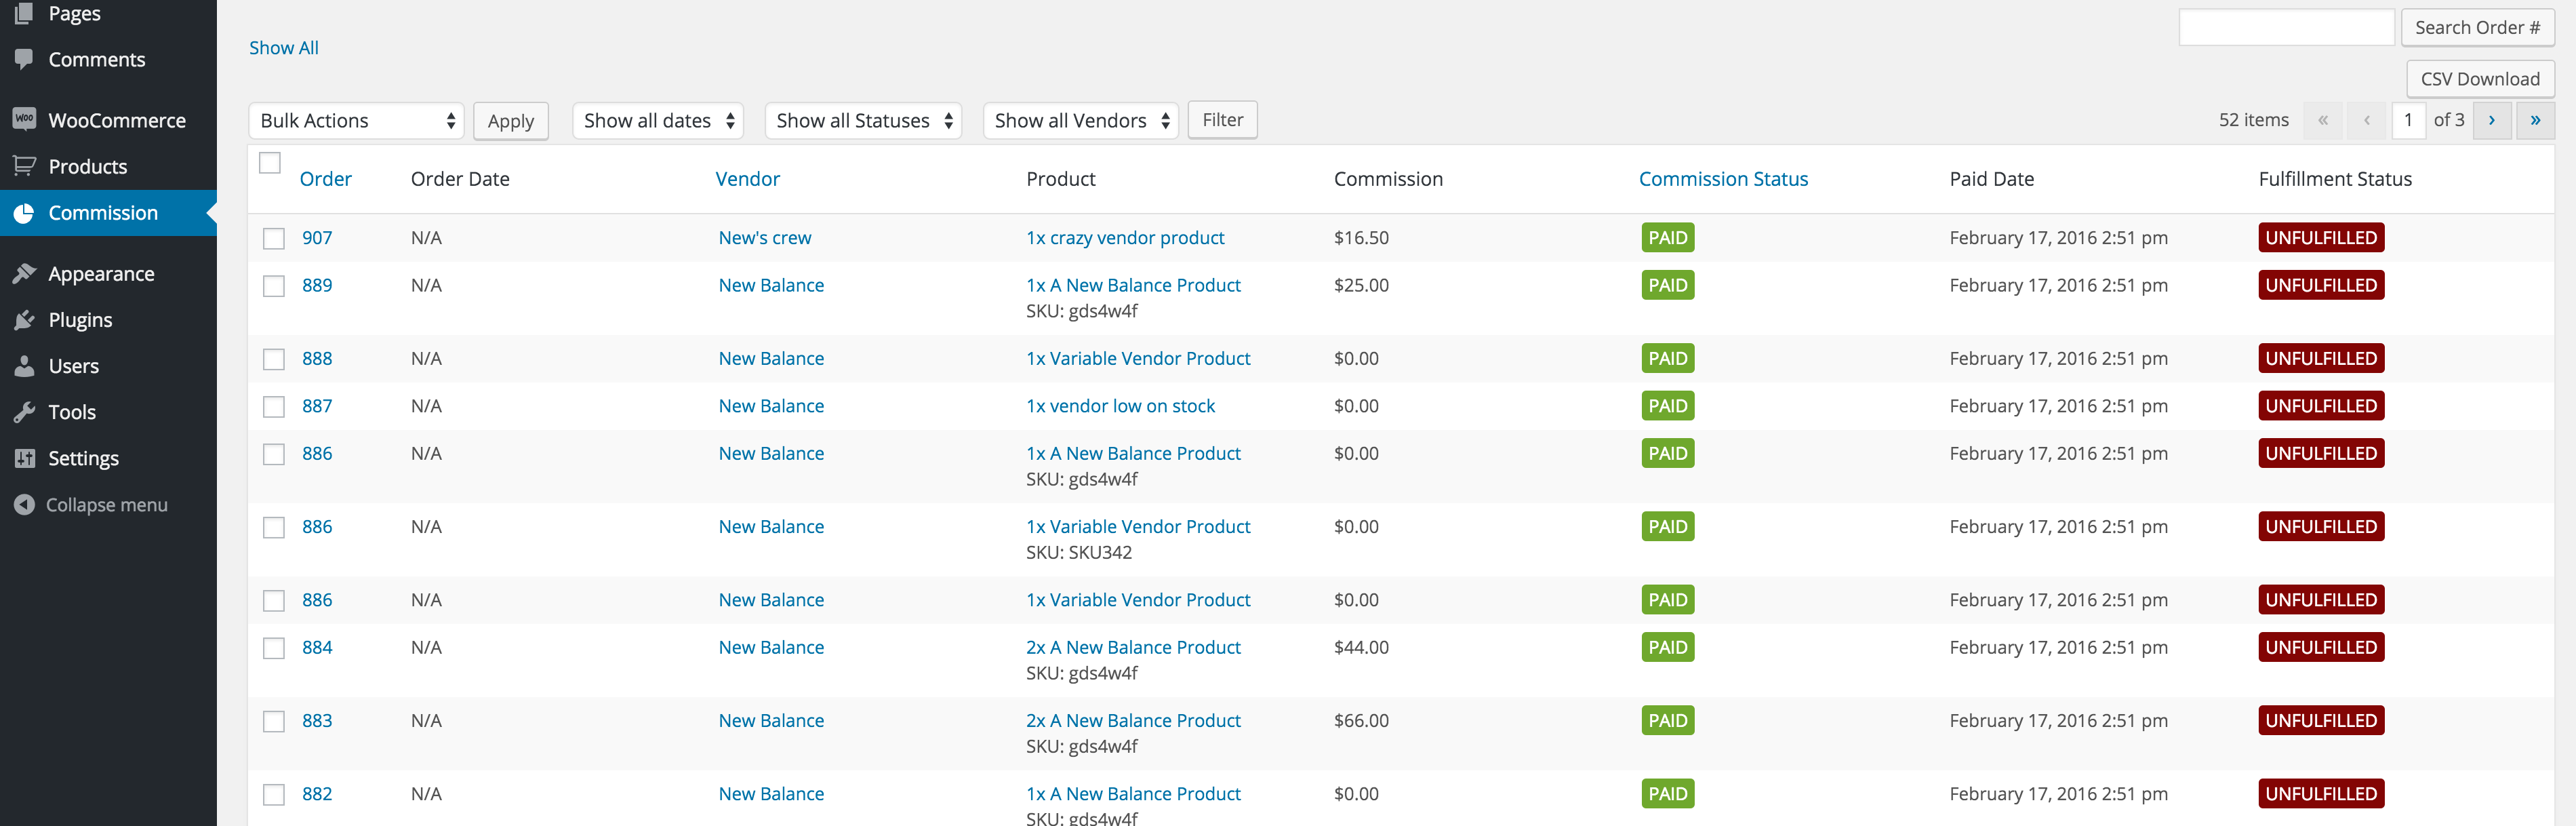
Bulk Actions in Product Vendors Commissions page
The Shop Owner can perform actions in bulk to process similar transactions and save time.
- Pay Commission
- Mark Unpaid
- Mark Paid
- Mark Void
- Mark Fulfilled
- Mark Unfulfilled
- Delete Commission
Commission Scheduled Payout
Rather than Instant Pay, you can plan commission payouts to vendors a week after week, bi-weekly, or month-to-month premise. Contingent upon your store and terms, you might need to pay commission sometime in the future so you can make a pad for client discounts or whatever preparation you might require.
PayPal Setup in WooCommerce Page
Utilizing PayPal for Product Vendors is beyond the realm of imagination in Germany because of country explicit laws as German law requires the assets to be held bonded.
Moment Pay and Scheduled commission payouts use PayPal Payouts, which are incorporated and incorporated into Product Vendors. You need a Business account with PayPal to mechanize commission payouts to vendors.
The vendor’s payments are paid out independently for each request. In this way, a PayPal exchange expense is charged per request.
To set up PayPal Payouts for your store:
- Sign up with a PayPal Business account. Or you can contact PayPal and switch your current account to Business.
- Request access to PayPal Bussiness Payouts. More info on getting access to PayPal Payouts
- Log into the PayPal Developers site with your PayPal account to set up an application at: https://developer.paypal.com/
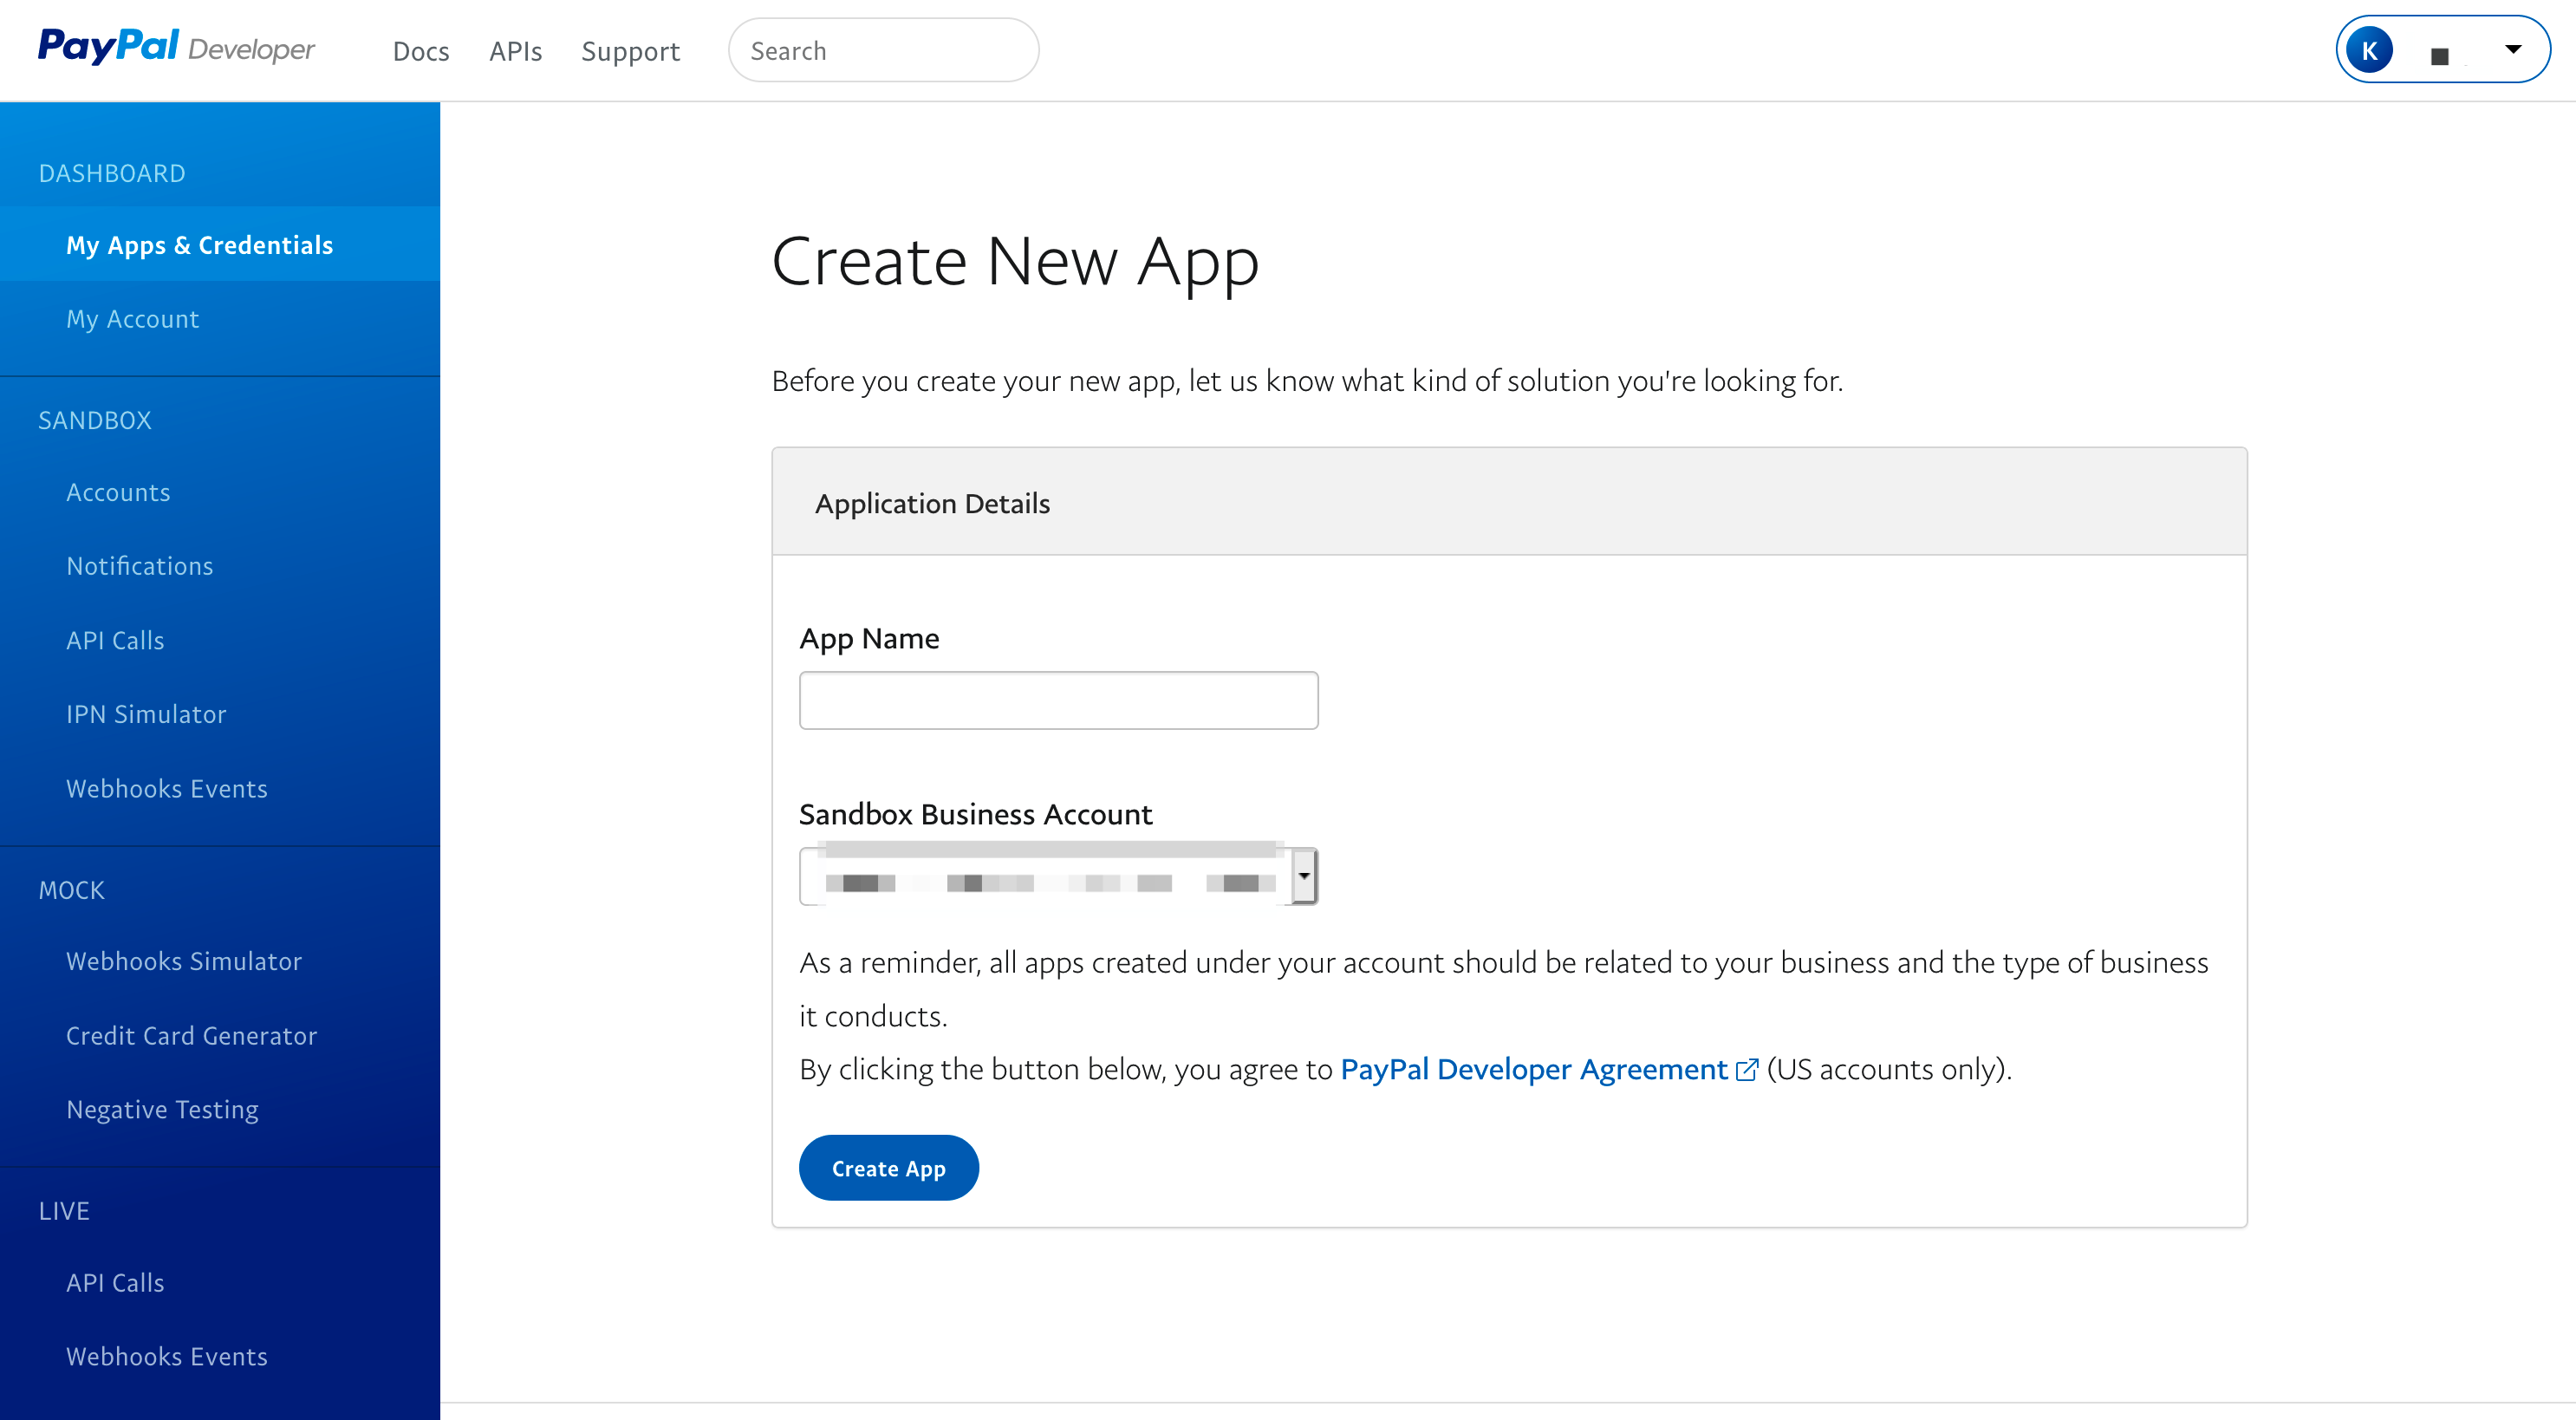
- Go to your PayPal Dashboard, select the mode you want to set up either “Sandbox” for testing, or “Live” for production, and click Create App.
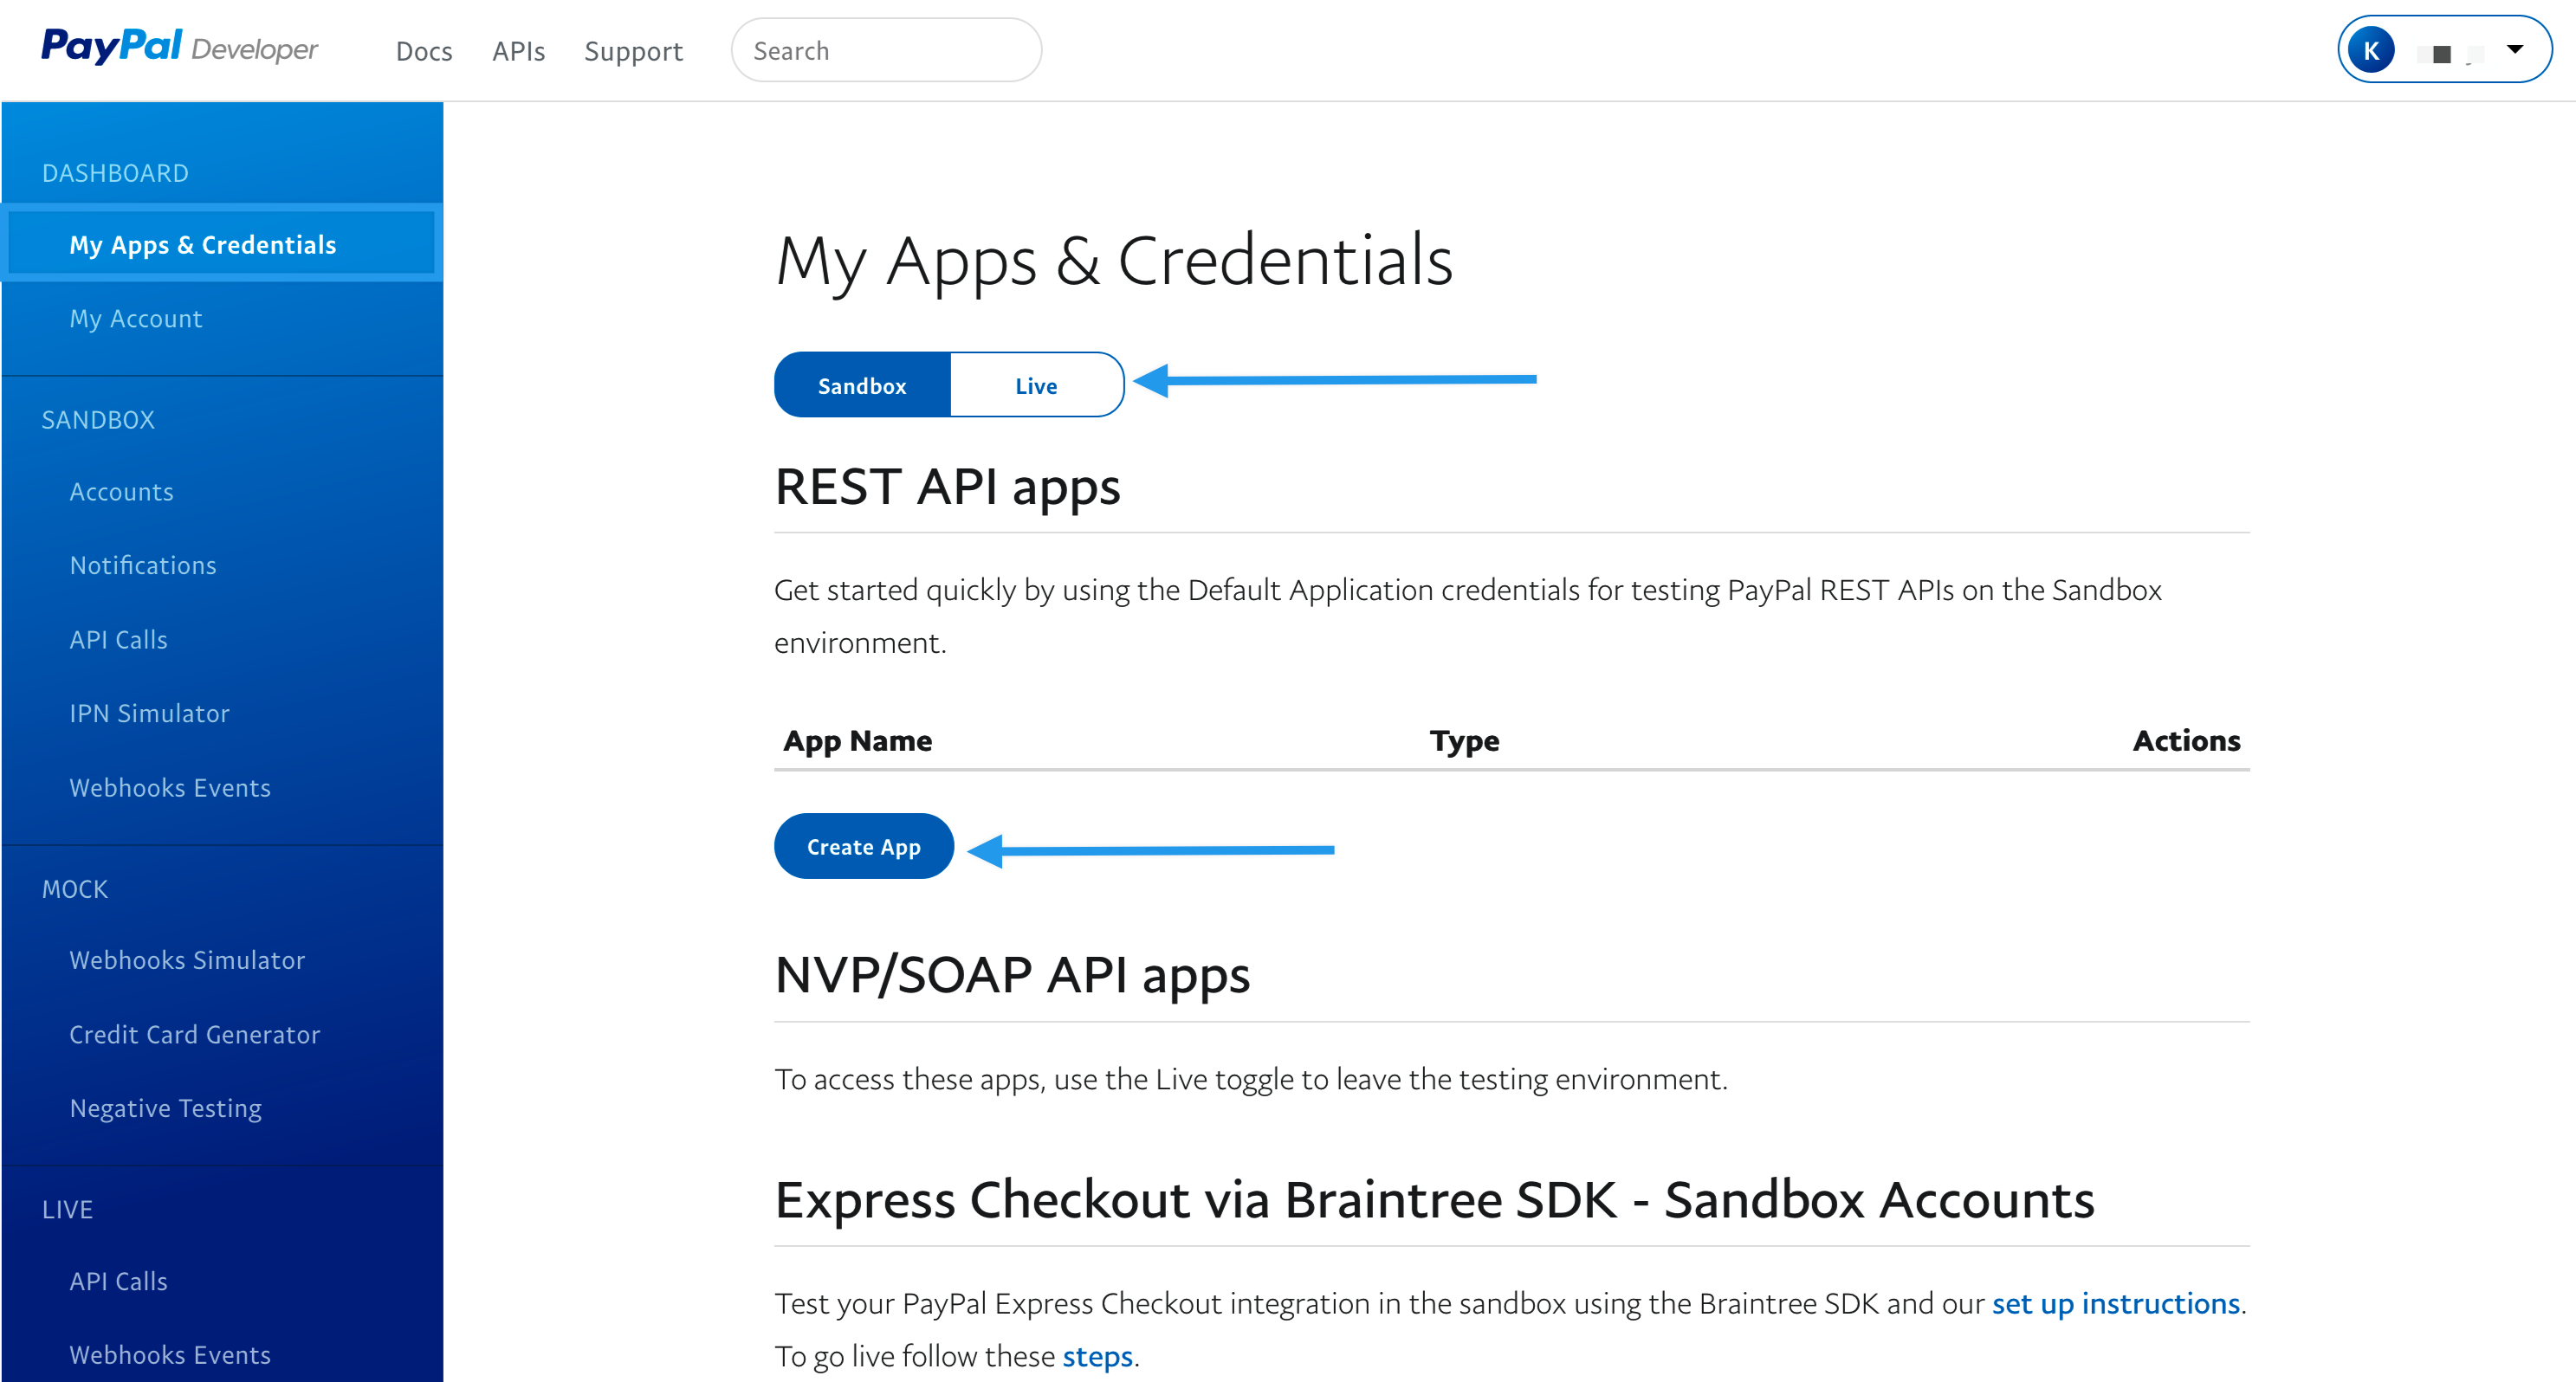
- Enter a descriptive name for the application, e.g., WooCommerce Payment.
- Whenever provoked, select the Sandbox account, which is consequently made for you. Regardless of whether you haven’t made one yet, there ought to be one to choose from.
- Duplicate the Client ID and Client Secret on the following page after the application is made and the screen shows up.
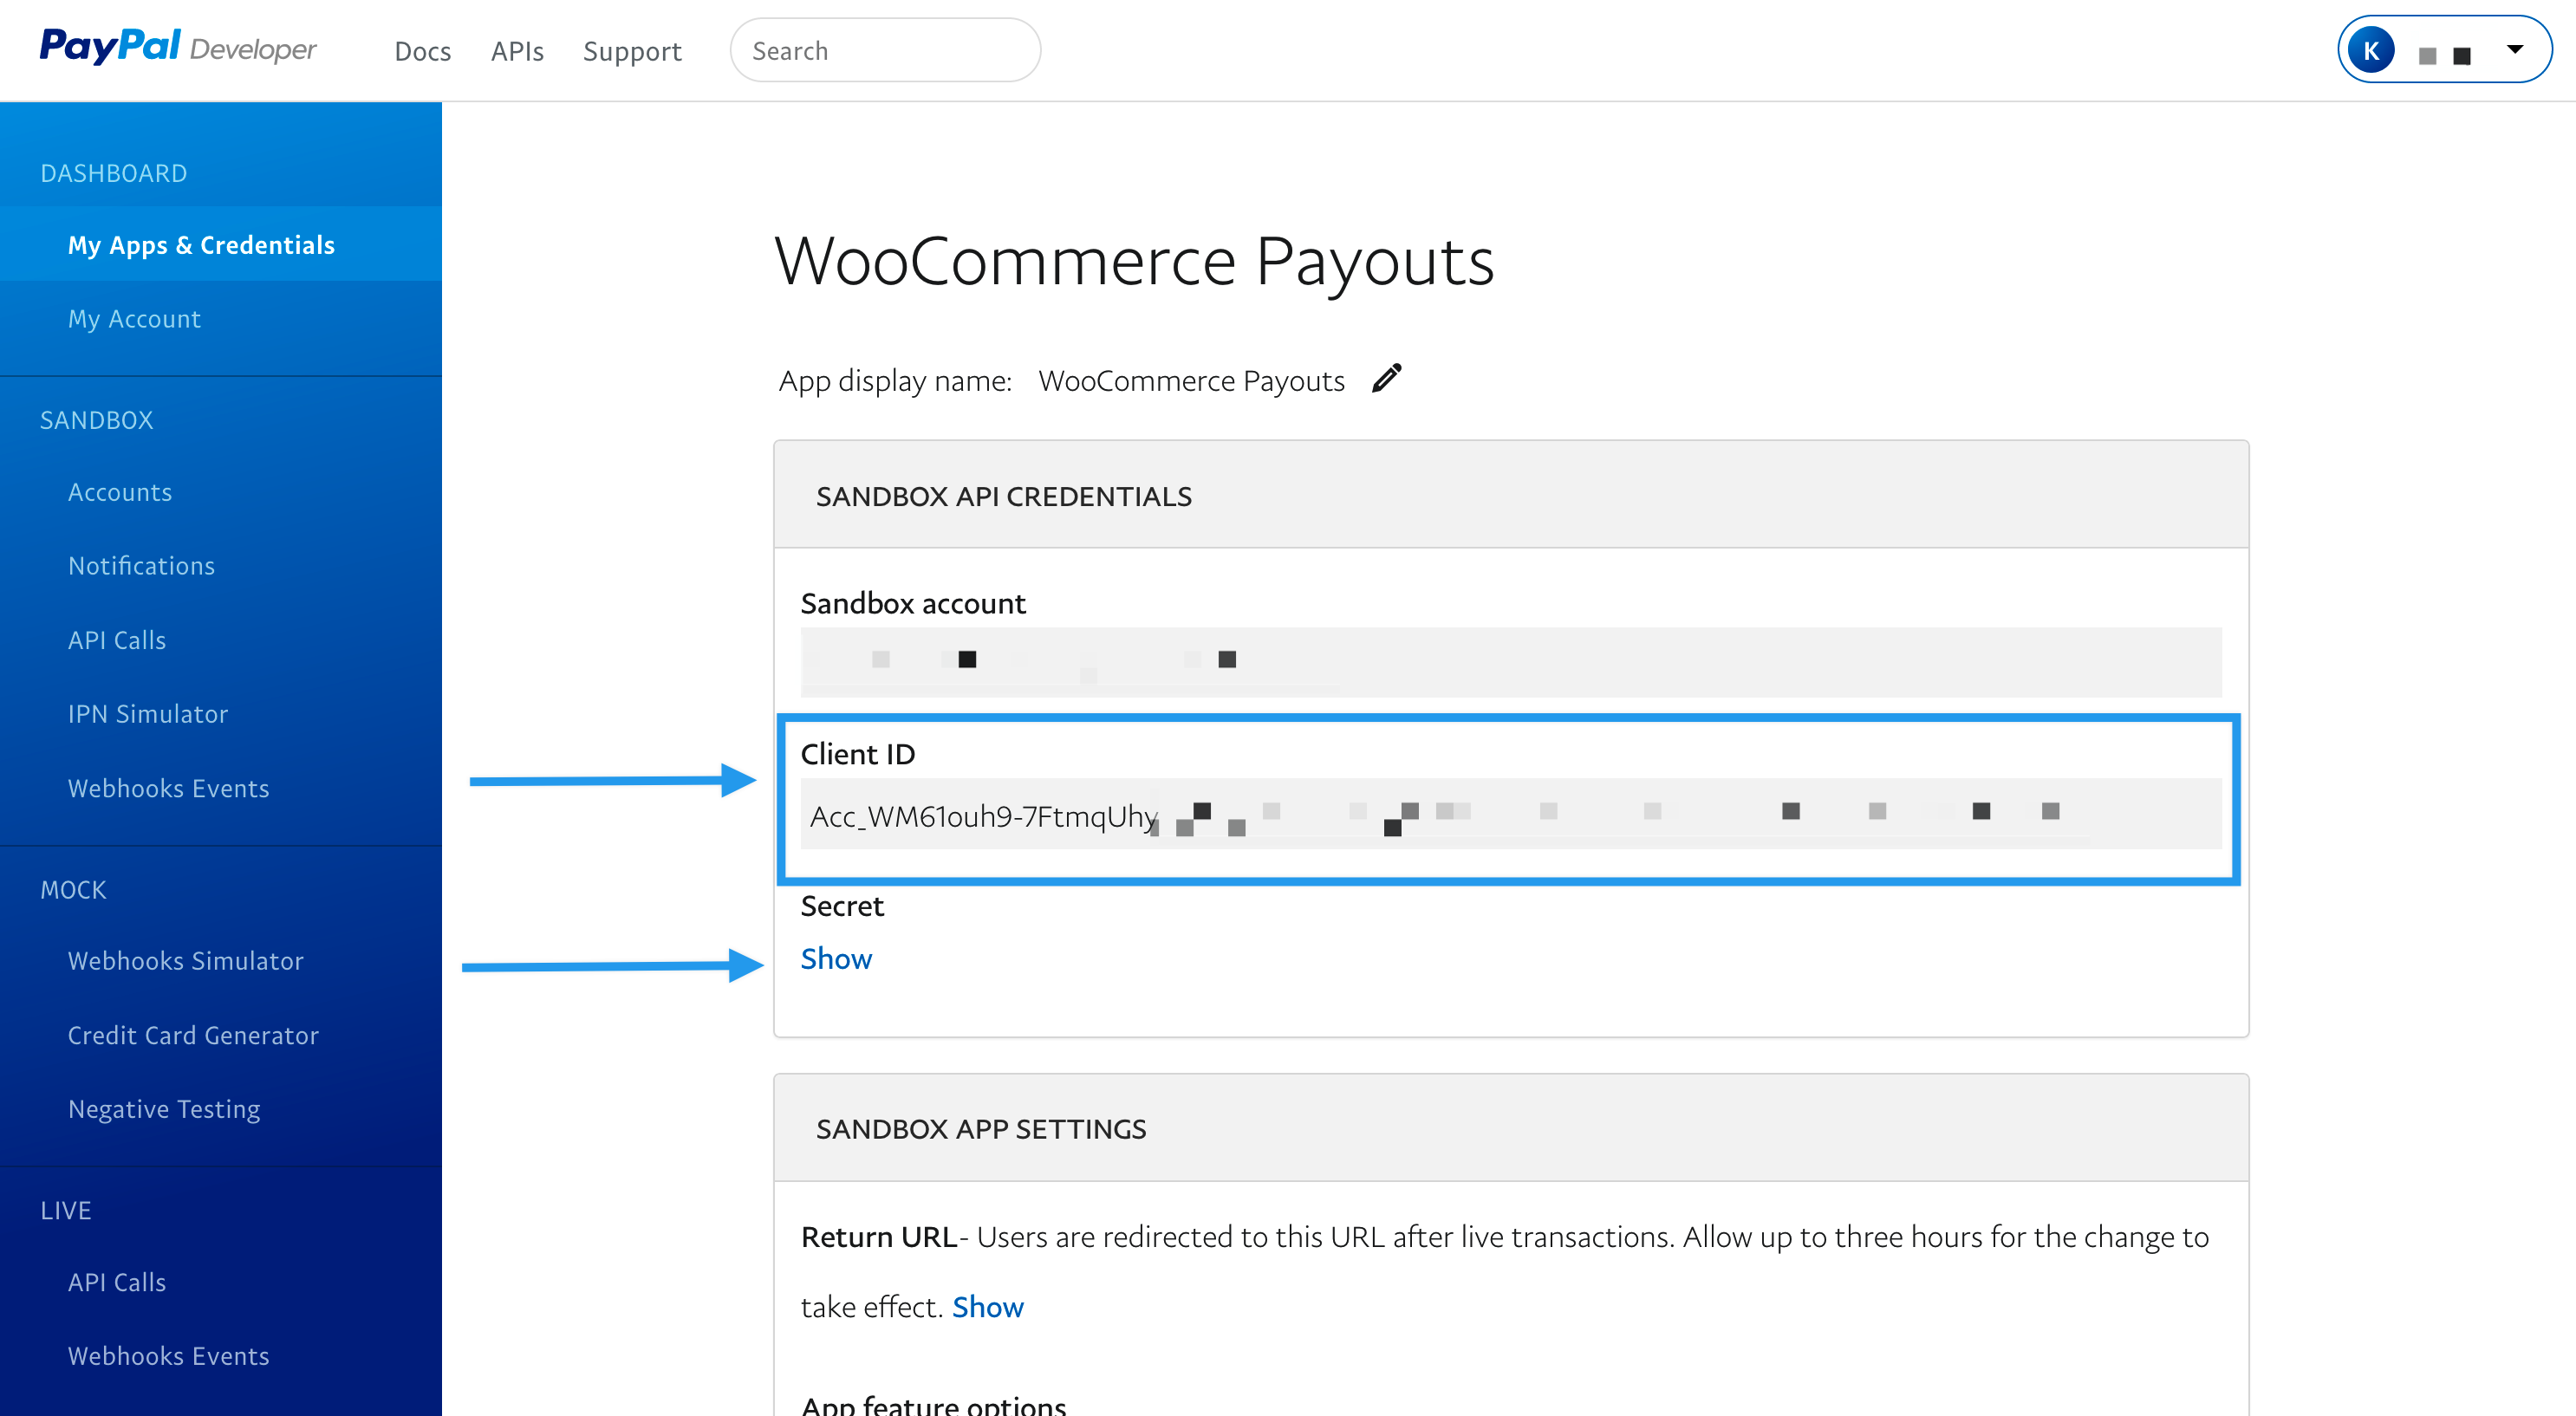
- At last, in the Vendors settings under WooCommerce > Settings > Products > Vendors, paste the Client ID and Secret into the “PayPal Payouts API Client ID” and “PayPal Payouts API Secret” fields, individually. Ensure the Environment is set to the suitable mode (Sandbox/Live) to coordinate with the ID and Secret that were duplicated from the PayPal dashboard.
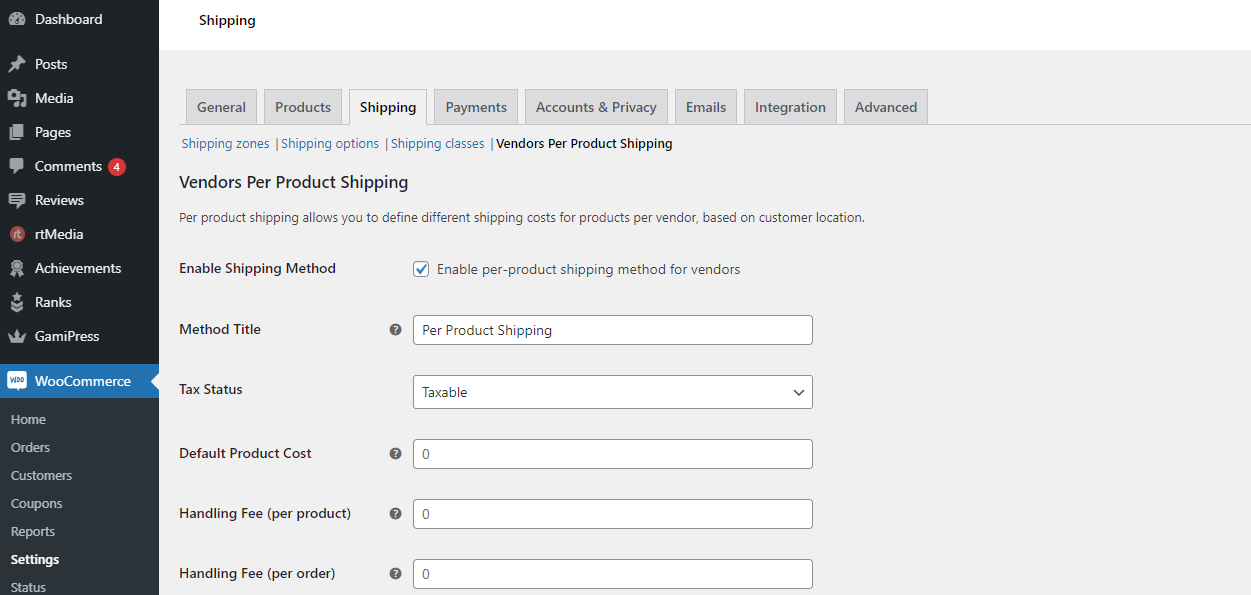
Vendor Per Product Shipping
Per Product, Shipping is incorporated and incorporated into Product Vendors. This is the lone transportation strategy that can give the gathered delivery add up to Vendors (added to the commission), yet that delivery cost should be set up on every item, under the Shipping tab. Any remaining delivery techniques from WooCommerce center or outsider engineers will charge the client dispatching yet won’t pass the sum gathered to the vendor.
This is set in Product Data under Shipping > Shipping Rules.

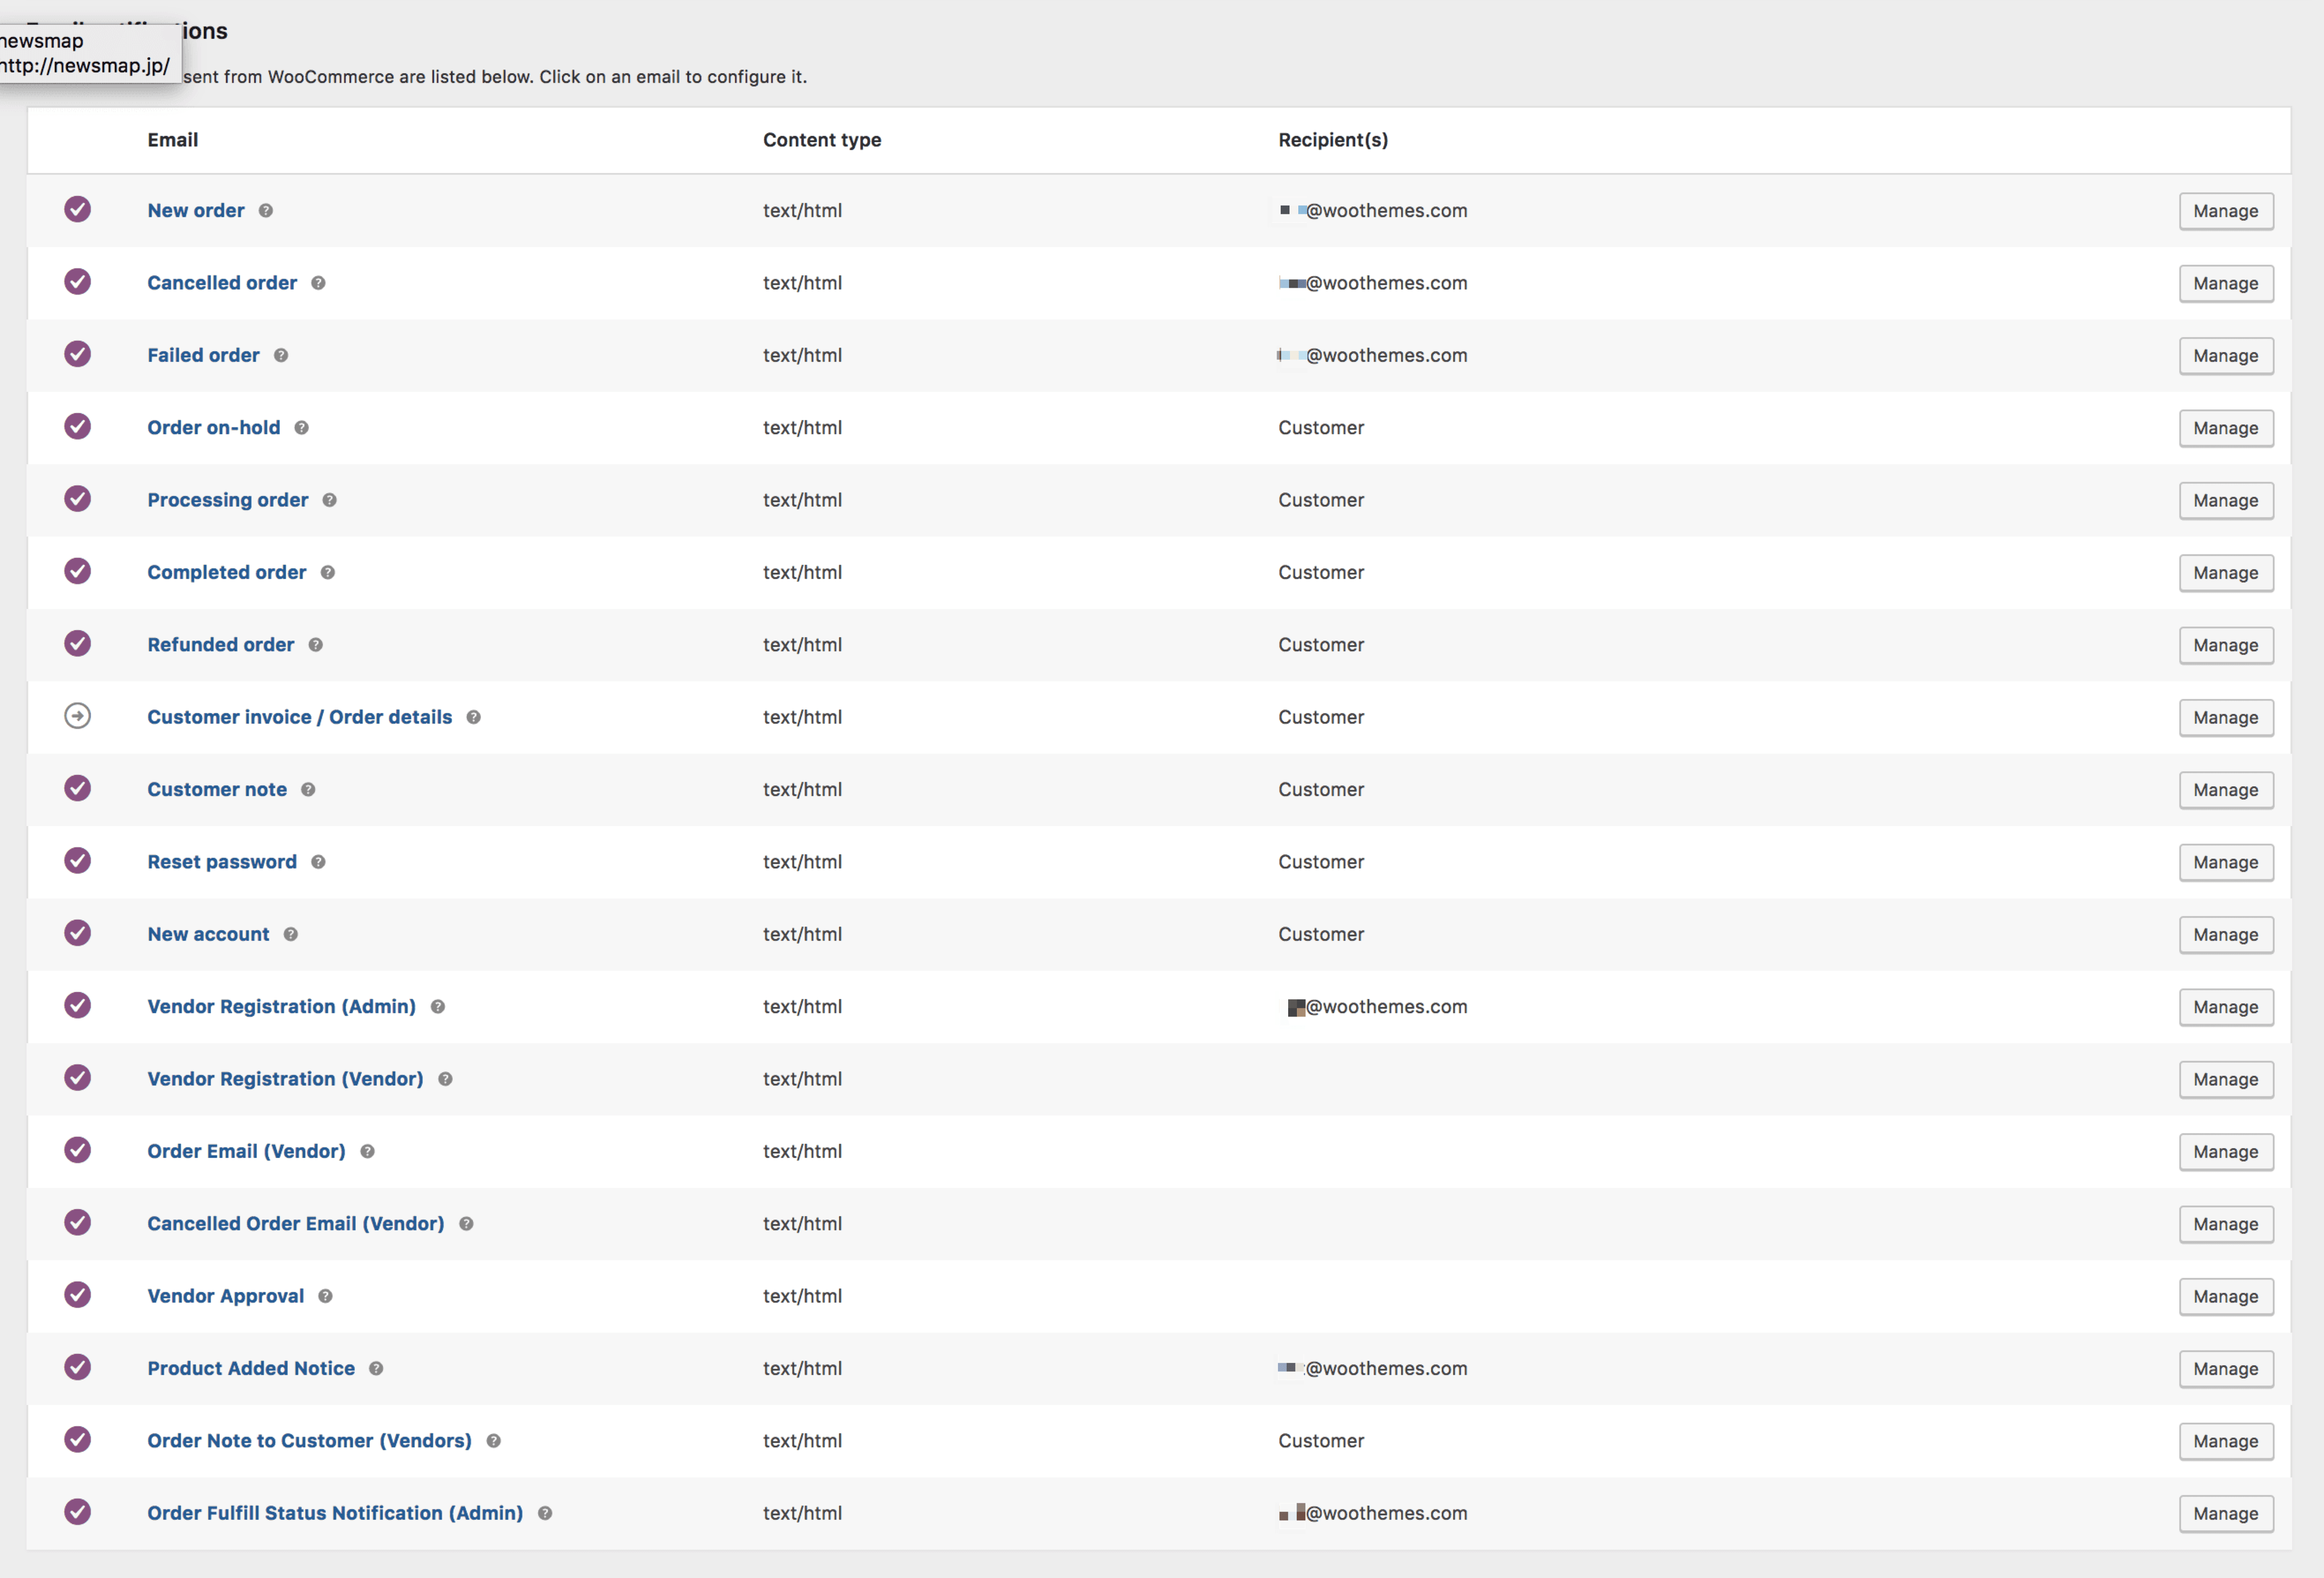
Product Email Notifications Setup
Several emails are set up in Product Vendors for Vendors and the Shop Owner.
Emails settings can be changed at WooCommerce > Settings > Emails.
Vendor List Shortcodes
To display a list of all vendors, you can utilize the shortcode [wcpv_vendor_list]. Accessible ascribes are “show_name” and “show_logo”. So you can say [wcpv_vendor_list show_name=true] and that would show the vendor list with names.
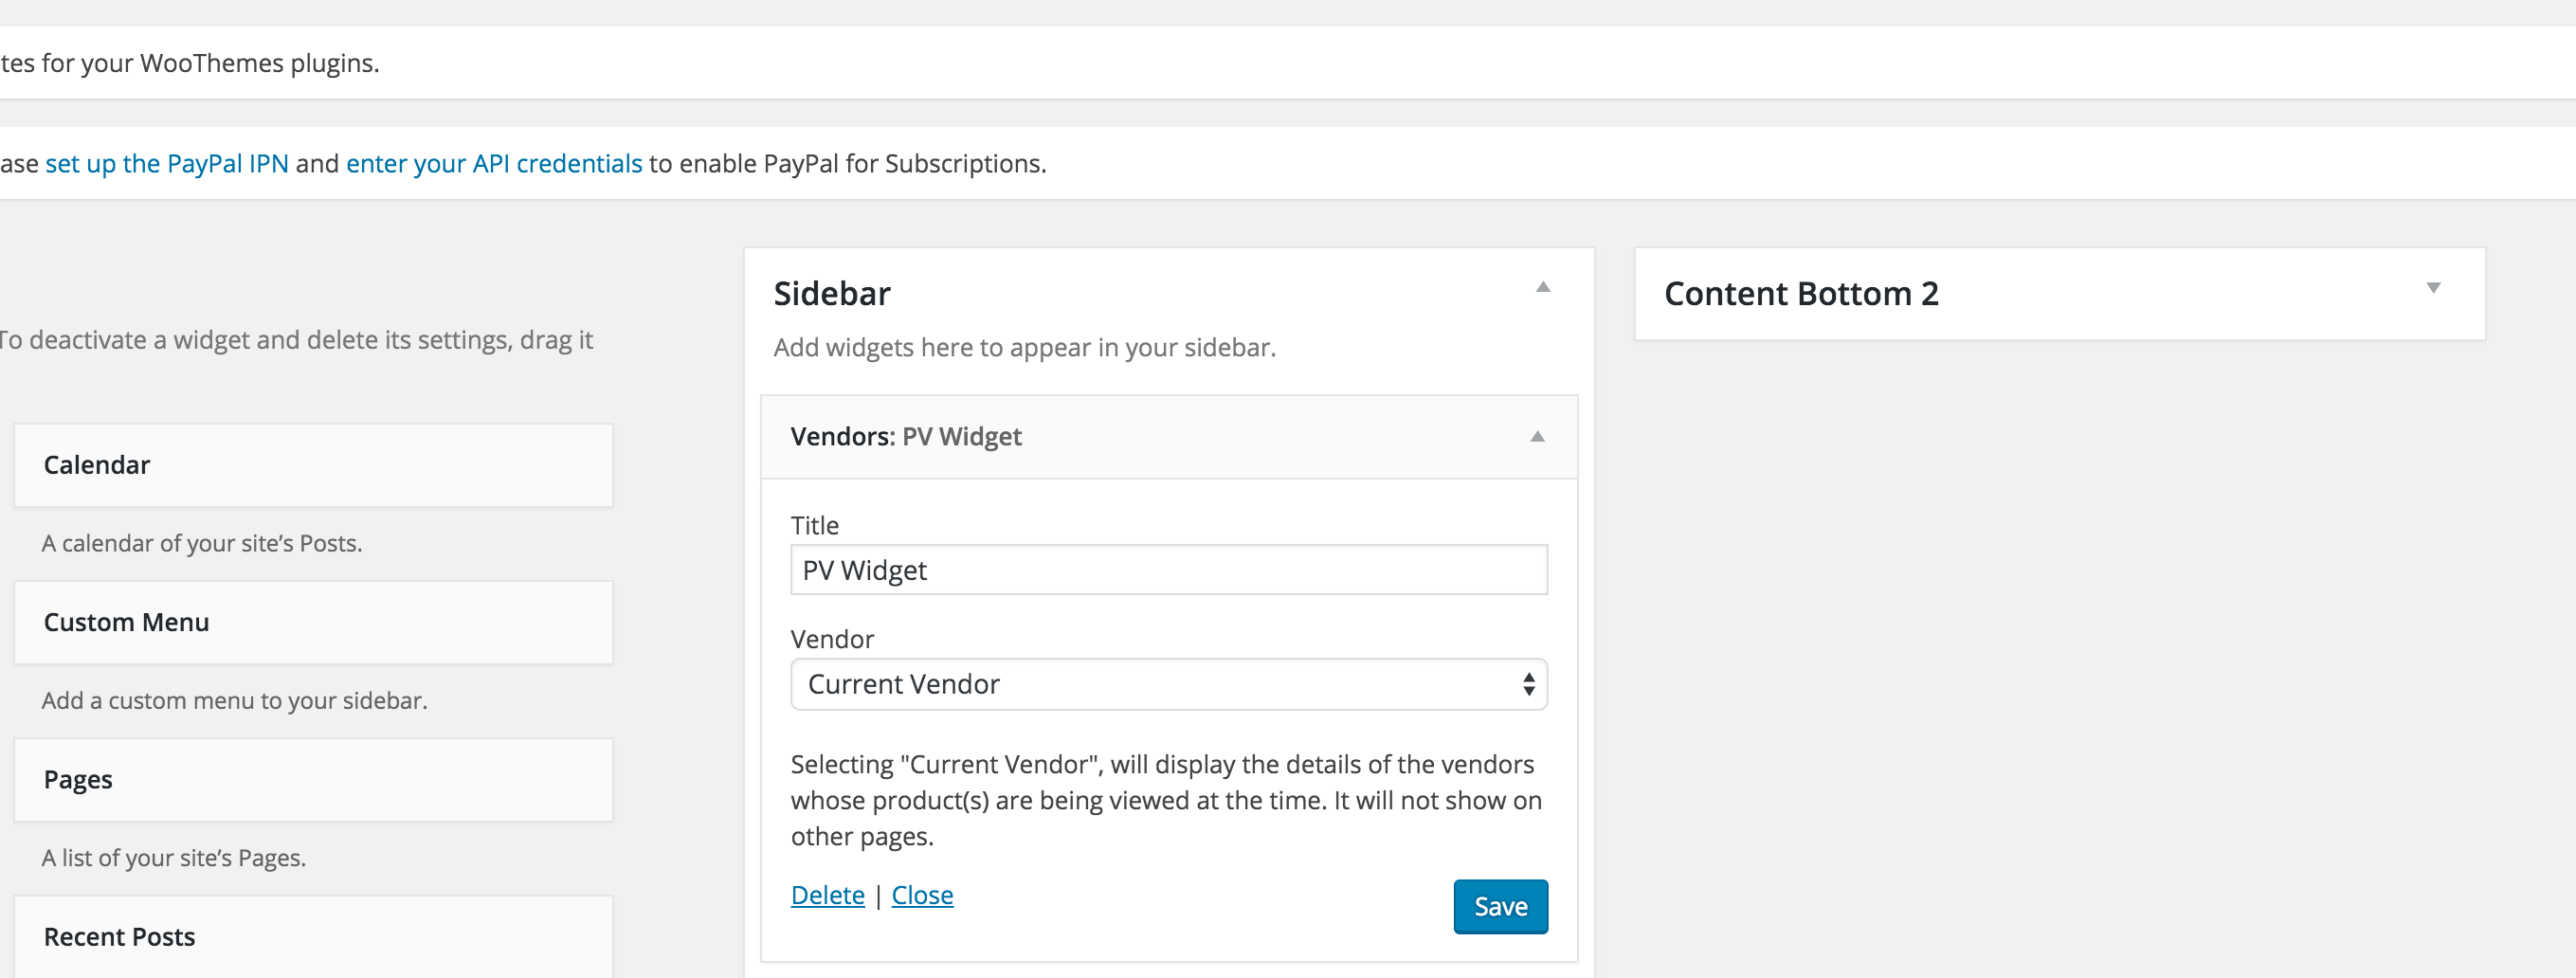
Product Vendors Profile Widget
Product Vendors Profile comes with one widget to display vendor information.
Product Vendor Plugin Compatibility
Some known compatibilities with other plugins are.
- WooCommerce Bookings.
- WooCommerce Product Enquiry.
- WooCommerce Order Customer CSV Export.
Our WoCommerce Compatible Theme
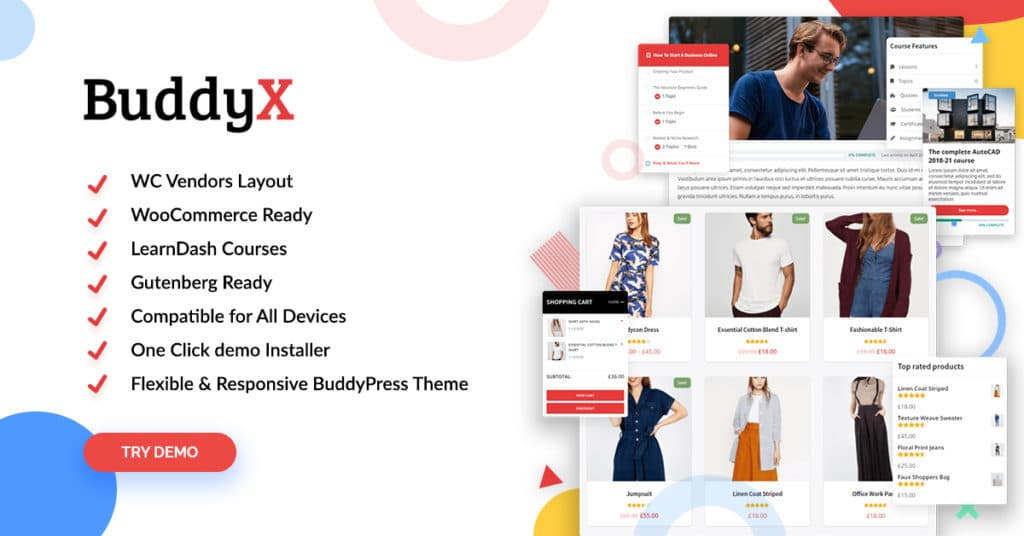
BuddyX is a multipurpose free WordPress theme that looks extraordinary and performs well. This theme is listed in the WordPress repository with great ratings and reviews. It is an advanced and clean theme according to vendors and buyers. BuddyX adheres to WordPress coding guidelines which makes it simple to customize. It is a completely responsive and Retina-ready theme, this will give shoppers and vendors to have a smooth experience on all devices like desktop and mobile. It supports WooCommerce and allows you to sell your products online easily. For more advanced features, you can try our BuddyX Pro theme.
Summary

With the help of the Product Vendor Plugin, you can easily create your online WooCommerce store with multiple vendors. On the off chance that if you have any further inquiries, be glad to ask me within the feedback part below.
We hope you liked this article. If you have any suggestions for us, let us know in the comments below. You can also follow us on social media platforms like Twitter, Instagram, and Facebook.
Interesting Reads:
How to Create a Dating Website Using WordPress Plugins
Related reading