5 min read
How To Set Up Apple Pay On A WordPress Site

Do you want to accept Apple Pay for your WordPress website? Apple Pay has seen a significant increase in popularity over the past few years. There are many easy ways to make Apple Pay a payment option for your website.
This article will show you how to accept Apple Pay on WordPress.

Why accept Apple Pay in WordPress

It’s essential to allow your customers to pay using their preferred payment method if you sell products or services via your WordPress website.
This often means that you will need a credit card. However, newer methods such as Apple Pay or Google Pay are growing. Apple Pay has over 40% of the US mobile payments market share. It makes it easy to make online payments.
Online Apple Pay payments cannot be made via the Safari browser on an iOS or Mac device.
Let’s now look at Apple Pay and how it can be accepted in your online shop.
Also Read: Professional University WordPress Theme To Create Online Education Platform
How to accept Apple Pay in WordPress
First, install and activate the WordPress Simple Pay plugin. You can find more information in our step-by-step guide on installing a WordPress plugin.
Because it is both easy and powerful, WP SimplePay is a popular WordPress payment and invoicing plugin. WP Simple Pay doesn’t charge additional transaction fees and can be set up simply without using a cart system.
There is a free version, but you will need the Pro plugin to accept Apple Pay and create on-site payments forms.
The WP Simple Pay setup wizard automatically starts upon activation. To continue, click on the ‘Let’s Get Started’ button.

You will first be asked for your license key. This information can be found in your WP Simple Pay account.
To move on to the next step, click the “Activate and Continue” button.
You will now need to connect WP simple pay to stripe. Stripe is a well-known payment gateway, and it’s the easiest method to add Apple Pay to your WordPress website. It supports all major credit and debit cards as well as Google Pay.
Click the “Connect with Stripe” button to log in or create a new Stripe account. Anyone can open a Stripe account to accept online payments.
After you have connected to Stripe, you will be asked to set up your WP Simple Pay emails. You already have the option to send invoices and payment emails to customers. You can also send payment notification emails.
Also Read: How to Make Local Business Benefited from Social Influencer Marketing?
Enter the email address to which you wish to receive notifications. After doing this, click the “Save and Continue” button. This completes the setup of WordPress Simple Pay.
1. Creating a Payment Form in WordPress
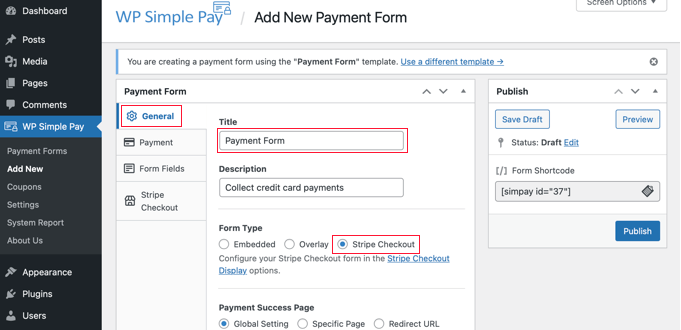
Next, create a payment form.
Click the “Create Payment Form” button at the end of the setup wizard to get started. This will take you to the WP Simple Pay >> Add a New Page.
First, give the payment form a description and a name. You can then choose from any payment (Embedded or Overlay, Stripe Checkout, etc.). Let’s take the Stripe Checkout option as an example.
Next, click on the Payment tab. You can choose to make the payment method live or test it. You can use the testing mode to make payments that aren’t charged to Apple Pay. This will allow you to verify that your form works properly and emails are being delivered.
When you are done testing, change the status to “Live”, and then you can start receiving payments.
You can also add products and services to your website, including their prices and whether they are a one-time payment or a monthly subscription.
Also Read: Top 10 Blogging Tips for College Students
Once you have added all the prices you require, click on the “Add Price” button. You will need to add a price and a label for each price. Other options are also available, such as a subscription price, or the user can set the price themselves, like in a donation.
Click the small arrow to show or hide a particular price. Next, we will move to the “Form Fields” tab. You can edit the form to add additional fields if you need.
You can select additional fields from the drop-down menu and click the ‘Add Fields’ button. Also, you can choose from the name, number, and address.
Pay with Card

The default text for the button is “Pay with Card”. You can change the text to something simpler, such as ‘Pay Now’. This will clarify that credit cards are not the only option for payment.
The ‘Stripe Checkout tab lets you choose additional payment methods or modify the checkout form after clicking the ‘Pay’ button.
These settings will be used in the tutorial.
Once you’re satisfied with your payment form, click the “Publish” button to save your settings and make the form live. We can now add the form to a page or post it on your website.
2. Adding the Payment Form to Your Website
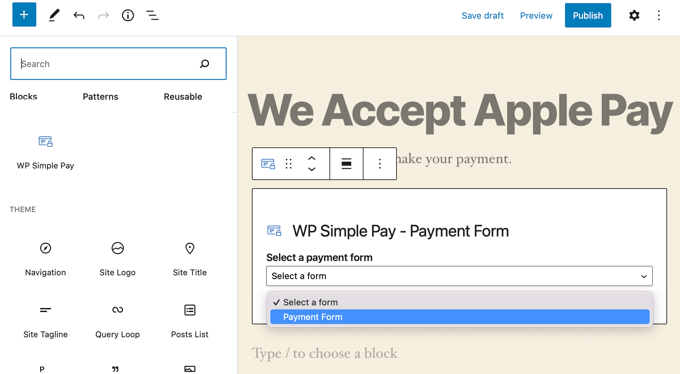
WP Simple Pay makes adding forms to your website super simple. You can create or edit a post or page by simply clicking on the plus (+) sign at the top. Click on the plus (+ sign) at the top to add a WordPress Simple Pay block in the WordPress block editor.
Next, choose your order form from the dropdown menu within the WPForms block. After you are done, you can publish or update the page or post. Click on the preview button to view your form in action.
The Stripe checkout form will appear when your users click on the Pay button.
The Apple Pay option will appear at the top of any form if they’re using Safari on a Mac, or an iOS device such as iPhone. The Apple Pay option will not be visible if your customers are using the Safari browser on a Mac or an iOS device like iPhone. Instead, they can pay with a credit card.
Summary
You can also use full eCommerce solutions such as WooCommerce or Easy digital downloads to add Apple Pay to WordPress. Both have support for Apple Pay as well as Google Pay.
This tutorial will help you accept Apple Pay in WordPress. Subscribe to our YouTube Channel to receive more WordPress tutorials.
Interesting Reads:
Must-Know The Essential And Successful Blogging Skills
What is the Pillar Page? And SEO Strategy Benefits of Using Theme
Related reading