5 min read
Basics of Inserting and Editing Images on WordPress – Part 1

Visuals are processed about 50,000 times faster and easier than text by the human brain. A clear reason for this might be that approximately 40% of our nerve fibers to the brain are connected to the retina. According to another study, customers have an attention span of just 8 seconds. This is even worse than a goldfish. The result is that the engagement per follower on Instagram is over 50 times higher than on Facebook.
In such a competitive environment, how will you stand out if you’re not good with images?
It doesn’t matter if you’re a new blogger, an experienced one, or just a layman. If you are ready to learn something new today, you are in the right place. We will begin by explaining the basic concepts and steadily move on to the more advanced sections of inserting and editing images on WordPress. Let us begin.
Downloading an image from the internet

As easy as it sounds, downloading an image can be a tricky proposition sometimes. Not only copyright issues, other discrepancies like hotlinking also become big issues, especially for new bloggers. Hotlinking is when you upload an image using its URL on the internet. It is not a good idea to avoid this due to the extra strain on their servers. The other problem is that the image disappears from your post as soon as it is removed from its current location. Now, once you find the desired image that can be legally utilized, follow these steps to download it to your computer.
- Right-click on the image.
- You will get an option of ‘Save image as…’.
- Click on ‘Save image as…’.
- Select the folder where you want to save this image on your computer.
- Enter the name of the image in the ‘File Name’ Tab
- Select the file type from the ‘Save As Type’ tab.
We recommend you to save pictures in.PNG format as it is a lossless compression file format. In simple words, it is the best choice to store line drawings, text, and icons at small file sizes. .JPG format is best suited to store photographs smaller in size than a BMP.
Uploading an image on a blog
Once you have downloaded the image, you must learn about uploading it to your WordPress blog. WordPress images can be uploaded individually or in a group. Whichever way you choose, only a copy of the original file(s) will be uploaded, while the original file will remain on your computer.
Now, once you log in to your WordPress dashboard, follow these steps to upload an image to your blog.
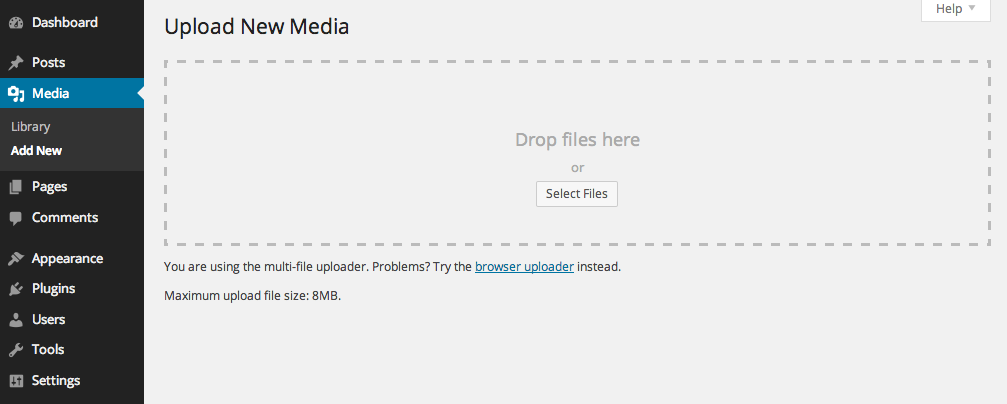
- Start with a new post or an old one, and click the ‘Add Media’ button.
- Click on the ‘Upload Files’ tab.
- Either drag and drop the file that you want to upload, or
- Click on the ‘Select Files’ button to browse through your computer and upload it.
- It will take a few seconds to upload successfully.
You can access these images whenever you want to via the WordPress Media Library. You need to click on the media menu on your WordPress Dashboard. This library acts as a store for all the media items you upload on WordPress.
Inserting an image within a post

The appropriateness and quality of an image are optimized only if it is placed in the perfect spot in the blog. This is extremely helpful if you need to explain a concept or narrate a story and support it with compatible pictures.
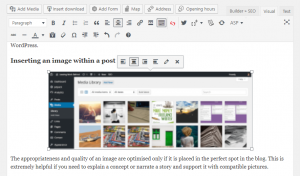
Now, once you have uploaded all the needed images in the WordPress Media Library, follow these steps to insert an image within your post.
- Take your cursor to the exact point where you want to insert the image within your post.
- Click on the start or end of a text or on a blank line near that point.
- Click on ‘Add Media,’ and then the “Media Library” tab, and you will find the respective image.
- Click on the particular image, and a panel will appear at the bottom right of your screen.
- Ignore the options for now and click on the ‘Insert into Post’ button.
After this, the image will be inserted into the post. You can perform actions like aligning an image, resizing an image, and turning an image into a link in this step itself. However, they have been explained in detail below to enable a greater understanding.
Aligning WordPress images in a post
Aligning an image in a post is of utmost importance. Unaligned images together look like a poorly organized workstation. Due to this, users tend to get confused and leave your blog. Hence, whenever you insert an image, remember to set its alignment right.
Now, once you have inserted the needed image within your post, follow these steps to align an image within your post.
- Click on the image that you want to align.
- A mini-menu pops up on the image.
- Move your cursor on the align button in that menu.
- Click on the right, center, left alignment, or no alignment buttons accordingly to adjust.
- Your image will now be aligned correctly in your post.
The alignment of an image can also be changed by clicking on the edit button or the little pencil.
Resizing Images on WordPress
Images that are either too big or too small distract the viewers and decrease your blog’s readability. Hence, these images need to be resized if you want the optimum results out of these images. There are a few ways you can do it. For instance, if you want your image to get bigger without losing its quality, you can use some useful tools such as image upscaler, and upscale your image to the desired size.
Once you have inserted the needed image within your post, follow these steps to resize an image.
- Click on the image.
- A mini menu will pop up on the top of the image.
- Click on the edit button or the little pencil in the mini-menu.
- A box named ‘Image Details’ will open.
- Click on the drop-down menu next to the “Size” tab and select from options like Thumbnail, Medium, Full size, or Custom size.
- Click on the “Update” button at the bottom.
- The selected image will be updated according to the selected size.
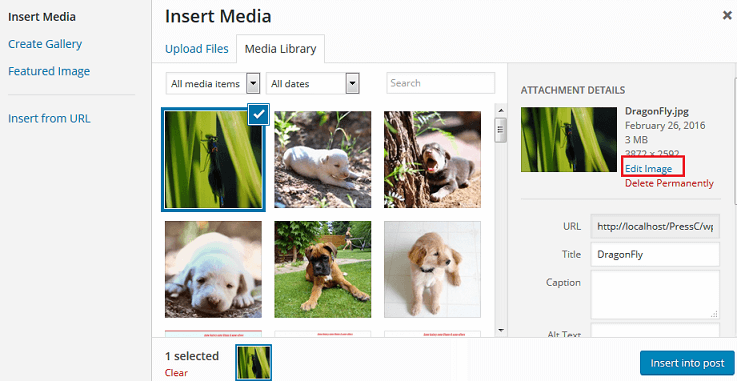
Resizing an image can also be done when uploading the picture or through the media library as shown in the picture. It does not change the size of your original image, so the file size remains the same. Also, while resizing, whenever you change the height of the image, the width will be automatically adjusted and vice versa.
The steps discussed above will help you to download an image from the internet and use it according to your convenience on your own blog. We call these steps altogether the basics of Editing Images on WordPress. However, there are still a few things that you need to keep in mind before becoming a pro at image editing. We will discuss them in the next part of this article. Till Then, Happy Editing!!
Interesting Read
Why Should You Add a Community to Your Membership Website?
Related reading