2 min read
Tips To Optimize WordPress Website In Five Minutes
Your WordPress site slows down over time. Old trackbacks, post revisions, and database bloat pile up. These quick optimizations take just minutes but make a real difference in speed.
Clean Up Trackbacks
Old trackbacks clog your database. We had 160,000 useless ones slowing our SQL queries. Here’s how to remove them:
- Go to Comments > All Comments
- Open Screen Options (top right) and set view to 100
- Search for
[...] - Select all trackbacks and move to trash
- Repeat until they’re all gone
- Empty the trash when finished
Optimize Your Database
A clean database means a faster, more secure site. The WP-Optimize plugin handles this safely. Over 200,000 sites use it.
Always back up your database first. Then:
- Install WP-Optimize
- Check: Remove post revisions, Remove auto drafts, Optimize database tables
- Click Process
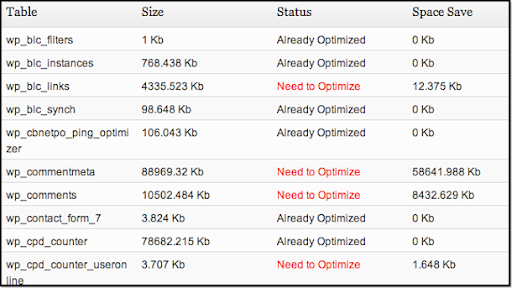
After the first run, you’ll see significant space savings, especially if you have 500+ posts.

Add a Slider (Nivo Slider)
Want a free image slider on your homepage? You can integrate Nivo Slider manually with FTP access. This method uses a custom post type so non-developers can add slides through the WordPress dashboard.
Step 1: Create a Custom Post Type
Add the custom post type code to your theme’s functions.php. This creates a “Slides” section in your dashboard where you upload slider images.
Step 2: Add Image Size Support
Add the slider image dimensions to your theme’s thumbnail support in functions.php. Example: add_image_size('slider', 960, 350, true);
Step 3: Add Slider HTML
Place the slider code on your homepage template (page-home.php or index.php). It pulls images from your Slides custom post type and displays them in the Nivo Slider.
Step 4: Link the JS and CSS
Add the Nivo Slider JavaScript and CSS files to your header.php. Upload the files via FTP to your theme’s js and css folders.
Step 5: Initialize the Slider
Add the slider initialization script to your footer.php. Configure settings like animation speed, pause time, and navigation options.
Fix Google Webmaster Errors
Log into Google Search Console and check HTML Suggestions under Diagnostics. You have three options:
- Option 1: Edit articles one by one and fix the HTML errors.
- Option 2: Delete low-quality old articles that aren’t worth fixing.
- Option 3: Use Robots Meta Plugin to add “Noindex, Nofollow” to problem pages.
Wait 1-2 weeks for Google to re-index. Then check Crawl Errors and clean up any 404s from deleted articles.
Bottom Line
These optimizations take minutes but improve your site’s speed and search health. Clean your database regularly, remove junk trackbacks, and stay on top of Google Search Console errors.
Related reading