WordPress introduces a groundbreaking enhancement known as Full-Site Editing (FSE). This significant update empowers users to revolutionize their website design and layout through an intuitive graphic interface, marking a notable stride toward the user experience offered by page builders. Notably, it opens up novel avenues for creating and tailoring themes on the platform. The advent of FSE heralds substantial implications not only for how users interact with WordPress but also for various components within its ecosystem. In this post, we will embark on a comprehensive exploration of WordPress Full-Site Editing, delving into its functionalities, impact, and the discussions surrounding a potential name change for brevity. The forthcoming discussion will kick off by elucidating the concept of Full-Site Editing and guiding users through a tutorial on leveraging this feature for seamless site modifications. Additionally, we will scrutinize the suite of tools it furnishes for theme development, capping off our exploration with an in-depth analysis of how this revolutionary feature is poised to influence developers, theme authors, and the landscape of existing page-builder plugins.
Create an online Community Website
Checkout BuddyX Theme Demos
Buy the BuddyX Pro theme and Community Bundle Addons and create a highly engaging community platform Today!
Table of Contents
ToggleWhat does WordPress Full-Site Editing entail?
Site editing is a pivotal aspect of crafting a distinctive online presence, enabling users to meticulously tailor the visual and navigational elements of their website. Within this comprehensive customization framework, the header stands out as a critical section where users can make impactful edits to refine the initial impression of their site. In the context of header editing, the focus is on three key components: the logo, site title, and navigation.
1. Header Editing: An Overview
-
Logo Customization

The logo is a visual cornerstone of brand identity, and header editing facilitates seamless modifications. Users can effortlessly upload, replace, or refine their site’s logo, ensuring that it harmonizes with the overall aesthetic and aligns with the brand narrative. This level of flexibility empowers users to maintain a consistent and professional appearance across their entire website.
-
Site Title Enhancement
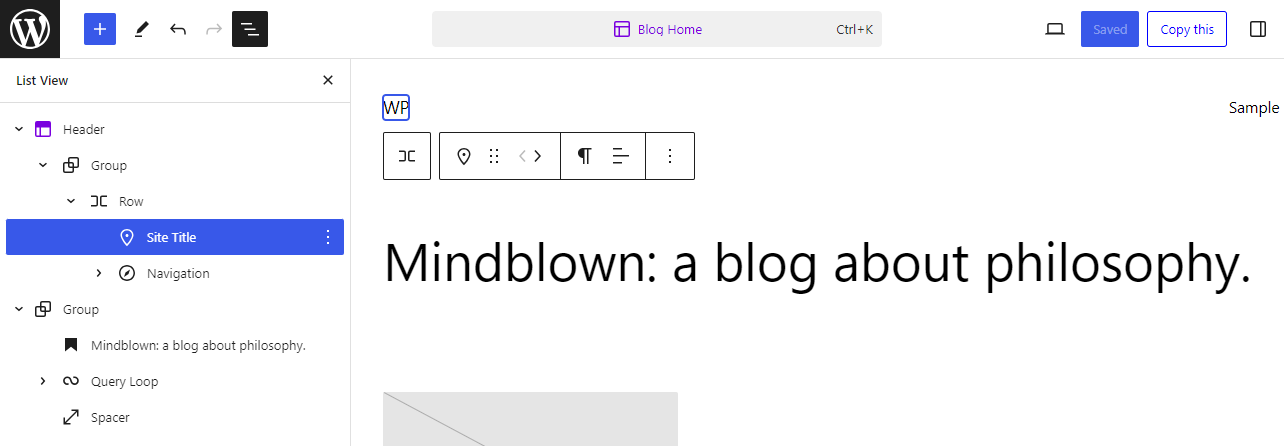
The site title represents a textual facet of brand recognition, and in the header editing interface, users have the opportunity to meticulously fine-tune this critical element. Whether it involves adjusting font styles, sizes, or color schemes, the editing options in the header enable users to showcase their site’s title in a manner that resonates with their brand image and design preferences.
-
Navigation Refinement

Navigation is a cornerstone of user experience, and the header editing functionality provides a sophisticated platform for refining this crucial aspect. Users can seamlessly edit navigation menus, rearrange items, and introduce dropdowns or submenus. This level of control ensures that site visitors can effortlessly navigate through the content, enhancing overall usability and engagement.
2. Group Editing: An Overview
let’s delve into the details of each point within the Group Editor for site editing, explaining the significance and customization options for each element:
-
Heading
The Heading block allows for the insertion and customization of headings within the content. Users can tailor font styles, sizes, colors, and alignment to ensure visually appealing and well-structured headings.
-
Query Loop
The Query Loop block dynamically fetches and displays a selection of posts based on specified criteria. Users can define parameters such as post type, category, or tags, offering a versatile and context-specific approach to content presentation.
-
Post Templates
Post Templates provide predefined structures for displaying individual posts within the main content. Users can choose from various templates, each offering a unique layout to enhance the visual representation of posts.
-
Featured Image
The Featured Image block highlights a specific image associated with a post or page. Users can upload or choose an image, adjusting its size and placement for optimal visual impact.
-
Title
The Title block enables the customization of titles for individual sections or content blocks. Users have the flexibility to adjust formatting, font styles, and alignment, ensuring seamless integration with the overall design.
-
Excerpt
The Excerpt block displays a concise summary or excerpt of a post or page. Users can control the length of the excerpt and apply styling options for seamless integration with the overall content.
-
Date
The Date block provides options to display the publication or modification date of a post or page. Users can choose date formats and styling preferences to maintain coherence with the overall site design.
-
Spacer
The Spacer block adds space between elements for improved visual organization. Users can adjust the height of the spacer, creating a balanced and aesthetically pleasing layout.
-
Pagination
The Pagination block divides content into multiple pages for enhanced readability. Users can choose pagination styles and configure items per page, tailoring the user experience for their audience.
-
Previous Page
The Previous Page block provides navigation back to the previous page. Users can adjust the appearance and styling of the link to ensure seamless integration with the site’s design.
-
Page Number
The Page Number block displays the current page number within a paginated set of content. Users can modify the appearance of the page number, aligning it with the overall design.
-
Next
The Next block offers a navigational link to move forward to the next page or set of content. Users can adjust the link’s appearance and styling for consistency with the site’s design.
-
Columns
The Columns block allows users to create multi-column layouts within their content. Users can define the number of columns, adjust widths, and add content to each column, creating a sophisticated and organized layout.
-
Column
This block is part of the Columns structure, representing an individual column within a multi-column layout. Users can add various content blocks within each column, tailoring the content presentation for specific needs.
-
Paragraph
The Paragraph block is fundamental for adding text content to the page. Users can modify text styles, alignment, and formatting to create clear and visually appealing paragraphs.
-
Buttons
The Buttons block allows users to insert multiple buttons for calls to action or navigation. Users can configure each button with unique text, links, and styling options, encouraging user interaction.
-
Button
This block represents an individual button within the Buttons structure. Users can define the button’s text, link, and appearance, tailoring it for specific purposes within the content.
-
Columns
This repetition of the Columns block signifies the ability to add multiple instances of multi-column layouts within the content. Users have the same features as the earlier Columns block, allowing for diverse and dynamic layouts.
3. Footer Editing: An Overview
-
Group

Organizing footer elements into groups is a key feature in full-site editing, allowing users to structure and manage related components seamlessly. By grouping items like copyright information, navigation links, and social media icons, users can easily customize and maintain a well-organized footer. This intuitive approach enhances the user experience, providing a more efficient way to tailor specific sections of the footer independently.
-
Column

Columns play a vital role in crafting dynamic footers by facilitating a multi-column layout. Users can arrange and customize various content types within these columns, such as widgets, text, or social media feeds. The flexibility of columns enables users to design responsive footers that adapt to different screen sizes, offering granular control over the visual presentation of their site’s bottom section.
-
WordPress Full-Site Editing A Deep Dive Into The New Feature Stack
The stacking feature within columns or groups is a powerful tool for creating a visually appealing sequence of elements in the footer. Users can strategically arrange components like copyright text, contact information, or call-to-action buttons in a vertical stack, ensuring a clear hierarchy. This adaptability allows for easy rearrangement of stacked elements, providing users with the means to fine-tune the appearance of their footers.
-
Site Tagline
Incorporating a site tagline into the footer is a strategic way to convey additional branding or contextual information. Users can seamlessly integrate and customize this succinct description using blocks. This feature enables users to emphasize their site’s identity within the footer, reinforcing the brand while maintaining a cohesive design throughout the website.
-
Site Logo

Full-site editing offers users the ability to seamlessly integrate and customize the site logo within the footer. This graphical representation of the website’s brand can be strategically placed to enhance the visual appeal of the footer. With adjustable parameters such as size and alignment, users can harmonize the site logo with other footer elements, contributing to a cohesive and branded appearance.
-
Site Title
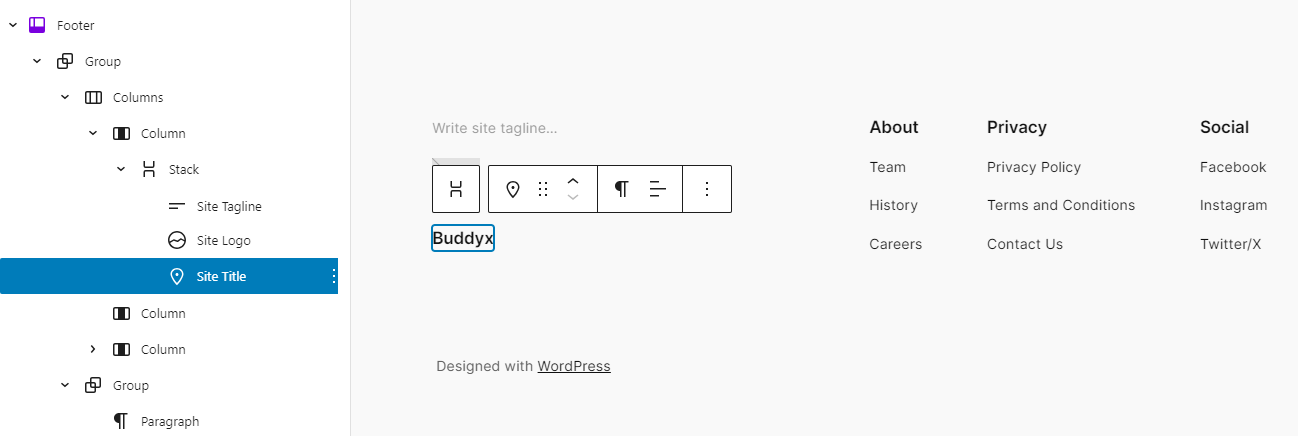
The inclusion of the site title in the footer provides users with a versatile element to emphasize their brand or website name. Customizable blocks allow users to fine-tune the appearance of the site title, adjusting factors such as font style, size, and color. This approach ensures a consistent branding experience within the footer, reinforcing the site’s identity throughout the website.
How do you customize WordPress using Full-Site Editing?
Initially, I will discuss how users can make the most of Full-Site Editing. Subsequently, we will explore the reasons why this feature is valuable for developers and theme designers.
1. PREREQUISITES FOR USING FSE
To make the most of Full-Site Editing, it’s crucial to have a WordPress site running at least version 5.9. Alternatively, you can use a lower version, but in that case, the Gutenberg plugin must be installed and kept up to date.
The second essential requirement is a block theme designed to leverage this new feature. We’ll delve into the distinctions between block themes and classic themes later on. For now, consider Twenty Twenty-Three, a viable option released with WordPress 5.9, which I’ll use in this Full-Site Editing tutorial. Additional options can be found in the resources section at the end.
If you’re exploring WordPress Full-Site Editing for the first time, it’s advisable to do so on a staging site or in a local development environment. This allows you to experiment freely without affecting your live site, providing room for trial and error.
2. OVERVIEW OF THE USER INTERFACE
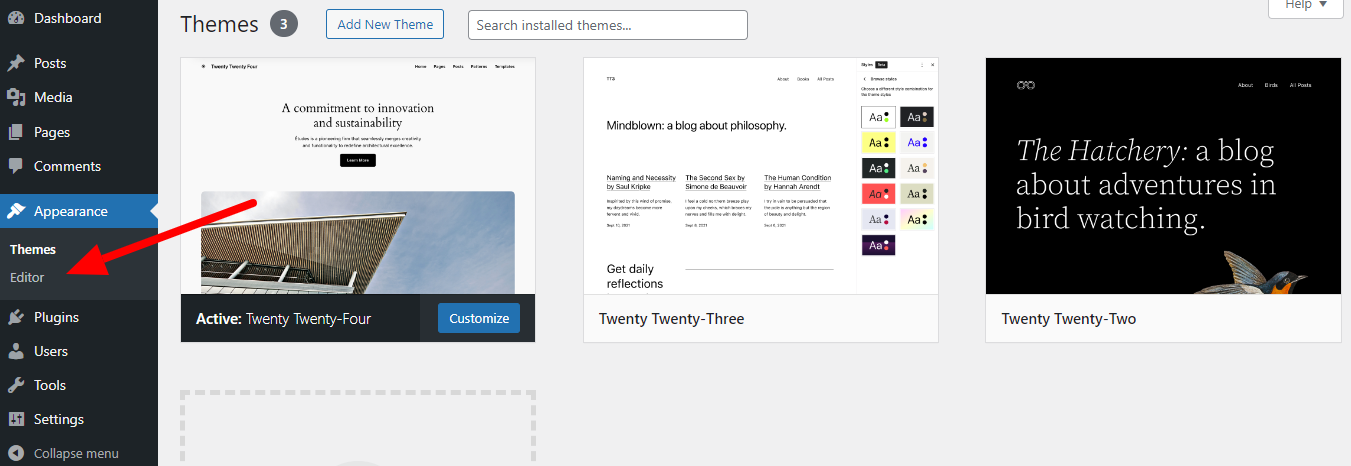
Once logged into your test site, navigate to Full-Site Editing through the Appearance > Editor menu. Take note that the widget and Customizer options are not present in this context.
Another route to access this is by using the Edit Site link located in the WordPress admin taskbar on the front end. Either method will bring you to the primary editor interface.
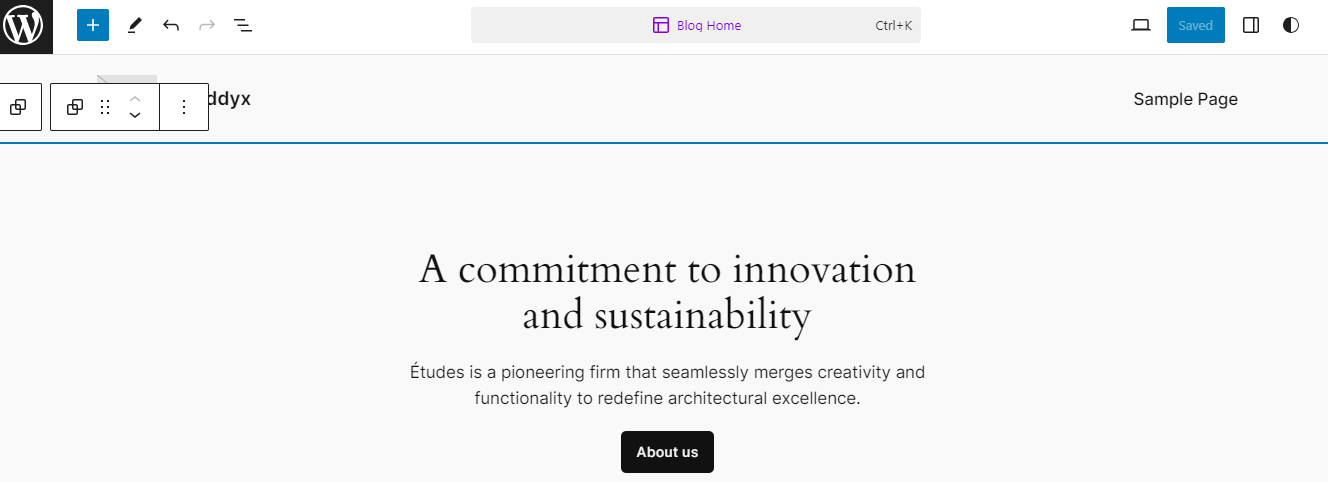
Let’s go through all the available options in this interface.
1. Top Left Corner
Initiate our walkthrough here as it’s easily overlooked. Clicking on the WordPress logo reveals a menu for editing templates and template parts, along with a link to return to the WordPress dashboard.
2. Top Bar
This section, familiar to Gutenberg editor users, includes options to add blocks and block patterns. It facilitates toggling between editing and selecting blocks and provides undo/redo buttons. Additionally, you can open a list view of the current page, select different template parts, and navigate directly to them.
3. Top Right Corner
Located in the top right corner, this area features buttons to save changes and preview the design on various screen sizes. The gear icon opens up settings for both templates and individual blocks. Adjacent to this, there’s an option to customize Global Styles. The three-dot icon provides display options for the editor, the ability to export templates and template parts, and access to the welcome guide.
4. Center
The central part of the interface is the main editing screen. This is where you’ll implement changes to page templates and work with blocks. It serves as an accurate representation of your design and includes controls to add blocks and other elements to the page.
Many of these options are toggleable, allowing you to have only the ones open that are essential and relevant to your needs.
1. Presets for Global Styles
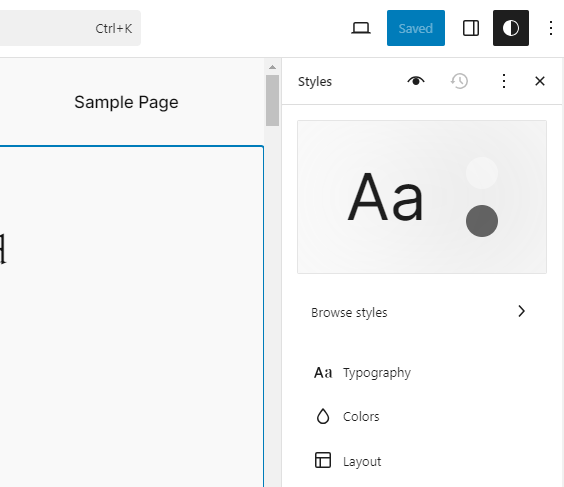
In Twenty Twenty-Three, you’ll find choices for typography, colors, and layout in the Global Styles menu. We’ll delve into these options shortly. For now, let’s shift our focus to the most captivating aspect of the Global Styles menu—the preset color themes. Discover them by clicking on “Browse styles.”
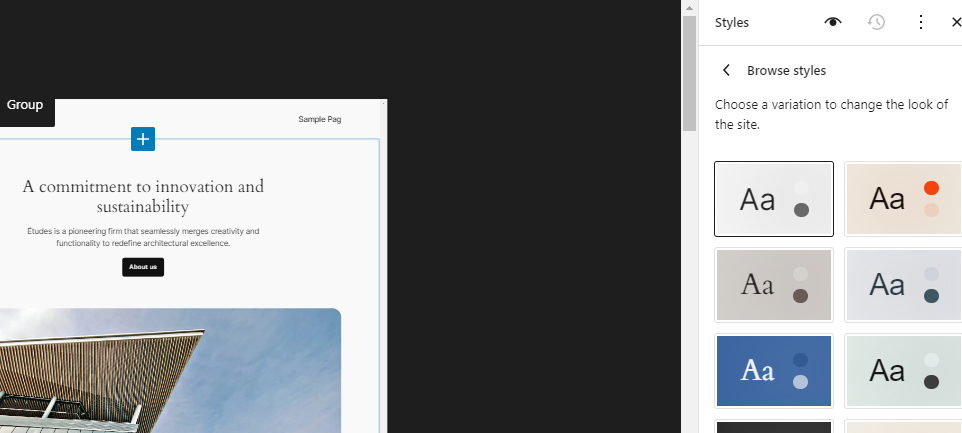
Within this menu, developers can provide styling presets for the entire theme. Hover over any of the options to preview its color and font scheme. To adopt the chosen look for your entire theme, a single click is all it takes.
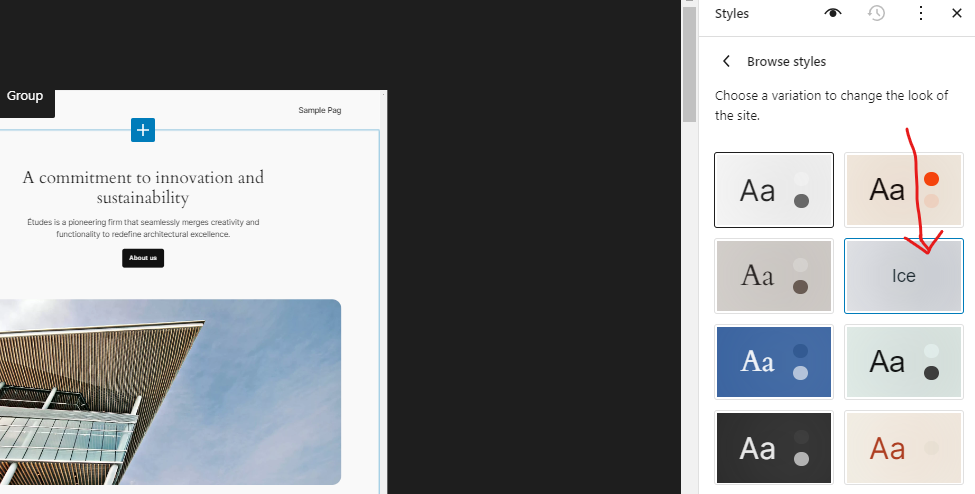
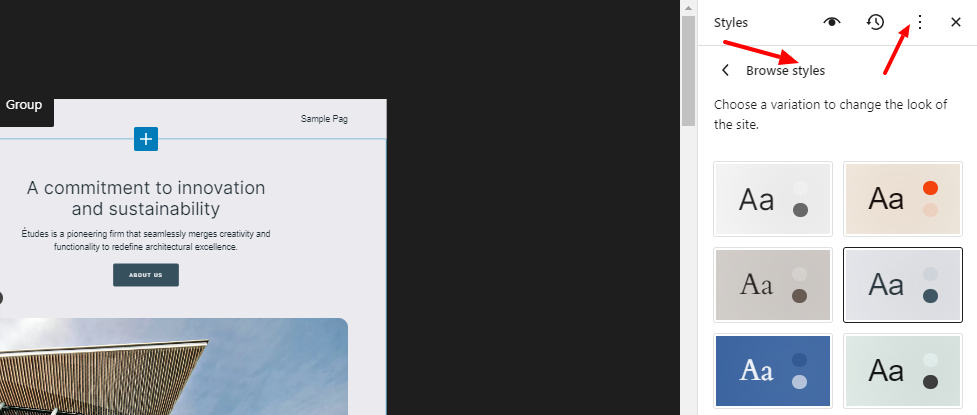
This feature is particularly appealing to me because it provides users with various versions of the same theme, serving as convenient starting points for their unique creations. It’s akin to themes being bundled with several pre-designed child themes. Reverting to the previous state is also possible by clicking the three dots at the top and selecting “Reset to default.”
2. GLOBAL STYLES: TYPOGRAPHY
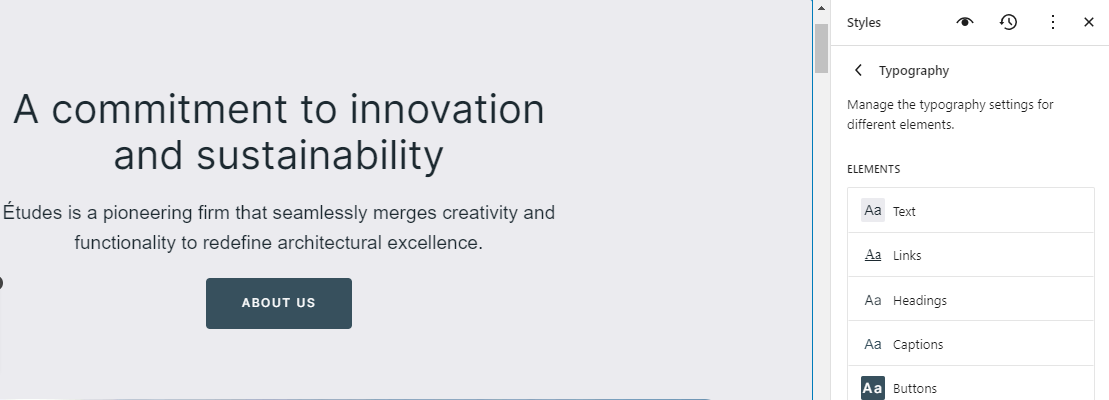
Upon clicking on “Typography,” you will be directed to a submenu where you can decide whether to personalize the styling for general text or links.
Another click will take you to a subsection where you can implement the actual modifications.

As evident, customization options include the ability to modify the font family, size, line height, and appearance, encompassing font-weight and slant. The available choices are theme-dependent. For instance, under Font Family, the options are restricted to System Font and Source Serif Pro in Twenty Twenty-Three, as these are the only fonts packaged with this theme.
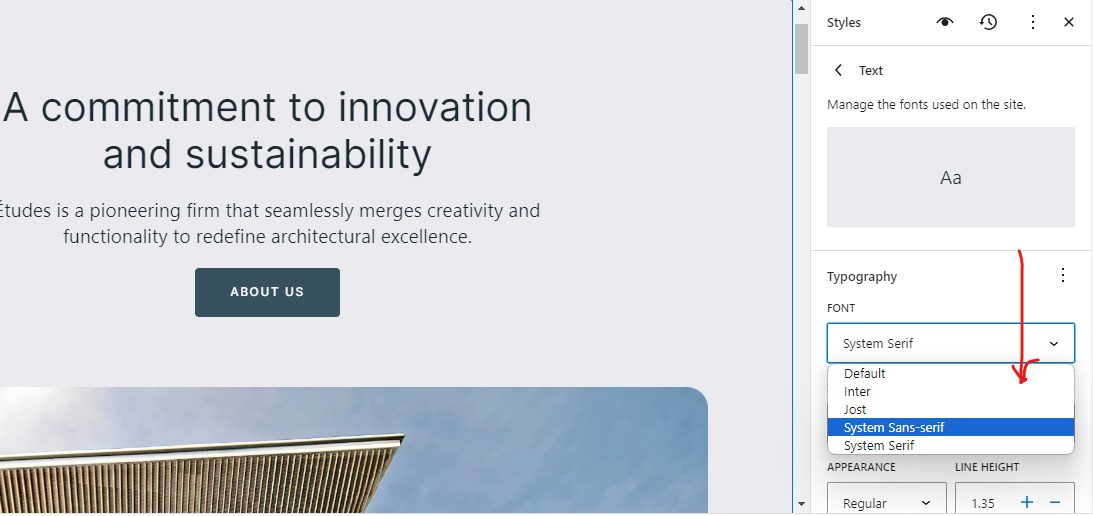
Nevertheless, this limitation is partly because full support for (local) web fonts only became available in WordPress 6.0, and this theme was released before that. Similarly, the numerical values under “Size” are preconfigured defaults established by the theme authors. Alternatively, you can click on the small icon in the upper right corner to input a custom value.
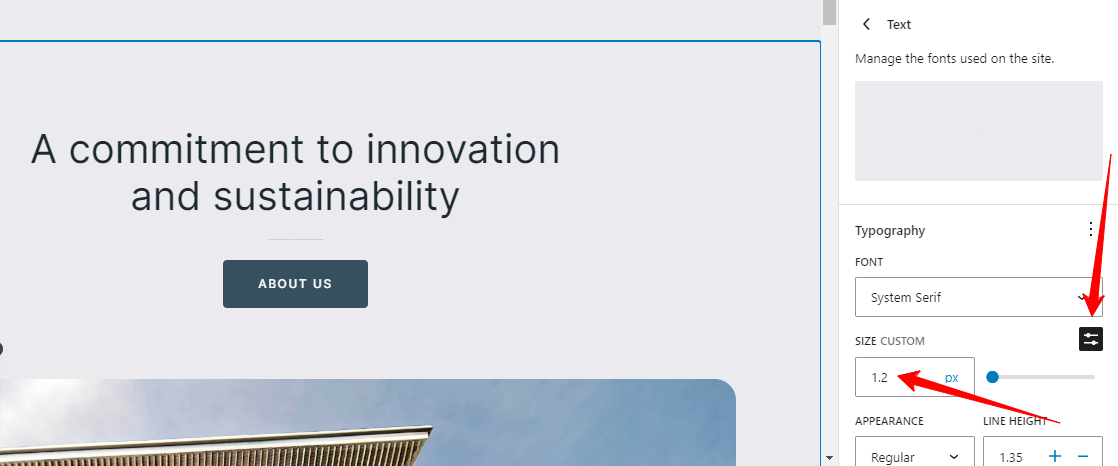
The concept of line-height is self-explanatory. In the Appearance drop-down menu, you can select font variations from a provided list.
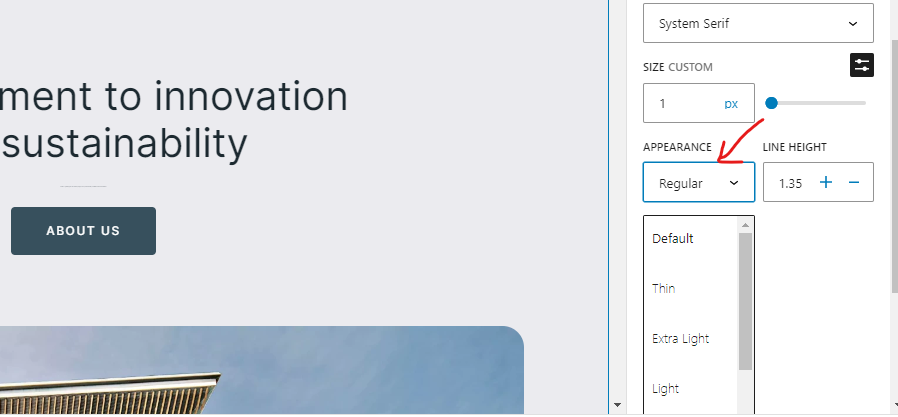
Selecting any of these options will instantly reflect changes on the editing screen.
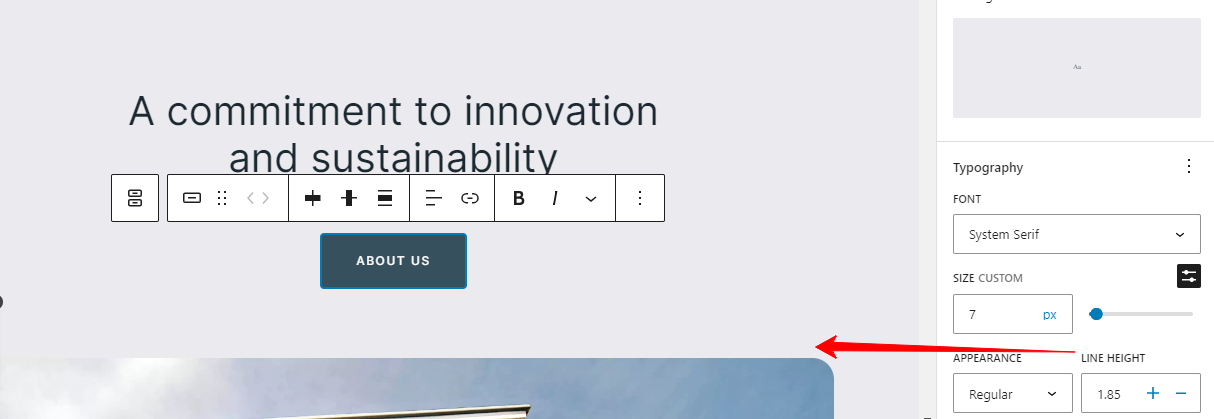
If you’re dissatisfied with the modifications you’ve implemented, you can easily revert to the default settings, as mentioned earlier.
3. GLOBAL COLORS AND LAYOUT
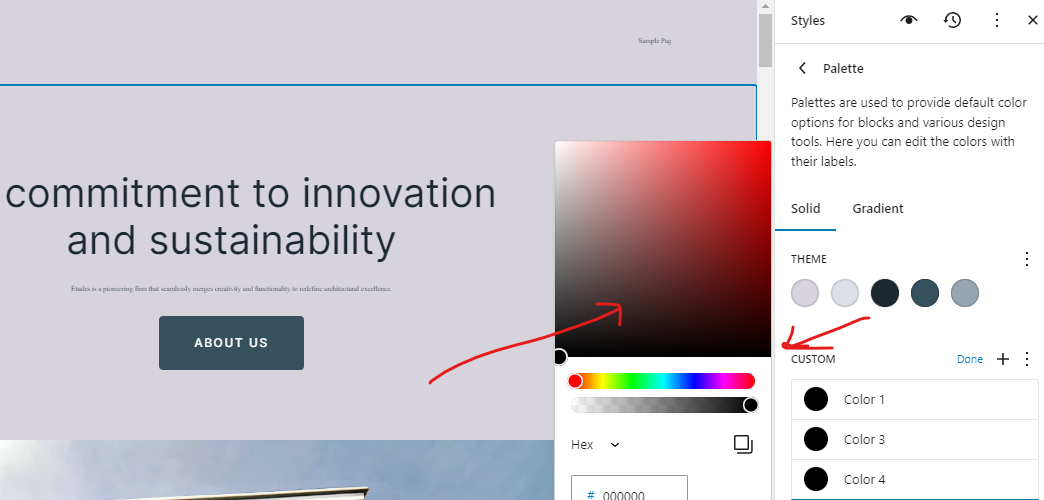
In the Colors section, you can alter the hue of various elements (obviously!).
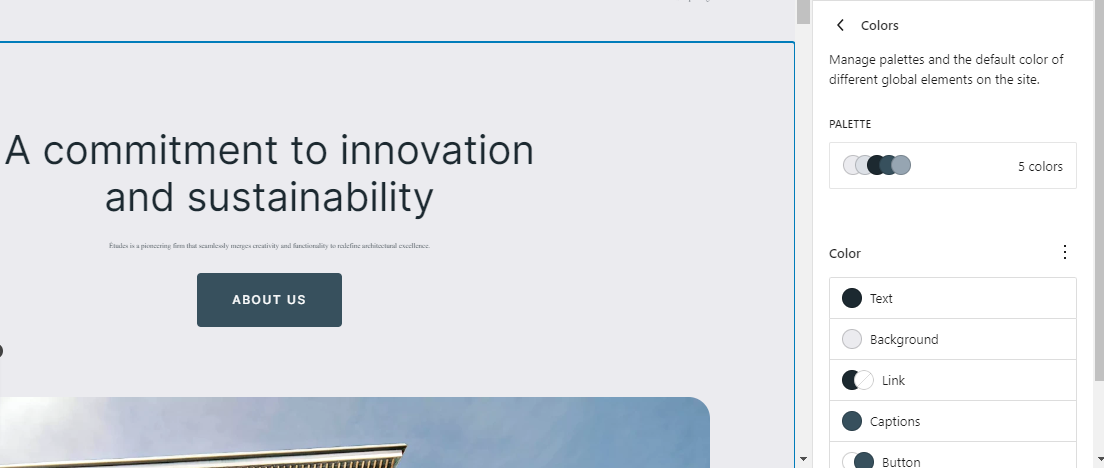
What adds intrigue here is the Palette option, allowing the theme to furnish its color palette, complete with gradients. This is in addition to the default choices offered by Gutenberg and the option for users to create custom colors.
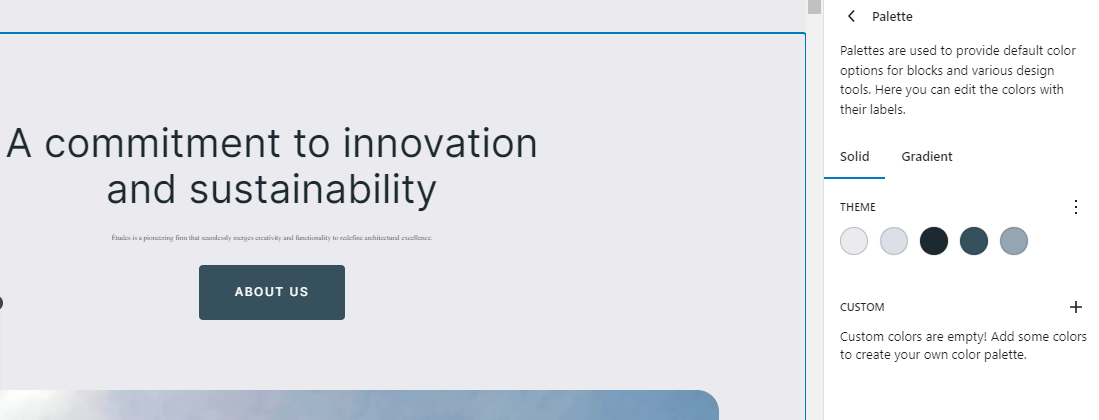
Additionally, similar to the typography customization, the theme presents various options for elements where color changes can be applied. In Twenty Twenty-Three, these include Background, Text, and Links. Upon selecting any of these, you are directed to a screen where you can effortlessly choose a color or gradient from the provided options or create your own. Once selected, your choice automatically reflects on the editing screen.
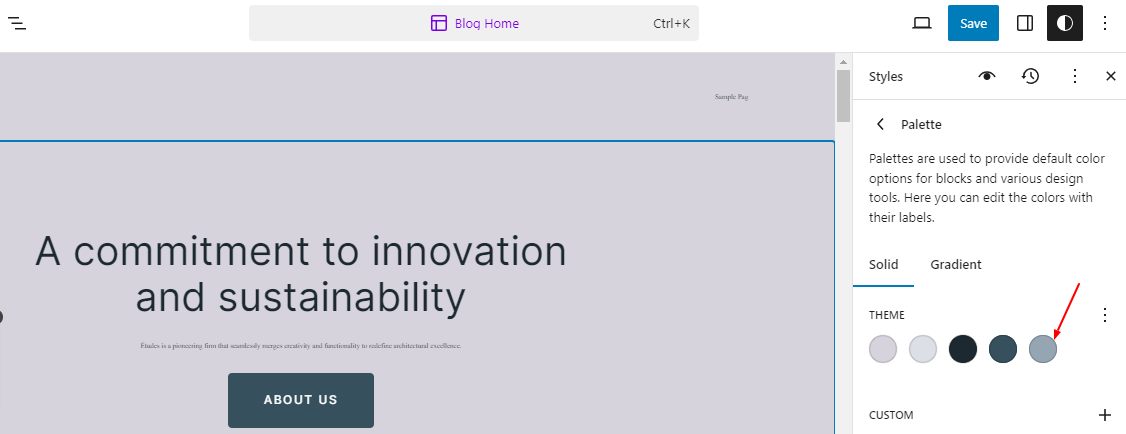
An included color picker enables you to define custom hues or input color codes in RGB, HSL, or HEX format.
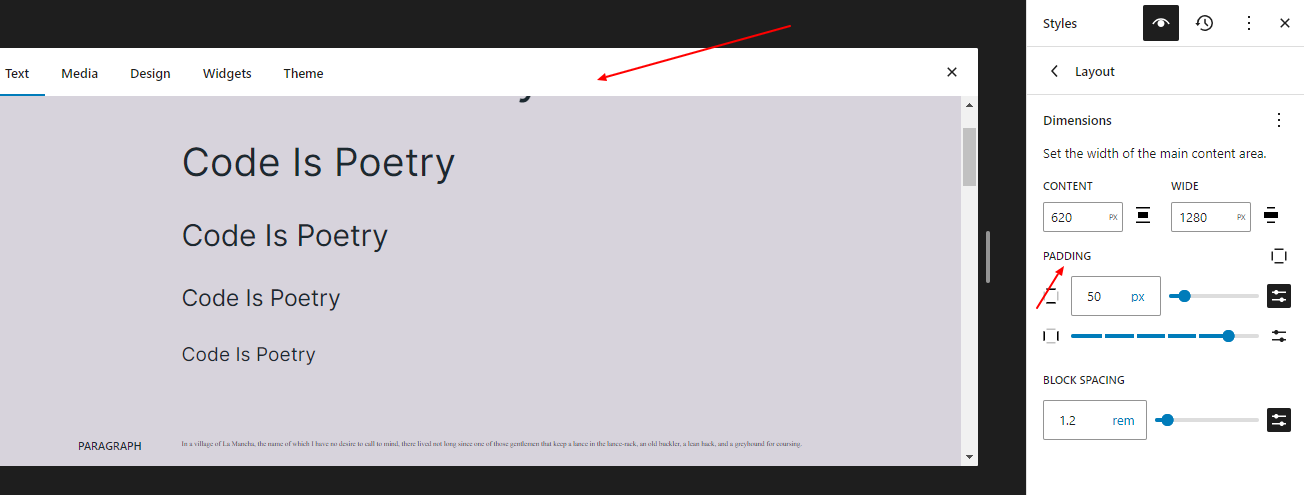
In this theme, the Layout option exclusively permits the addition of padding around the homepage.
CHANGING STYLES FOR INDIVIDUAL BLOCKS
Styling defaults are not limited to the entire website; you can also configure them for individual blocks. To do so, navigate to the bottom of the Global Styles menu, where you’ll find the option labeled “Blocks.”
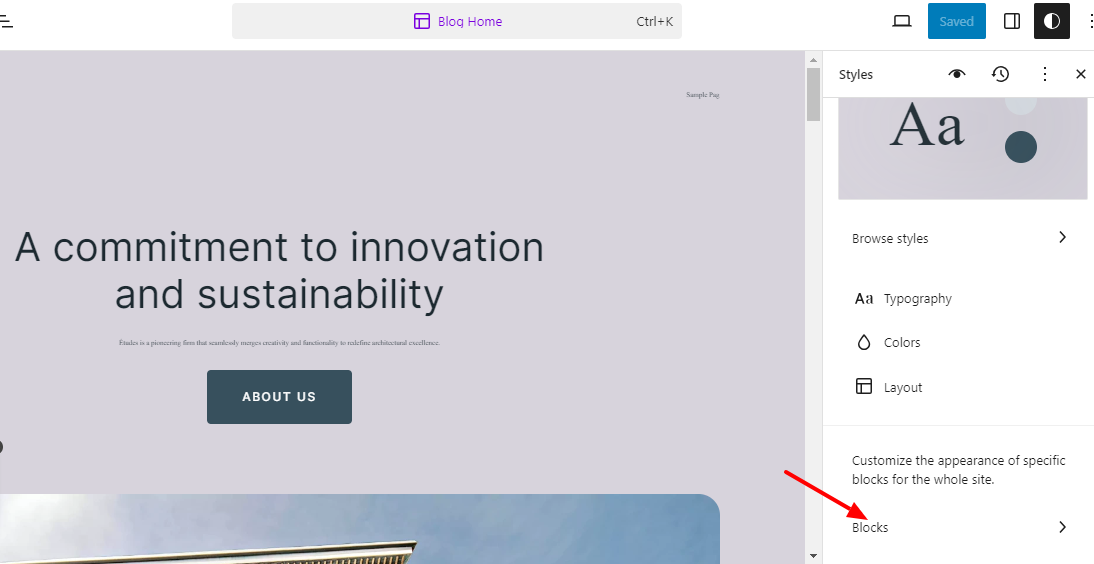
Upon clicking it, you’ll encounter a comprehensive list of all the default blocks provided by WordPress.
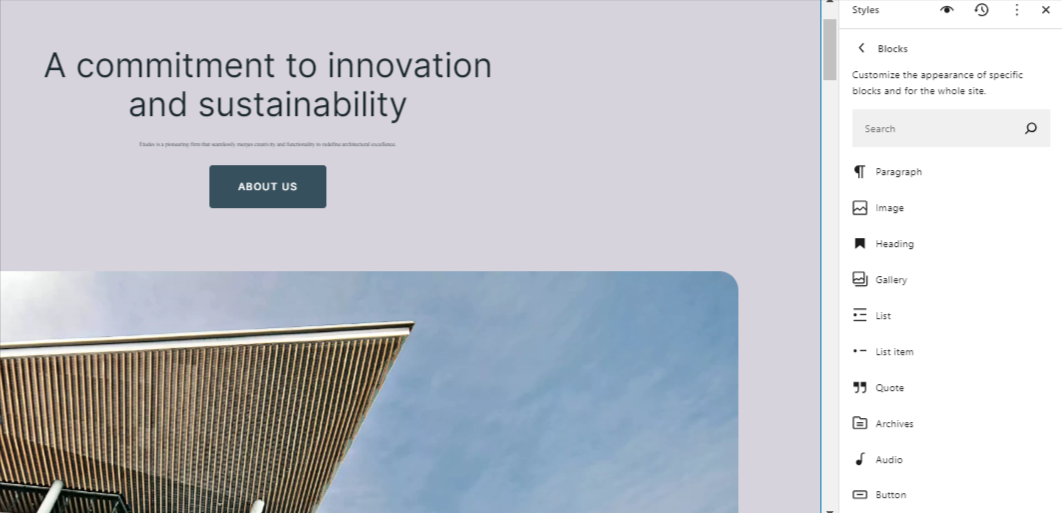
Click those in turn to find similar options to customize their design on a per-block basis. For example, below, I have set the link color globally to blue but set the color for the Post Title block (which is also a link) to contrast. As a consequence, Contrast overwrites the initial value, and the title comes out in that color.
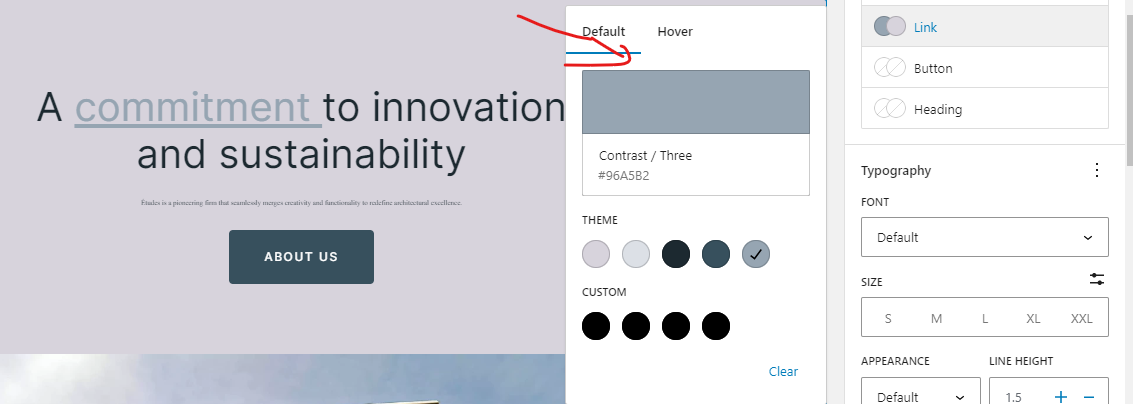
If you have experience with CSS, this principle should be quite familiar. Establish some site-wide standards at the beginning of the style sheet and then override them with customizations lower down in the cascade. The same concept applies here.
Also Read: An Odyssey of Innovation: WordPress’s 20-Year Impact on Web Development
MOVING BLOCKS AROUND
Effecting layout changes operates in a manner akin to the primary WordPress block editor. The entirety of the screen comprises blocks, whether individually or grouped as block patterns. Therefore, you have the flexibility to move and customize them as needed. For instance, the central component of the homepage is the Query Loop block, responsible for presenting the latest blog posts. Yet, it, too, is composed of distinct blocks, namely Post Title, Post Featured Image, Post Excerpt, Post Date, Spacer, and Pagination.
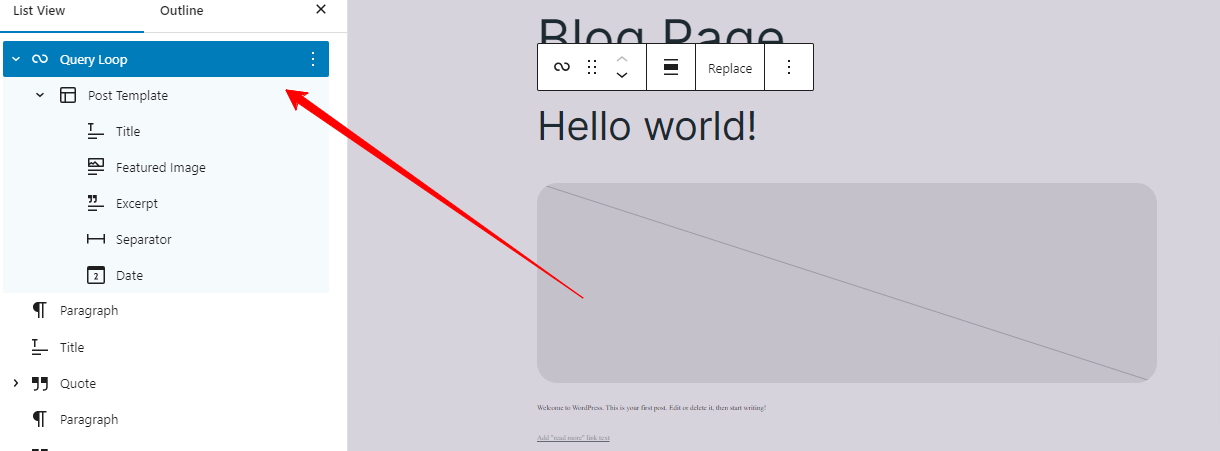
If you wish to modify its appearance, you can easily do so. For instance, click on the Post Featured Image block and utilize the arrows in the toolbar to reposition it either above or below the post title.

As an alternative, hover over the block and utilize the Drag button (represented by six dots) to relocate it to a different position. Upon saving these changes, they will be reflected in the design of your site.
USING BLOCK OPTIONS- WordPress Full-Site Editing
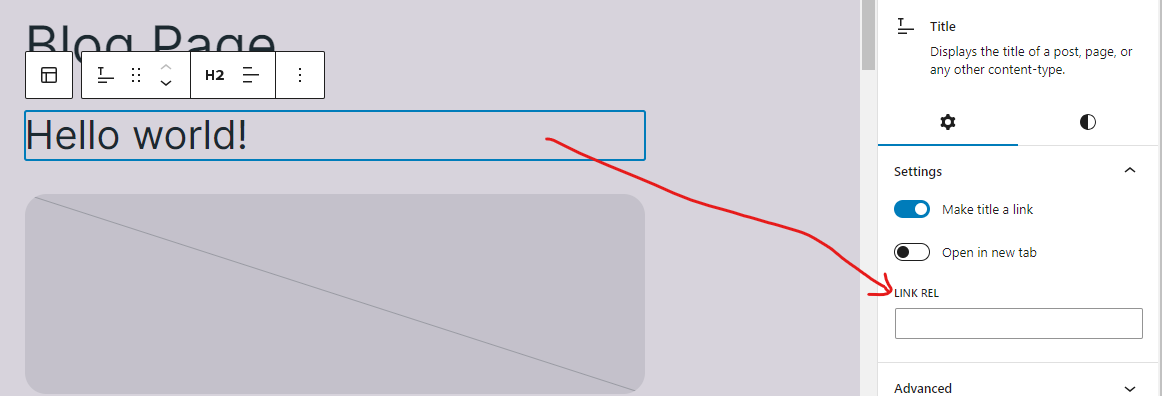
The options available in this area are contingent on the specific block you are working with. For instance:
- Post Featured Image: Offers choices to add margin, padding, and configure image dimensions.
- Pagination: Provides control over justification, orientation of elements, wrapping, colors, and the display of arrows, chevrons, or no indicators.
- Post Title: Apart from setting colors, you can determine whether the title should be a link, open in a new tab, or have a rel= attribute. Additionally, you can manage colors and typography (including the option to use Title Case) and add a margin.
This pattern continues, and it’s essential to note that there are often additional settings hidden, accessible via a plus or three-dot icon within the respective sections.
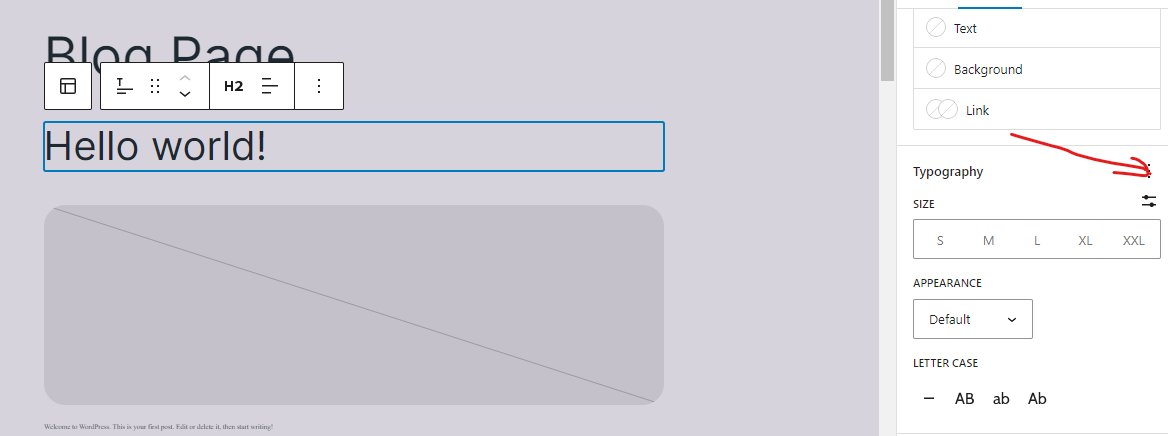
Additionally, remember to check the settings in the toolbar at the top of selected blocks, as they can play a crucial role. For instance, with the Post Title block, this is where you determine the heading order (h1-h6), which is an essential consideration for SEO.
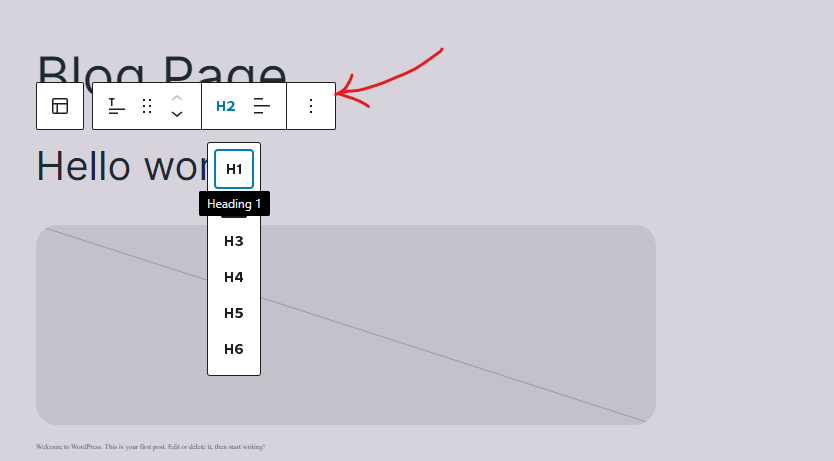
ADDING AND REMOVING BLOCKS- WordPress Full-Site Editing
Certainly, customization extends beyond the provided blocks, allowing you to add your own. The process mirrors that of the content editor and offers various options:
- Hover over a space in the template until a plus button appears, then click it. Subsequently, search or choose your desired block from the list.
- For existing blocks, click on them and utilize the options button in the top bar to select “Insert before” or “Insert after.”
- Employ the plus button located in the upper left corner to view and search the comprehensive list of available blocks. From there, you can drag and drop them to your preferred locations.
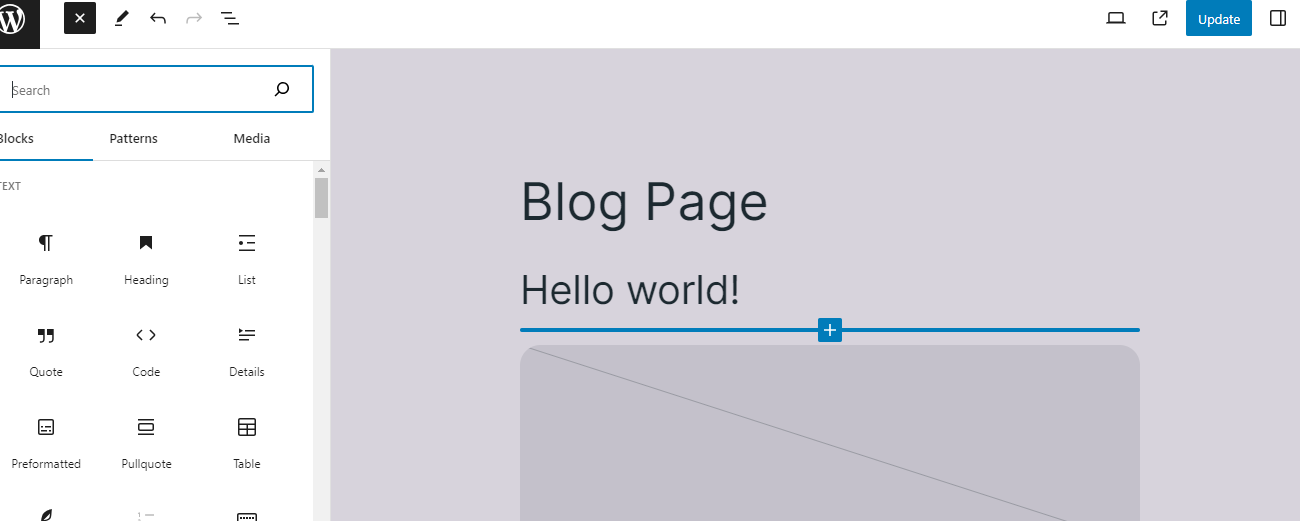
In certain locations and within existing blocks, you will encounter icons that enable the addition of more blocks. Additionally, you can incorporate block patterns, but we will delve into this topic further below.
This leads to the question: How does any of this prove beneficial?
The answer lies in the fact that you can effortlessly incorporate both static and dynamic content into the homepage. For instance, you could include a heading and paragraph above the Query Loop block, serving as an introduction to your blog.
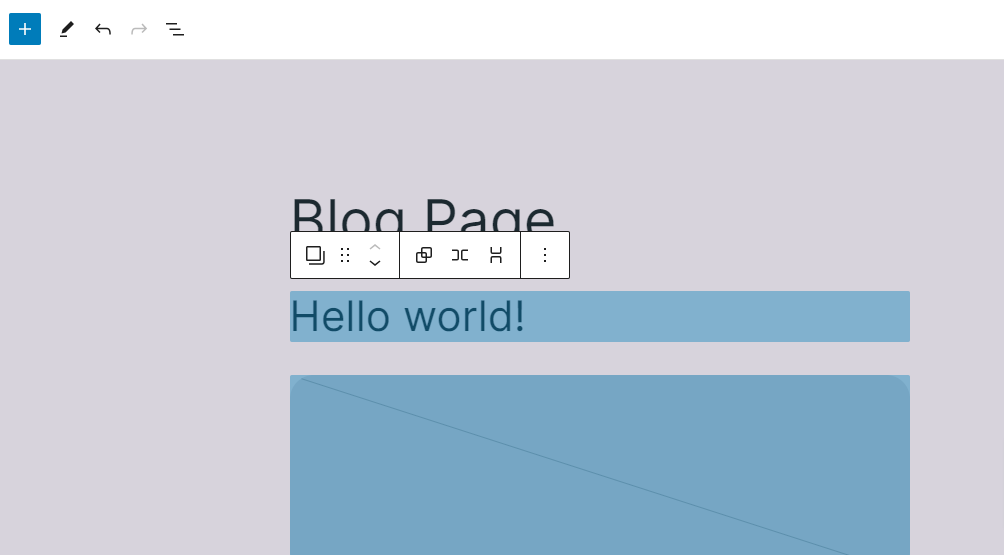
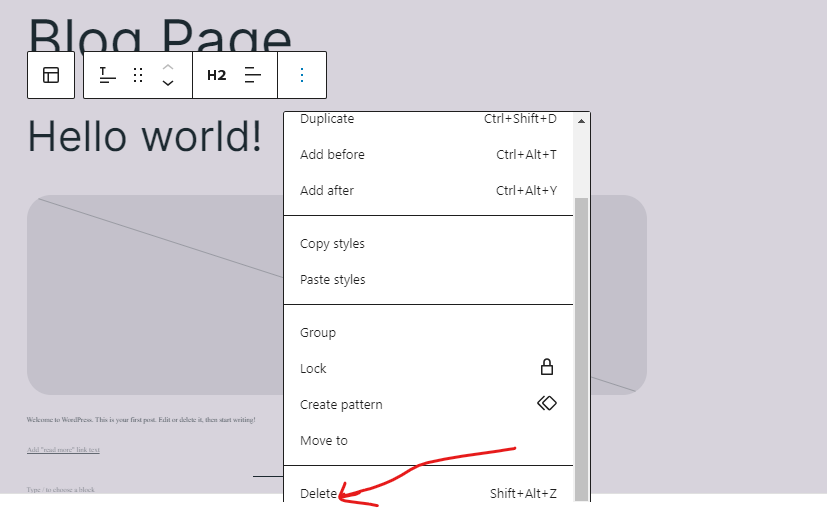
Of course, removing blocks you don’t want is just as straightforward. Simply select a block and press the “Del or backspace button” on your keyboard, or opt for removal through the block options.
You also possess the capability to access a list view at the top (identified by the icon with three staggered lines) and navigate to blocks from there, allowing you to choose to delete them instantly if needed.
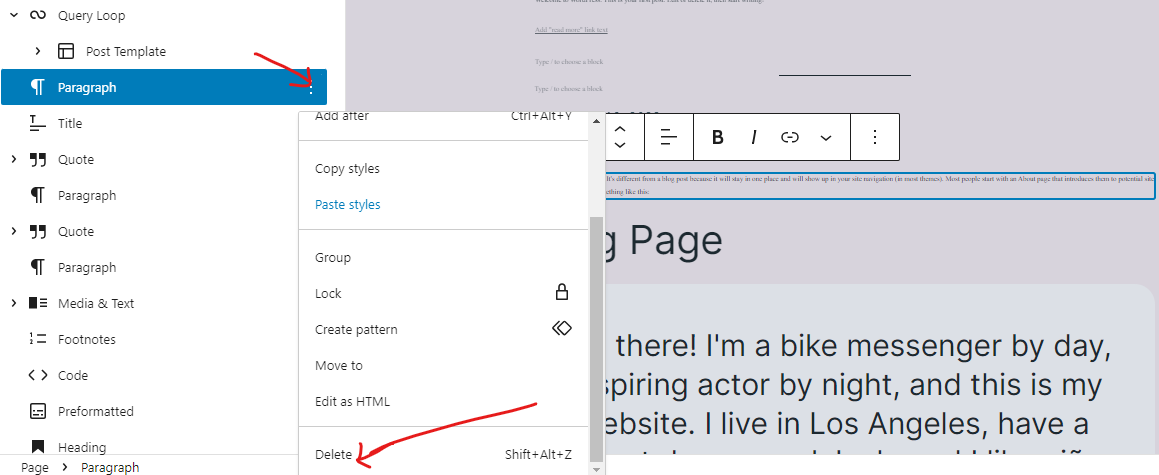
This feature provides an excellent overview of the block structure for the specific section of the site you are currently editing.
EXCHANGING AND EDITING TEMPLATE PARTS
Template parts refer to complete sections within templates that can be interchanged as a whole and individually modified. In the instance of Twenty Twenty-Three, these encompass the header and footer. This can be observed in the template options on the right or by clicking the arrow in the top bar.
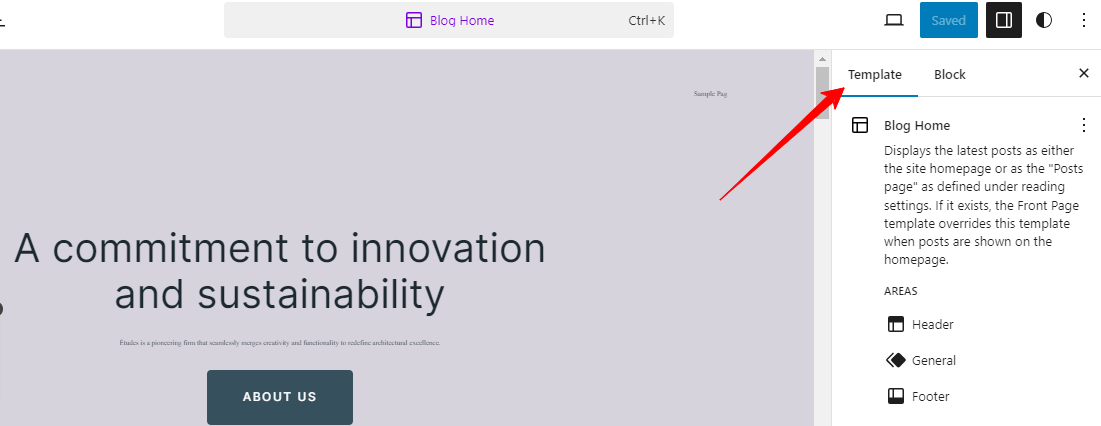
Template parts are essentially groups of blocks on a page, and you can edit them using the methods described earlier. However, what distinguishes them is the ability for themes to provide variations, enabling you to alter the entire part with a single click.
As an illustration, when you choose the header in the example, a “Replace” option will appear in the settings bar at the bottom.

Upon clicking it, you’ll be able to view the variations that the theme provides for this template part, along with suitable block patterns.

Twenty Twenty-Three includes various default options to select from. Clicking on any of them will trigger Full-Site Editing to automatically replace the entire header with the chosen option.

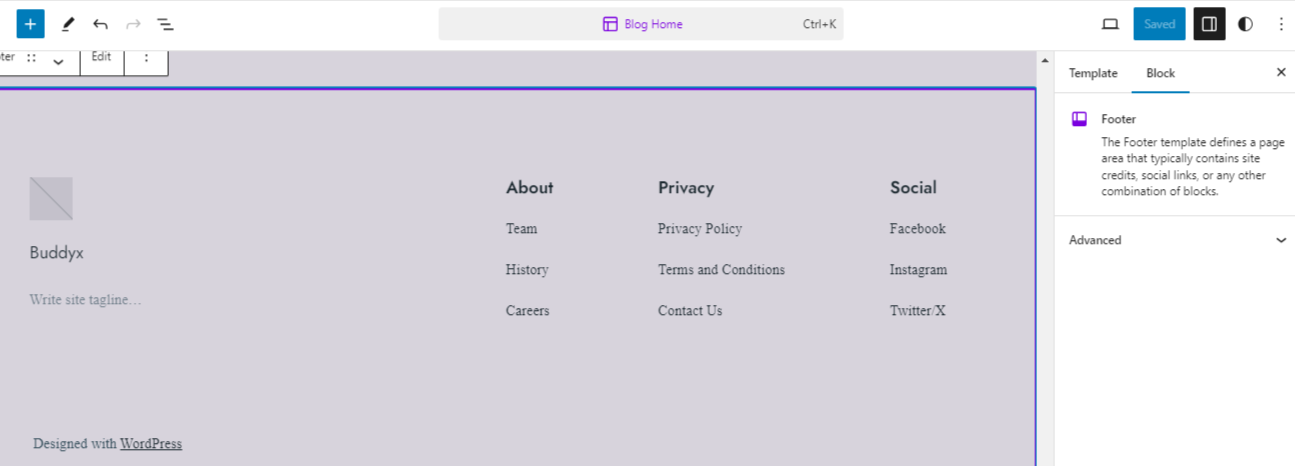
Similarly, this process applies to the footer, and Twenty Twenty-Two provides several options for you to choose from.
Impacts of Full-Site Editing on the WordPress Ecosystem
In addition to offering a tutorial on utilizing Full-Site Editing, I aim to discuss the implications of its introduction for the WordPress ecosystem and those involved in the platform.
Opportunities in Employment for Developers and Designers
the introduction of WordPress itself, page builders, and similar technologies aimed at simplifying website creation hasn’t diminished the need for professional assistance. This trend persists with Full-Site Editing. While users can now manage routine tasks independently, like altering colors or fonts, there remain numerous complex tasks that non-technical site owners cannot execute with the available tools, necessitating professional intervention. Furthermore, for those seeking a distinctive design rather than relying on common templates, the expertise of a designer and/or developer is indispensable.
Moreover, the capability to create a well-designed website doesn’t equate to universal proficiency in design. Design involves more than technical skill—it encompasses creativity and an understanding of aesthetics. Additionally, not everyone desires to undertake the work themselves; many prefer to enlist the services of skilled professionals. Lastly, a successful website entails considerations beyond design, such as SEO, performance, security, and maintenance.
In essence, while the barriers to website construction may have diminished, the notion of designers and developers becoming obsolete is unfounded. On the contrary, the transition to new tools presents ample opportunities for professionals to build services and products around these evolving technologies.
Also Read: 10 Best Block Plugins for WordPress
FULL-SITE EDITING VS. PAGE BUILDER PLUGINS
The future of existing page builder plugins, such as Divi, Elementor, and others, is a significant uncertainty in light of Full-Site Editing (FSE) capabilities in WordPress. The question arises: Will these plugins survive when WordPress itself can perform many functions they were originally designed for?
To begin with, it’s improbable that everyone will swiftly transition away from the tools they are accustomed to using. Page builder plugins are likely to persist for a considerable period, especially considering that some of them currently offer more advanced features than what FSE provides in its current state. The familiarity and established nature of these plugins, often bundled with themes, make a sudden loss of market share unlikely. Nevertheless, FSE is expected to gradually impact its market share, particularly among new users who adopt it as an integral part of WordPress.
As with any technology, page builder plugins will need to evolve to remain competitive, offering features that FSE may lack. One possible direction is the development of hybrid plugins that extend WordPress’ native page editor—a strategy already seen with plugins compatible with both Gutenberg and the Classic Editor.
Conclusion on WordPress Full-Site Editing
Full-Site Editing marks an exciting new phase in the evolution of WordPress, streamlining the design process and bringing greater consistency across the platform. This presents fresh opportunities for content creators and users to personalize their pages.
However, the introduction of FSE also poses intriguing challenges for developers and theme designers. It necessitates adjustments to theme architecture, introduces novel markups, and alters workflows. Despite these changes, FSE offers significant advantages, presenting new possibilities and expediting the prototyping and creation of themes with reduced coding requirements.
Throughout this discussion, we’ve explored the detailed offerings of FSE. In my personal assessment, it stands as a well-conceived feature, impressing with its current capabilities. I highly recommend incorporating it into your WordPress skill set.
Certainly, there is room for enhancement. For instance, I couldn’t find an option to modify the hover or active color for links and other elements. Additionally, it may not match the potency of existing page builder plugins, although I anticipate that future updates will bridge this gap. Nevertheless, I appreciate its modularity and the flexibility it provides to customize various theme components uniquely. I am inclined to explore its usage further in the future. How about you?
Interesting Reads:
What’s Coming in WordPress 6.2

