9 min read
How to Send Invoices in WooCommerce

One of the essential tasks of running an online store is to send invoices to your customers. WooCommerce, the most popular and powerful e-commerce platform for WordPress, makes this easy and flexible. You can use WooCommerce to create and manage your online store, as well as to send invoices in WooCommerce using various methods.
Invoices are important documents that show the details of a transaction, such as the products or services sold, the prices, the taxes, the payment methods, and the terms and conditions. Invoices help you keep track of your sales, manage your cash flow, and comply with tax regulations. Invoices also help you build trust and credibility with your customers, as they provide proof of purchase and a professional image.
But how do you send invoices in WooCommerce? There are different methods you can use, depending on your preferences and needs. In this blog post, we will show you some of the best ways to send invoices in WooCommerce, using plugins or extensions that add this functionality to your store.

Flexible PDF Invoices for WooCommerce & WordPress
WooCommerce Emails
WooCommerce is a powerful e-commerce platform that allows you to manage an online store seamlessly. One of its key features is the ability to send automated emails to customers for various actions, such as order confirmations, shipping notifications, and customer inquiries. These emails keep customers informed and engaged, enhancing their overall shopping experience. However, managing and sending invoices manually can be time-consuming and prone to errors, which is why integrating a flexible PDF invoice solution is essential. By using Rev.io, businesses can streamline their billing processes and reduce the likelihood of errors. This integration ensures that all financial transactions are handled efficiently, saving time and improving accuracy.
Why Do You Need WooCommerce Invoices?
- Professionalism: Automatically generated invoices give your business a professional appearance, building trust with your customers.
- Legal Compliance: Many jurisdictions require businesses to provide invoices for sales. WooCommerce invoices ensure you meet these legal obligations.
- Record Keeping: Invoices serve as a crucial record-keeping tool for both your business and your customers, helping with accounting and financial audits.
- Customer Convenience: Providing invoices directly to customers’ email saves them time and effort, enhancing their buying experience.
- Operational Efficiency: Automating invoice generation reduces the administrative burden on your team, allowing them to focus on other essential tasks.
How to Automatically Create and Send an Invoice in WooCommerce
1. Install a Plugin
- Flexible PDF Invoices for WooCommerce & WordPress: Start by installing a reliable plugin like the “Flexible PDF Invoices for
- WooCommerce & WordPress” from the WordPress plugin repository. This plugin simplifies the process of creating and sending invoices.
2. Plugin Configuration
- After installation, navigate to the plugin settings in your WordPress dashboard.
- Configure the basic settings, such as your business details (name, address, tax information) and the template design for your invoices.
- Customize the invoice layout to include your logo, colours, and any other branding elements.
3. Automation Settings
- In the plugin settings, enable the option to automatically generate and send invoices. Typically, you can set this to trigger on specific order statuses like “Completed” or “Processing.”
- Choose the email template to be used for sending invoices. Most plugins provide a default email template that you can customize to match your brand voice and style.
4. Test the Setup
- Before going live, place a test order to ensure that the invoice is generated correctly and sent to the customer’s email address.
- Check the invoice for accuracy, including product details, pricing, tax, and business information.
5. Monitor and Adjust
- Once the system is set up, monitor the process to ensure invoices are being sent as expected.
- Periodically review the settings and templates to ensure they remain up-to-date with any changes in your business information or compliance requirements.
By integrating flexible PDF invoice solutions with WooCommerce, you can streamline your invoicing process, ensure compliance, and enhance the customer experience. This automation not only saves time but also reduces errors, contributing to a more efficient and professional online store operation.
How to Send Invoices in WooCommerce Store
Step 1: Install a WooCommerce invoice plugin
To send invoices in WooCommerce, you need to install a plugin that allows you to create and send invoices, such as WooCommerce PDF Invoices & Packing Slips. This plugin allows you to automatically generate and attach PDF invoices to the order confirmation emails that are sent to your customers. You can also download or print the invoices from the order admin page.
The plugin comes with several customizable templates that you can use to create professional-looking invoices. You can also add your own logo, company details, and custom notes to the invoices. The plugin supports multiple languages and currencies, as well as full tax compliance.
WooCommerce PDF Invoices & Packing Slips is a free plugin that you can install from the WordPress plugin directory. If you want more features, such as custom fields, sequential invoice numbers, or premium support, you can upgrade to the premium version of the plugin.
To install the plugin, go to your WordPress dashboard and navigate to Plugins > Add New. Search for “WooCommerce PDF Invoices & Packing Slips” and click on the Install Now button under the plugin name. Then click on the Activate button to activate it.

Step 2: Run the setup wizard
After activating the plugin, you will see a notice asking you to run the setup wizard. The setup wizard will walk you through the most important settings you need for your standard WooCommerce invoice. Click on Run The Setup Wizard button to start.
The first step of the setup wizard asks you to type in the name of your shop and its address. The plugin will include these details on your invoice. Go ahead and fill in those fields and click Next.

The next step asks you to upload a logo for your invoice. Click on the Set Image button to select a logo from your media library or upload a new one. This logo will appear as a preview on the screen and the plugin will also include it in your PDF invoices. Click Next.
![]()
The third step you to select to which emails you would like to attach your invoice. Like to New orders, Cancelled orders, Failed orders, Orders on hold, Processing orders, Completed orders, Refunded orders, Customer invoice / Order details (Manual email), and Customer notes.

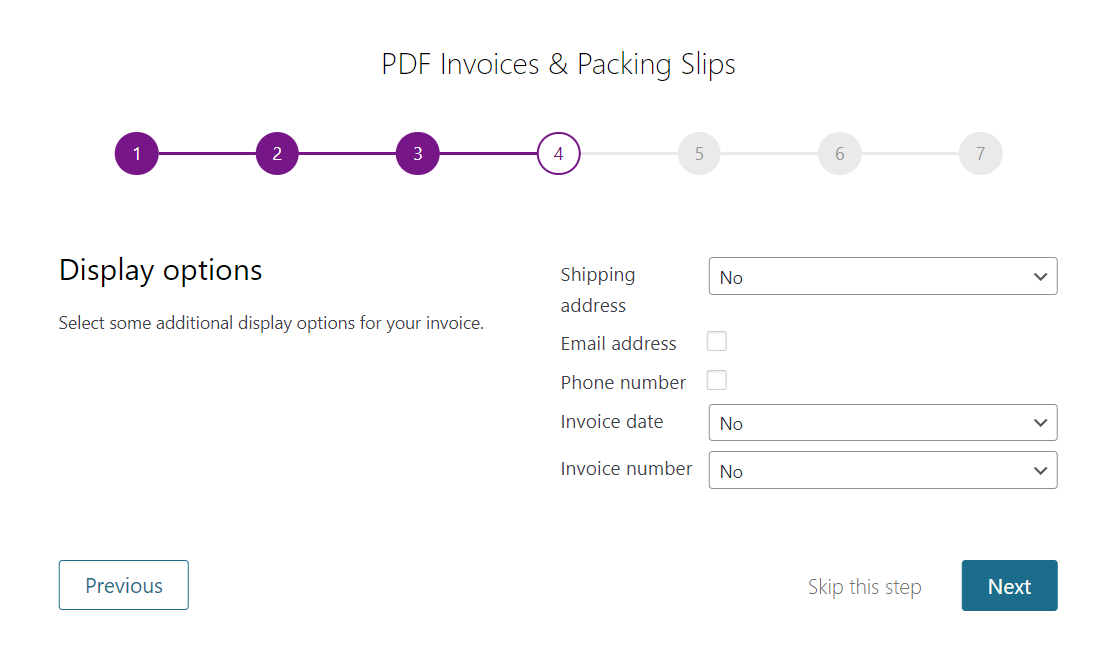
The fourth step asks you to select some additional display options for your invoice. Like shipping address, Email address, Phone number, Invoice date, and Invoice number.
The fifth step asks you to select the paper format for your invoice. ie. either A4 or Letter.

In the sixth step, choose to display the action buttons in your WooCommerce order list or not. The action buttons allow you to manually create a PDF.

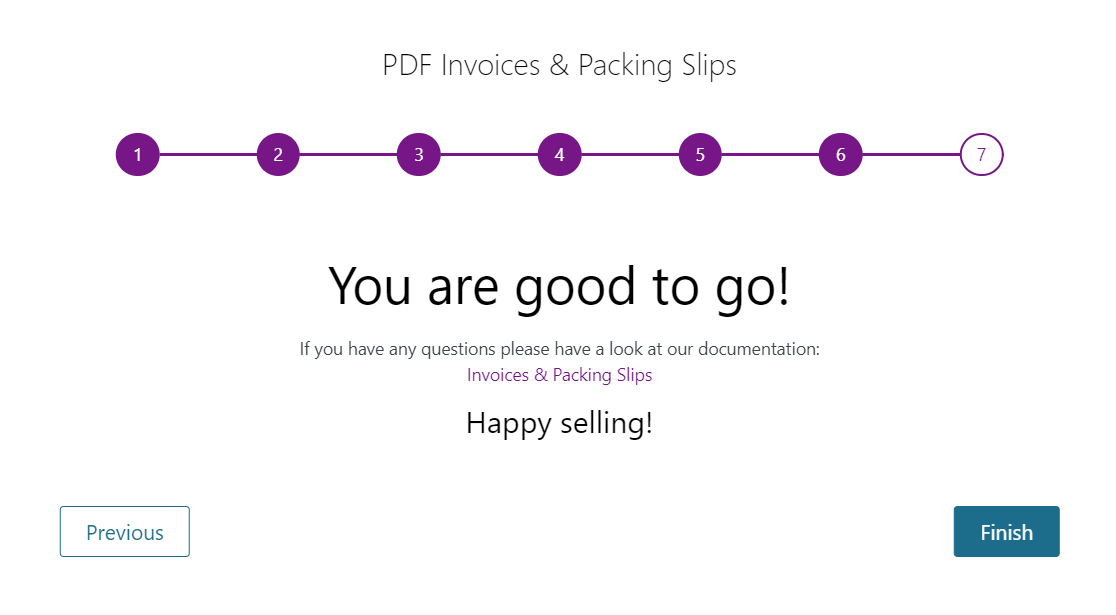
In the final step Click Finish and you are ready to go.
Step 3: Send an invoice manually or automatically
Now that you have configured the plugin settings, you are ready to send invoices to WooCommerce. There are two ways to do this: manually or automatically.
To send an invoice manually, go to WooCommerce > Orders and find the order that you want to send an invoice for. Click on the View link under the order number.
On the order details page, scroll down to the Order Actions section on the right sidebar. From the drop-down menu, select Email invoice/order details to customer and click on the Apply button.
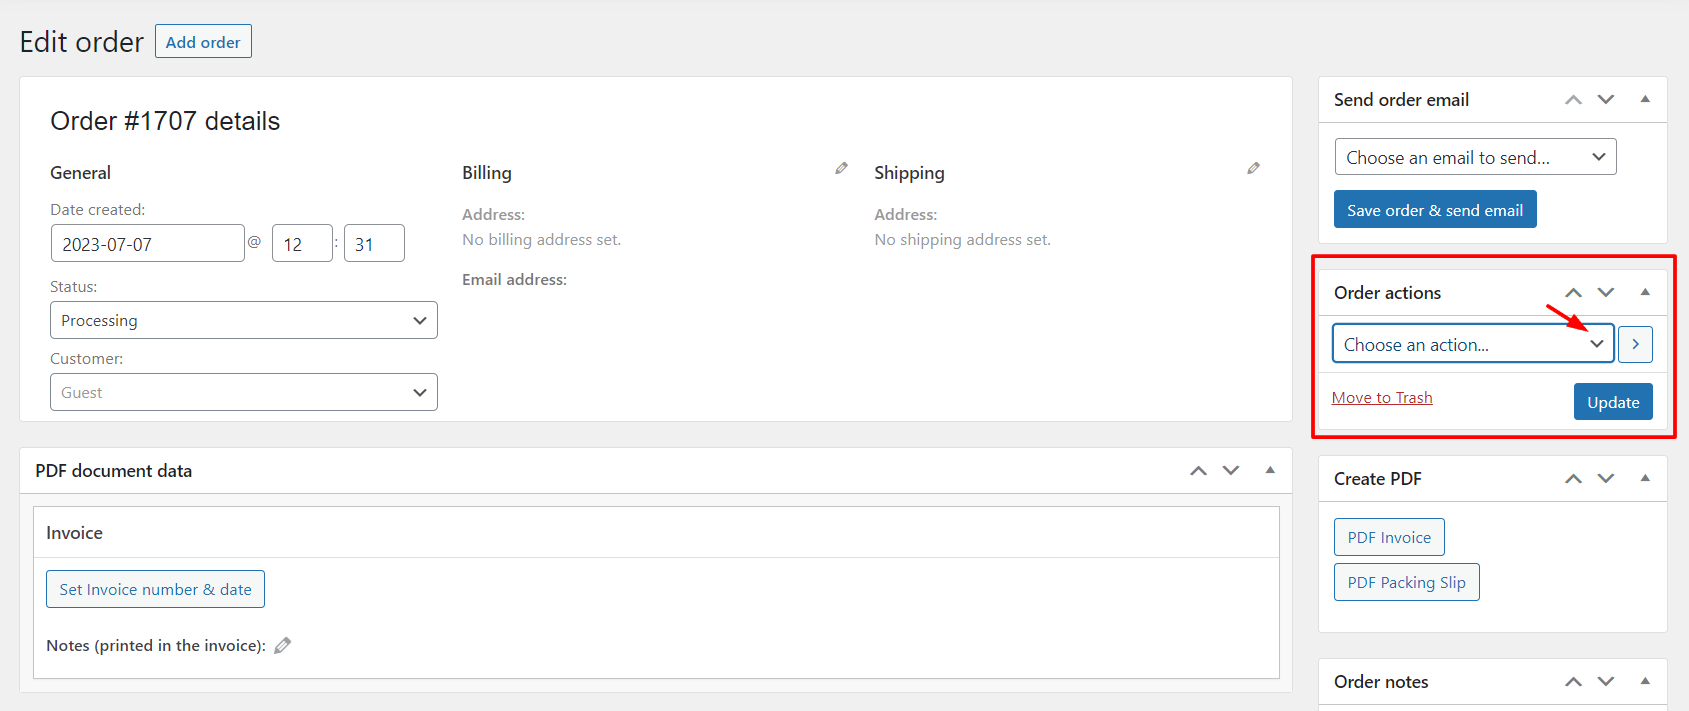
This will trigger an email with a PDF invoice attachment to be sent to the customer’s email address.
To send an invoice automatically, you don’t need to do anything extra. The plugin will automatically generate and attach a PDF invoice to the order confirmation email that is sent to the customer when they place an order in your store.
You can also customize the email subject and content by going to WooCommerce > Settings > Emails and clicking on Processing order or Completed order email.
Wbcom Designs WooCommerce Addons

If you are looking for a comprehensive solution for enhancing your WooCommerce store, you may want to check out Wbcom Designs WooCommerce Addons. This is a collection of WooCommerce extensions that add various features and functionalities to your store, such as audio preview, document preview, product inquiry, pincode checker, custom my account page, sell services, and more.
How the “Flexible PDF Invoices for WooCommerce & WordPress” Plugin Will Help You Automate Invoices

The “Flexible PDF Invoices for WooCommerce & WordPress” plugin is a powerful tool designed to streamline and automate the invoicing process for your WooCommerce store. Here’s how it helps:
1. Automatic Invoice Generation
- The plugin automatically generates PDF invoices for every order placed in your WooCommerce store. This eliminates the need for manual invoice creation, saving you time and reducing the risk of errors.
2. Seamless Integration
- It integrates seamlessly with WooCommerce, ensuring that invoices are generated and attached to relevant orders without any additional effort from your side.
3. Customizable Templates
- The plugin offers customizable invoice templates, allowing you to tailor the look and feel of your invoices to match your brand. You can include your logo, adjust colours, and add custom fields.
4. Email Automation
- Once an order is placed and processed, the plugin automatically sends the generated PDF invoice to the customer’s email. This ensures that your customers receive their invoices promptly and reliably.
5. Order Status Trigger
- You can configure the plugin to generate and send invoices based on specific order statuses (e.g., when an order is marked as “Completed” or “Processing”). This ensures that invoices are only sent when appropriate.
6. Bulk Invoicing
- The plugin allows you to generate and send invoices in bulk. This is particularly useful for handling large volumes of orders efficiently.
7. Compliance and Record Keeping
- By automating the invoicing process, the plugin helps you maintain accurate records for tax and legal compliance. Each invoice includes essential details such as order information, pricing, taxes, and business information.
8. Customer Convenience
- Automated invoicing provides convenience for your customers, as they receive their invoices directly via email without having to request them. This enhances the customer experience and satisfaction.
9. Efficiency and Accuracy
- Automation reduces the chances of human error in the invoicing process. Invoices are generated with accurate order details, ensuring that your financial records are precise and consistent.
10. Multi-Language Support
- The plugin supports multiple languages, making it suitable for international businesses. You can generate invoices in the preferred language of your customers, improving communication and professionalism.
11. User-Friendly Interface
- The plugin features an intuitive and user-friendly interface, making it easy to configure and manage without requiring extensive technical knowledge.
12. Regular Updates and Support
- The plugin is regularly updated to ensure compatibility with the latest versions of WooCommerce and WordPress. Additionally, it comes with responsive customer support to assist with any issues or questions.
By using the “Flexible PDF Invoices for WooCommerce & WordPress” plugin, you can automate the entire invoicing process, improve operational efficiency, and provide a better experience for your customers. This automation helps you focus more on growing your business rather than managing administrative tasks.

Summary
Sending invoices in WooCommerce is not a difficult task if you use the right tools. Some many plugins and extensions can help you create and send invoices to your customers automatically or manually. You can choose the method that suits your business needs and preferences.
In this blog post, we have shown you the step-by-step tutorial to send invoices in WooCommerce using the plugin and Wbcom Designs WooCommerce Addons. These plugins can help you improve your WooCommerce Store and provide a better customer experience.
We hope you found this blog post helpful and informative. If you have any questions or feedback, please feel free to leave a comment below.
Interesting Reads:
5 Best WooCommerce Quick View Plugins
Related reading