If you run an online store using WooCommerce, one of the most important aspects of your business is shipping. Shipping is not only a cost factor for you, but also a key factor for your customers’ satisfaction and loyalty.
However, setting up shipping options in WooCommerce can be confusing and overwhelming, especially if you’re new to ecommerce. There are so many variables and choices to consider, such as shipping zones, methods, rates, fees, classes, and more.
That’s why we’ve created this beginner’s guide to help you understand how to add shipping charges in WooCommerce. We’ll explain the different types of shipping methods you can use, how to set them up, and how to offer the best shipping experience to your customers.
Table of Contents
ToggleWhat are WooCommerce Shipping Methods?
WooCommerce shipping methods are the ways you can charge your customers for shipping their orders. WooCommerce comes with a few built-in shipping methods that you can use right away, or you can use plugins to add more options and features.
The default WooCommerce shipping methods are:
- Flat rate shipping: This is a simple method that lets you charge a fixed amount for shipping, regardless of the destination, weight, or size of the order. For example, you can charge $5 for shipping anywhere in the US.
- Table rate shipping: This is a more flexible method that lets you charge different amounts for shipping based on various factors, such as the destination, weight, size, quantity, or value of the order. For example, you can charge $10 for orders under $50, $5 for orders between $50 and $100, and free shipping for orders over $100.
- Per-item shipping: This is a method that lets you charge a shipping fee for each item in the order. For example, you can charge $2 for each shirt and $3 for each pair of jeans.
- Free shipping: This is a method that lets you offer free shipping to your customers, either as a default option or as a conditional offer based on certain criteria, such as a minimum order amount or a coupon code. For example, you can offer free shipping on all orders or only on orders over $75 with the code FREESHIP.
You can also add multiple shipping methods to each shipping zone, so your customers can choose the option that suits them best. For example, you can offer both flat rate and free shipping options to your customers in the same zone.
How to Set Up WooCommerce Shipping Zones
Before you can set up your WooCommerce shipping methods, you need to set up your WooCommerce shipping zones. Shipping zones are geographical areas where you ship your products. You can create different shipping zones based on countries, states, zip codes, or continents.
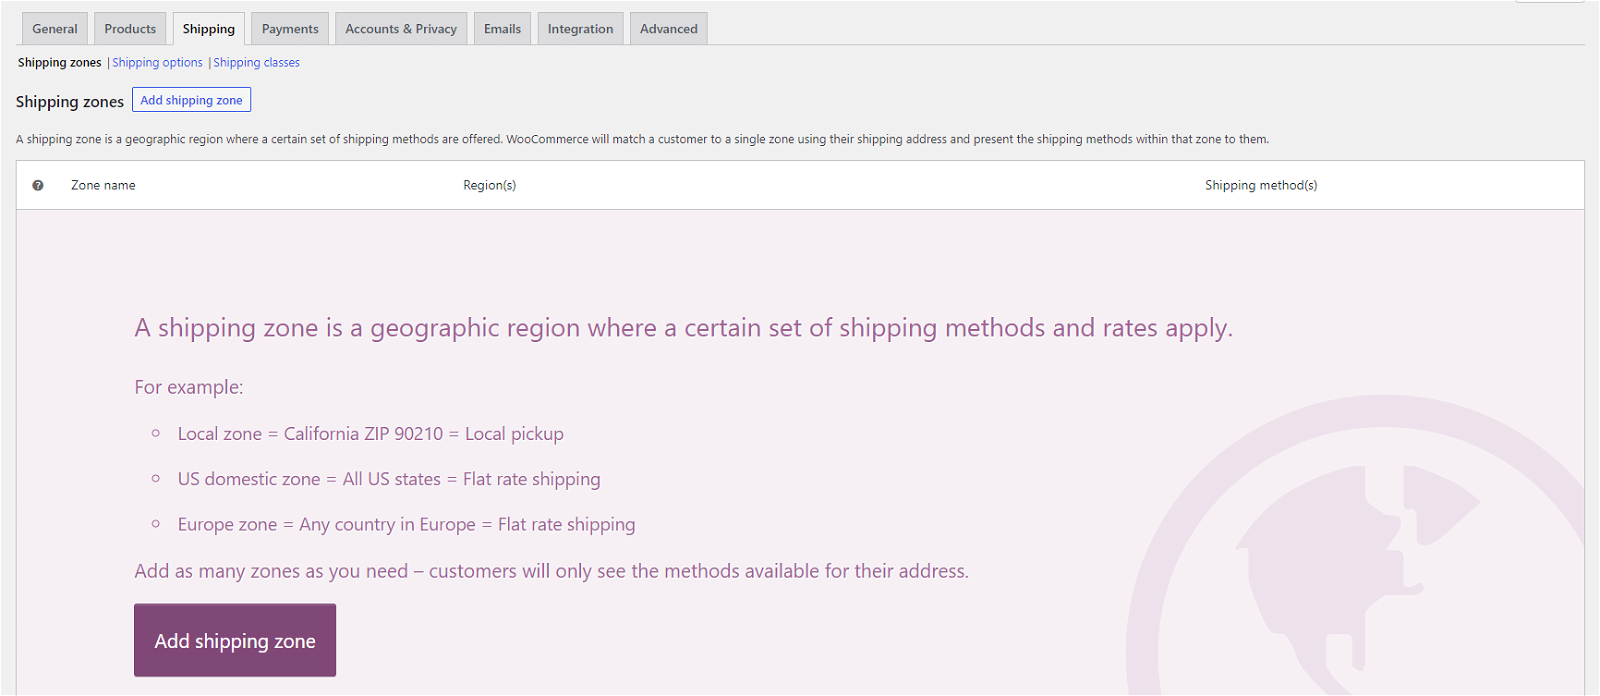
To set up your WooCommerce shipping zones, go to WooCommerce > Settings > Shipping and click on Add Shipping Zone:

Here, you can enter a name for your zone (such as US or Europe) and select the regions that belong to it. You can also drag and drop the zones to change their order of priority.

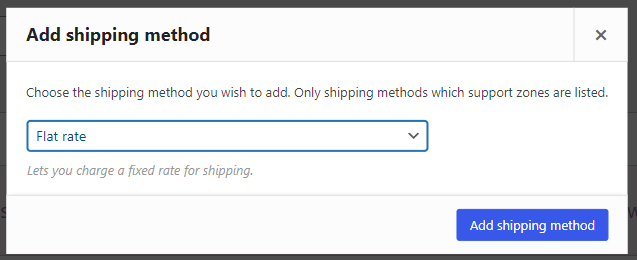
After creating your zones, you need to add shipping methods to each zone. To do this, click on Add Shipping Method and select the method you want to use:

Once you’ve added a method, you can click on Edit to configure its settings. For example, if you choose Flat Rate as your method, you can enter the cost of shipping in the Cost field:

You can also use placeholders and formulas to calculate dynamic costs based on factors such as weight or quantity. For example, if you want to charge $5 plus $1 per kg of weight, you can enter 5 + [qty] * [fee] in the Cost field and enter 1 in the Fee field.
You can repeat this process for each zone and method you want to use. You can also enable or disable each method by toggling the switch next to it.
How to Add Shipping Classes in WooCommerce
Another way to customize your WooCommerce shipping costs is by using shipping classes. Shipping classes are groups of products that have similar shipping characteristics or requirements. For example, you can create a shipping class for heavy items, fragile items, or oversized items.
To create a shipping class, go to WooCommerce > Settings > Shipping > Shipping Classes and click on Add Shipping Class:

Here, you can enter a name and a description for your class. You can also drag and drop the classes to change their order of priority.

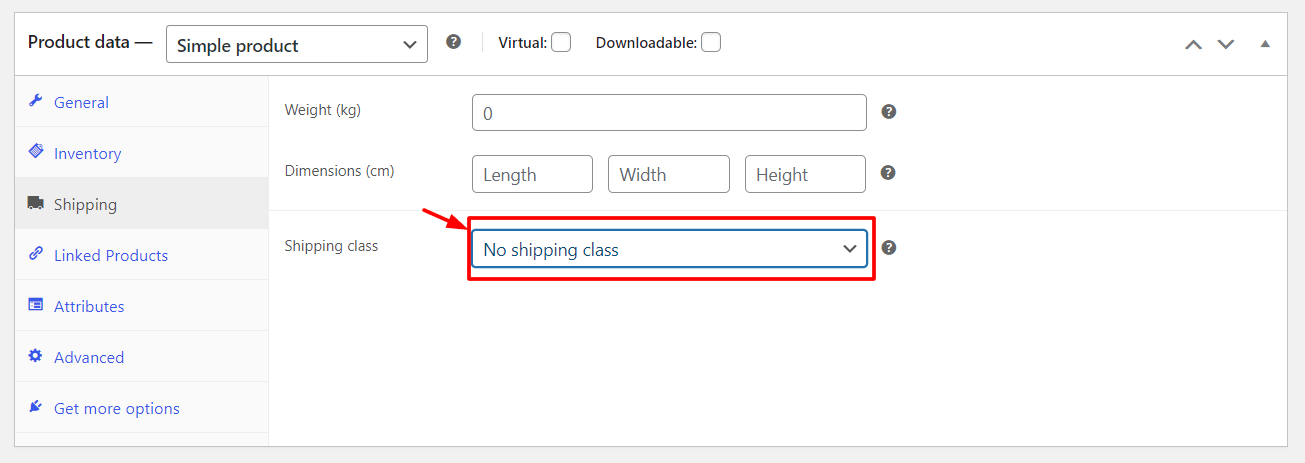
After creating your classes, you need to assign them to your products. To do this, go to WooCommerce > Products and select the product you want to assign the class to. Then, go to the Shipping tab and select the class from the Shipping Class dropdown:

You can also assign shipping classes in bulk by using the Bulk Edit feature.
Once you’ve assigned your classes, you can use them to adjust your shipping costs for each method. For example, if you use Flat Rate as your method, you can add a cost for each class in the Cost field by using this format: Class Cost + [class] * [fee]. For example, if you want to charge $10 for the Heavy class and $5 for the Fragile class, you can enter 10 + [heavy] * 0 + 5 + [fragile] * 0 in the Cost field.
You can also use placeholders and formulas to calculate dynamic costs based on factors such as weight or quantity. For example, if you want to charge $5 plus $2 per kg of weight for the Heavy class and $5 plus $1 per item for the Fragile class, you can enter 5 + [heavy] * 2 + 5 + [fragile] * [qty] in the Cost field.
You can repeat this process for each method and class you want to use.
How to Set Up WooCommerce Order Fulfillment
The last step in setting up your WooCommerce shipping is to set up your order fulfillment process. Order fulfillment is the process of preparing, packing, and shipping your orders to your customers.
There are different ways to handle order fulfillment, depending on your business model and preferences. Here are some of the most common options:
- Self-fulfillment: This is when you handle everything yourself, from storing your inventory, packing your orders, printing labels, and shipping them out. This option gives you full control over your shipping operations, but it also requires a lot of time, space, and resources.
- Third-party fulfillment: This is when you outsource some or all of your fulfillment tasks to a third-party service provider, such as ShipBob or ShipStation. This option saves you time and hassle, but it also adds an extra cost and reduces your control over your shipping operations.
- Dropshipping: This is when you don’t keep any inventory at all, but instead rely on a supplier or manufacturer to ship your orders directly to your customers. This option eliminates the need for inventory management and fulfillment tasks, but it also limits your product selection and quality control.
To set up your order fulfillment process in WooCommerce, you need to choose the option that works best for you and integrate it with your WooCommerce store. For example, if you choose self-fulfillment, you can use WooCommerce Shipping to print labels and track shipments from your dashboard. If you choose third-party fulfillment or dropshipping, you can use plugins like WooCommerce ShipStation Integration or WooCommerce Dropshipping to connect your store with your service provider.
Conclusion
Shipping is a vital part of any ecommerce business. By setting up your WooCommerce shipping options correctly, you can offer a smooth and satisfying shopping experience to your customers, while also optimizing your costs and efficiency.
In this guide, we’ve shown you how to add shipping charges in WooCommerce using different methods, zones, classes, and plugins. We’ve also explained how to set up your order fulfillment process using different options.
We hope this guide has helped you understand how to add shipping charges in WooCommerce. If you have any questions or feedback, feel free to leave a comment below.
Happy selling! 🚀


