All the social media platforms have added stories as their features. The basic concept of stories is to tell the story through images, videos, or gifs in a specific constrained time. Long back when Instagram introduced stories, it has been seen that stories are more easily accessible and engaging as well as create branding. Now, almost every social media platform has this feature. Google has also introduced such features as Google web stories.
Table of Contents
ToggleWhat are web stories?
Web stories are basically a storytelling format that allows a full-screen experience that helps every type of content to be imaginable. Unlike Instagram Google web stories are open and freely distributable. You can even publish them on the website or create your own.
Back in 2018, Google introduced AMP stories for quickly building visual stories. In May 2020, Google renamed AMP stories to Google web stories and by October 2020, it launched on one of the most popular platforms “WordPress”. This web stories plugin has made easy the process of building stories on the platform which you can access for free.
This year Google has dedicatedly brought improvement to its earlier products. It has also announced that tools like Google search console & Rich Results Testing Tools also recognize web stories. Also, in popular communities, there are chatters like stories within content that help boost its reach & traffic.
There are speculations that these stories can pop up everywhere in order to track the performance of this feature on Google search engines. But, you won’t find it on social media platforms like Facebook & Instagram. Definitely, you will get a lot of functionality to beautifully design your web stories.
How to get started with web stories?
Step 1: Install the Web Stories for WordPress plugin from the WordPress admin dashboard or manually download it from the plugin repository.
To do so follow the steps provided below :
- Login to your WordPress website backend.
- On your left menu, go to “Navigation”.
- Click on “Add New”.
- Search “Web Stories” on the search bar
- Click on the “Web stories” plugin pop-up in the search bar.
- Install the plugin and activate it on your website’s backend.
- Now open the web stories plugin option that appears on the navigation menu on your left in the dashboard.
Also Read: 5 Elements of a Successful Website
How to install the Web Stories plugin?
Now, Open the web stories dashboard,
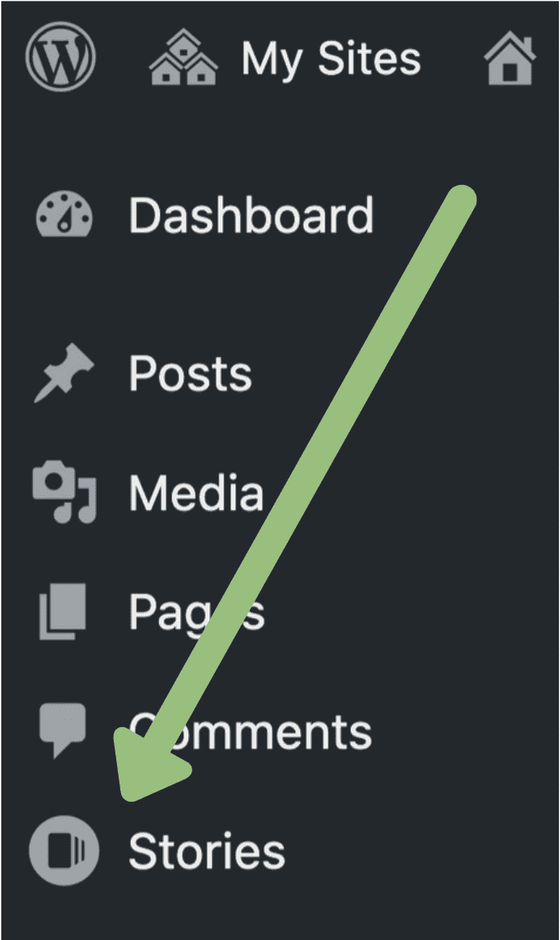
Step 2: Select the stories from the sidebar to navigate to the web stories dashboard.

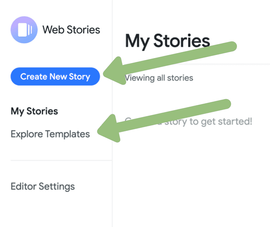
Step 2: Create your own web stories, Click on create a new story and select explore templates for selecting your favorite templates and styles.

Also Read: Thing To Include While Writing An Engaging Brand Story
Step 3: Filter your stories.
You can find out all your stories using filters. Select the “draft” status & “published” status tabs at the top of the web stories dashboard. You can also sort the stories using filters like name, date created, last modified, or their creator.
Step 4: Change the view
You can change the view type in WordPress. Click on the icon next to the sort drop-down. You can also switch to the classic WordPress table view next to the grid icon.
Step 5: Add Google Analytics, Logo & update the sharing settings :
You can add Google Analytics tracking ID, and Logo, and can change the data sharing settings by clicking editor settings.
Also Read: The Best Strategies For Teaching Literature
How to use the Google Web Stories Editor?
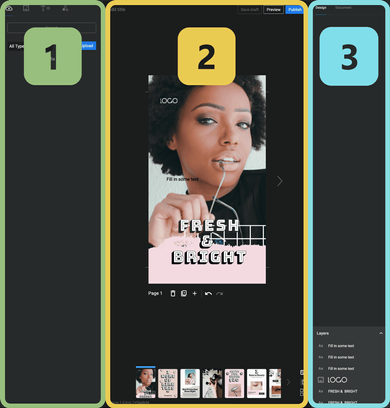
There are three panels in the editor section of the plugin :
- The Element Panel
- The Workspace
- The Design Panel

Panel 1: In the first panel, The element panel, you can upload assets, and add images, text, and shapes to your stories.

Panel 2: In the Workspace panel, you can write titles, and add & remove story pages. You can design your page using assets and elements. Also, you can view the keyboard shortcuts, enable & disable the safe zone and can view the stories in grid form.

Panel 3: The Design Panel contains 2 tabs: Design & Document

You can use the design tab to make changes in the elements like position, size, font properties, and more. You can make the changes in the order of the elements through the layer panel at the bottom of the design tab.

You can control how your story is published through the “Document” tab. Add any important metadata and control whether pages auto-advance or need to be tapped manually.

How to build Web Stories?
As instructed above, install the plugin on the WordPress site. Go to the Web story by Google plugin on the WordPress dashboard.
- As you open the plugin, you will find a number of templates from which you can choose your template according to the requirements.
- After choosing the right template, add images from the library. Pro Tip: Vertical Images work best.
- You can also upload the videos in the story. The recommended time range for video is 15 minutes Maximum. The videos should contain subtitles for understanding.
- Create backgrounds with solid or gradient colors or add overlays.
- Google recommends adding text to the story with a minimum font size of 24. Keep the text minimum as the idea is to highlight the headlines and attract the viewer to click to know more.
- Add video clips or background sound to the story, it creates interest and increases engagement.
- Remember Shorter the better, your story should be snackable to consume.
- How can you make your story more engaging?
Use CTA (Call to Action) links to interact with your audience. Google web stories have a great option of clickable links which helps you to drive the audience to the landing page.
- Now, your story is ready to go, you can check the preferences at the right-hand tab on “Document”. Here you can set the author, publisher logo, & cover image. Pro Tip: The cover image works best with square canvas.
Pro Tip: After publishing the web store, don’t forget to embed the link of the story to your blog posts. It will give your story as well as the blog posts a traffic & engagement boost.
Also Read: How To Add Web Stories For WordPress Community Website
Final Thoughts
You have just read the mechanism & steps to build the web story using the Google web store plugin in WordPress. Remember, Google has worked hard on this feature, so implementing it as soon as possible on your website or blog can definitely help you rank on Google’s search engine. Remember, Create web stories as short and snackable as possible. If you have any queries you can comment down below. Stay tuned with us for such google updates!
Interesting Reads:
How To Let Your Users Submit Posts In PeepSo Profiles?


