
A streamlined checkout experience is essential for any e-commerce store. According to research, nearly 70% of online shopping carts are abandoned, and a complicated checkout process is one of the primary reasons. Shopify is often praised for its clean, step-by-step checkout process that makes purchasing quick and user-friendly. But what if you’re running your store on WooCommerce? The solution is to implement a Shopify-style multi-step Checkout in WooCommerce, giving your customers the same smooth and intuitive experience.
By default, WooCommerce uses a single-page checkout, which can be overwhelming for customers. The good news is that you can recreate this Shopify-like flow using the right plugin. With a multi-step layout, you break the checkout into manageable sections – billing, shipping, payment, and confirmation – making it easier for customers to follow through.
In this guide, we’ll show you exactly how to set it up using the Fluid Checkout plugin. We’ll also cover the benefits of multi-step checkouts, best practices to maximize conversions, and how you can further customize the checkout experience for your WooCommerce store.

What is a Shopify-Style Multi-Step Checkout in WooCommerce?
A Shopify-style multi-step checkout is a checkout process where the entire journey is divided into clear, sequential steps instead of displaying all fields on a single page. Instead of overwhelming customers with billing details, shipping options, payment methods, and order reviews all at once – as WooCommerce does by default – the process is broken into smaller, manageable sections.
For example, a typical multi-step checkout flow might look like this:
- Step 1: Customer Information – Name, email, and contact details.
- Step 2: Shipping Information – Shipping address and delivery options.
- Step 3: Payment Method – Credit card, PayPal, or other gateways.
- Step 4: Order Review & Confirmation – Final summary before placing the order.
This is exactly how Shopify’s checkout works, and it’s one of the reasons customers find it smooth and reliable. By recreating the same Shopify-style multi-step checkout in WooCommerce, you provide your customers with a guided experience that reduces confusion, improves focus, and makes them more likely to complete their purchase.
Why Choose a Shopify-Style Multi-Step Checkout in WooCommerce?
WooCommerce is flexible, but its default checkout design can feel outdated. Let’s explore why adopting a Shopify-like approach is beneficial:
1. Improved User Experience
Breaking the checkout into steps makes the process easier to understand. Customers aren’t overwhelmed by too many fields on one page.
2. Reduced Cart Abandonment
When checkout is simple and predictable, customers are less likely to abandon their carts. A step-by-step process helps reduce friction and boosts completion rates.
3. Higher Conversions
Every step feels like progress. This motivates customers to continue, resulting in more successful checkouts.
4. Mobile-Friendly Checkout
A multi-step layout is cleaner on smaller screens. Instead of endless scrolling, customers see only what’s needed for that step.
5. Professional Look and Feel
Adopting a Shopify-style checkout gives your WooCommerce store a modern, polished appearance that inspires customer trust.
Step-by-Step Guide: How to Create a Shopify-Style Multi-Step Checkout in WooCommerce
The Fluid Checkout plugin makes it simple to turn WooCommerce’s default one-page checkout into a modern, Shopify-style multi-step flow. Follow these steps to set it up:
Step 1: Install and Activate the Plugin
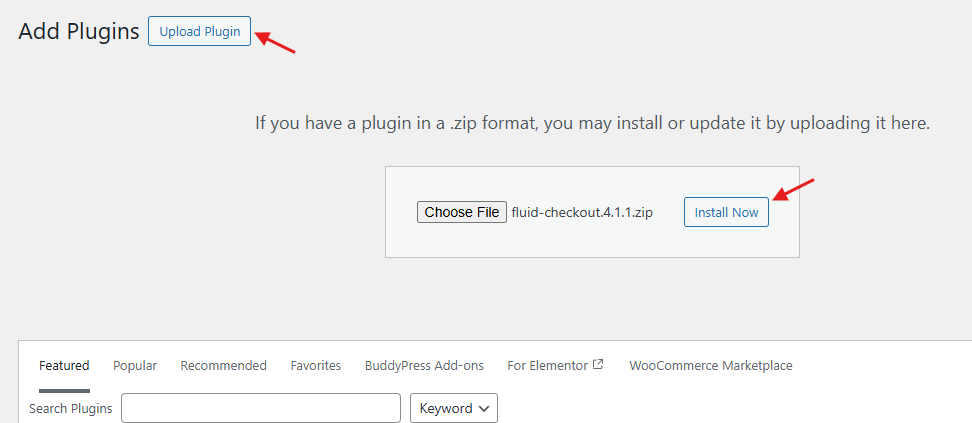
First, download the Fluid Checkout plugin.
- Go to your WordPress dashboard → Plugins → Add New → Upload Plugin.

- Upload the ZIP file, click Install Now, then Activate.
Step 2: Access Plugin Settings
Once activated, head over to WooCommerce → Settings → Checkout.
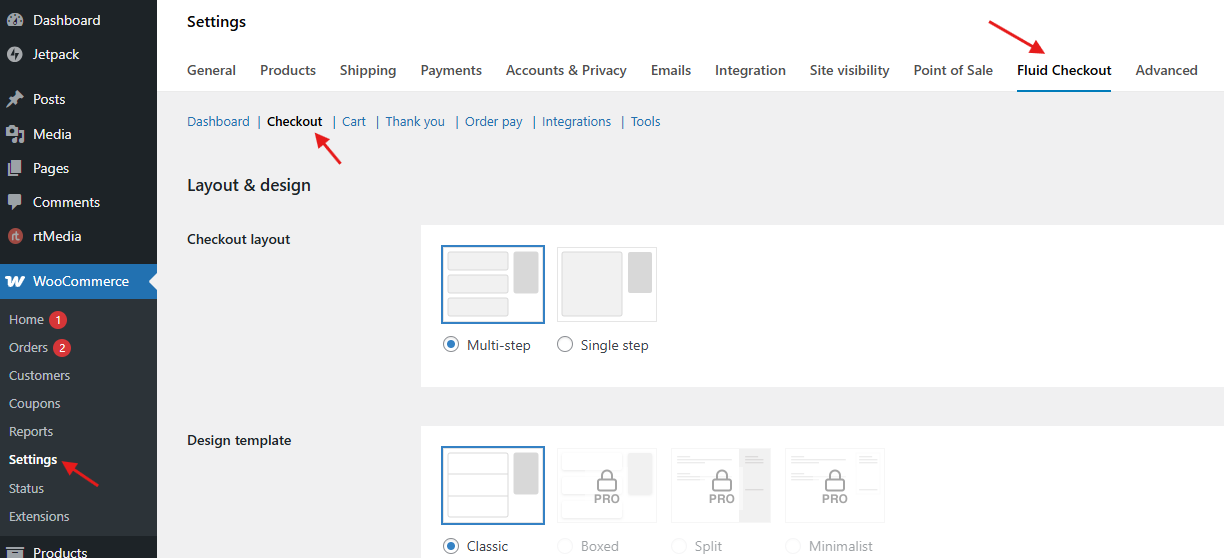
Here you’ll find all the options to configure and customize the multi-step layout.
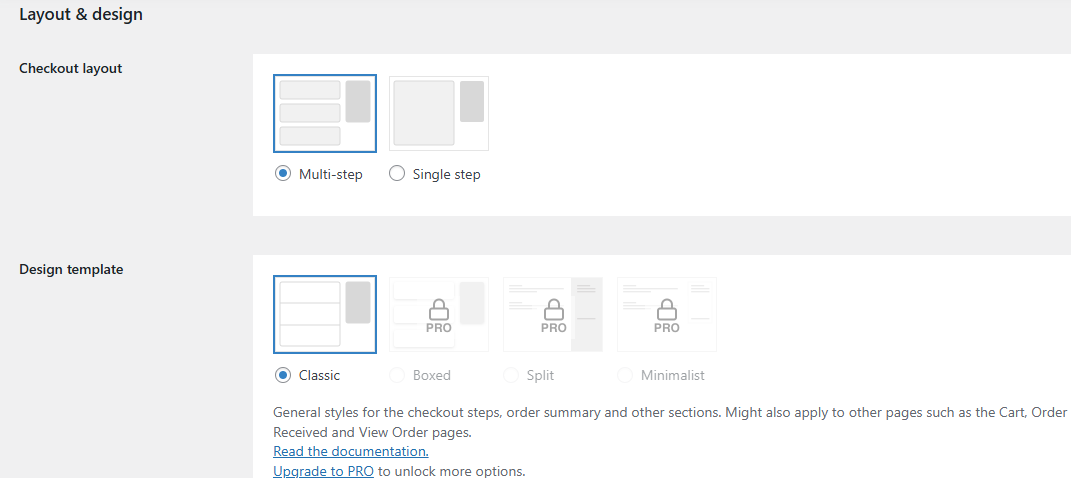
Step 3: Enable Multi-Step Layout
- In the settings, select Multi-Step Checkout Layout.

- Decide how you want the steps to appear – either as a horizontal progress bar or a vertical list.
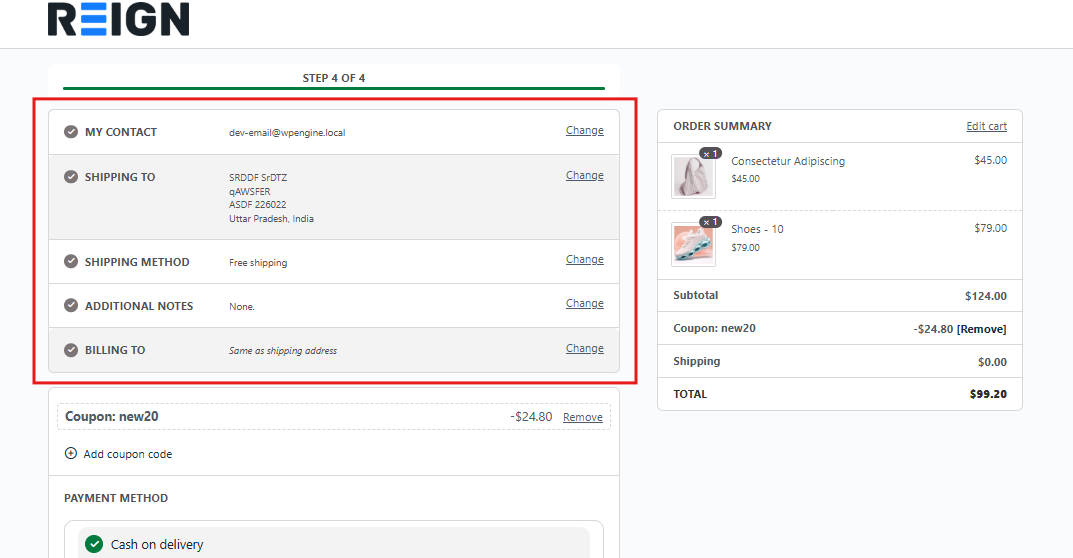
Step 4: Customize Checkout Steps
Fluid Checkout lets you divide checkout into logical sections:
- Step 1: Customer Information – Basic contact details.
- Step 2: Shipping Details – Shipping address and delivery method.
- Step 3: Payment Information – Choice of payment gateway.
- Step 4: Review & Confirm – Order summary before placing the order.
You can also reorder these steps or hide unnecessary ones to simplify the process further.
Step 5: Adjust Field Settings
- Hide optional fields to reduce clutter.
- Decide whether to combine or separate billing and shipping addresses.
- Add placeholders or tooltips for better customer guidance.
Step 6: Style the Checkout
Make sure the new layout matches your store’s branding:
- Customize fonts, button styles, and colors.
- Enable the built-in progress bar so customers can see their progress at a glance.
Step 7: Test the Checkout
Before going live, test the new checkout flow:
- Place a test order in your store.
- Check responsiveness on both desktop and mobile.
- Verify that payment gateways, shipping options, and confirmation emails work correctly.
By completing these steps, you’ll successfully implement a Shopify-style multi-step checkout in WooCommerce that feels intuitive, professional, and optimized for conversions.
Advantages of Using a Multi-Step Checkout in WooCommerce
Adopting a Shopify-style multi-step checkout in WooCommerce is more than just a design change – it directly impacts how customers experience your store and whether they complete their purchase. Here are the key advantages:
Simplifies the Checkout Process
Instead of presenting every field on a single page, the process is broken into smaller steps. This keeps customers focused and makes checkout feel less overwhelming.
Boosts Conversion Rates
A cleaner, more intuitive checkout flow reduces friction and cart abandonment. When customers feel that each step is simple and easy to complete, they’re more likely to finish their order.
Enhances Mobile Experience
Over half of online purchases happen on mobile devices. Multi-step layouts work particularly well on small screens, eliminating endless scrolling by showing only the fields relevant to that step.
Improves Customer Confidence
Progress indicators reassure customers by showing how close they are to completing the checkout. This sense of progress reduces uncertainty and builds trust in your store.
Customizable and Scalable
The multi-step approach can be adapted to fit different business models – whether you sell physical products, digital downloads, or subscriptions. It also scales easily as your store grows.
By improving usability, trust, and performance, multi-step checkout becomes a powerful tool for increasing customer satisfaction and driving higher sales.
Best Practices for a Shopify-Style Multi-Step Checkout
A Shopify-style checkout can significantly improve your WooCommerce store, but only if implemented thoughtfully. To maximize its effectiveness, follow these best practices:
1. Keep It Simple: Avoid overwhelming customers with unnecessary fields. Only request the information that is essential to complete the order. For example, don’t force users to fill in a company name if they are individual buyers.
2. Use Progress Indicators: Shoppers like knowing where they are in the process. A visible progress bar or step indicator reduces uncertainty and gives them confidence that they’re close to finishing.
3. Optimize for Mobile: Since most online purchases are made on mobile devices, test your checkout on different screen sizes. Ensure steps are easy to navigate, fields are large enough to tap, and the layout doesn’t require endless scrolling.
4. Offer Guest Checkout: Forcing account creation can frustrate first-time buyers. Provide a guest checkout option to remove friction. You can always offer account creation after the order is placed.
5. Provide Multiple Payment Options: Support widely used gateways such as PayPal, Stripe, Apple Pay, and credit cards. The more flexibility you offer, the easier it is for customers to complete their purchase.
6. Test Regularly: Whenever you update plugins or themes, run test orders to ensure that every step works correctly. Regular testing helps prevent technical issues that could block real customers from completing their checkout.

Unlocking Growth with a Shopify-Style WooCommerce Checkout
Your checkout process can make or break a sale. By moving from WooCommerce’s default one-page layout to a Shopify-style multi-step checkout in WooCommerce, you create a smoother, more professional experience that reduces cart abandonment and improves conversions.
The Fluid Checkout plugin makes this transition simple. With built-in customization options, progress indicators, and a mobile-optimized design, it helps you deliver the streamlined checkout flow customers expect.
If you’re ready to take your WooCommerce store to the next level, start with Fluid Checkout today.
For advanced customization, get custom WooCommerce development solutions from Wbcom Designs to tailor your checkout even further and maximize sales for your business.
Interesting Reads
How to Export and Import WooCommerce Orders & Coupons Without Hassle
5 Best WooCommerce Multistep Checkout Plugins 2025
How to Set Up Guest Account Checkout to Streamline Orders in WooCommerce
